
Working with Grids
Overview
When search criteria are entered into a Submit screen, the results display in the Search Results grid. A search results grid allows you to view and sort results from a search. On many Search Results grids, double-clicking on a search results opens the detail screen for that search result.
Process
Search results grids typically allow multiple rows to be marked/unmarked for selection or deletion by checking/unchecking the far-left check box or the red deletion icon, respectively, on the first row in the selection, then holding the Control key and checking/unchecking the far-left check box or red deletion icon, respectively, on the last row in the selection.
Multiple rows in a grid can have any boolean property that is common to all rows (for example, Active or Reportable check box) marked/unmarked for selection by checking/unchecking the boolean's check box on the first row in the selection and holding the Control key and checking/unchecking the boolean's check box on the last row in the selection.
When tabs are displayed that contain child entities of the current entity on an Update screen, the child entities display in the entity grid.
If a large number of search results or child entities are returned, drag the ![]() Resize search grid icon in the centre of the grid to maximise the grid to full view.
Resize search grid icon in the centre of the grid to maximise the grid to full view.
Note: The icons that display vary depending on the functionality of the application.
Grid flow buttons are displayed in the bottom of the grid and apply to selected rows in the grid. Row flow buttons are displayed on the left-hand-side of each row and apply only to the row from where the flow was activated. Flow button availability varies depending on your security access and the grid displayed.
Grid Icons
The search results grid displays a set of icons that can filter or format the information displayed in the grid. The icons display in the bottom left of the grid. The icons can also display in the Detail screen where records display in a grid.
|
Icon |
Description |
|---|---|
|
|
Exports the grid results to Microsoft Excel. |
|
|
Show or hide individual grid columns. |
|
|
Toggle conditional grid formatting menu. |
|
|
Remove applied conditional formatting. |
|
|
Restore the default grid columns. |
|
|
Retrieve a selected number of records or retrieve ALL records. |
|
|
Filters the information in the grid based on a particular attribute. Use this option to show or hide columns. |
|
|
Add rows or items. Note: It may be possible to add multiple items at the same time. To add multiple items: 1. Right-click to display the Add Multiple icon. 2. Enter the required number of rows/items to add (or use the up/down arrows). 3. Click the green plus to the right of the number field to add the rows/items to the grid. |
|
|
Delete rows. Click this icon at the top of the grid to mark/unmark multiple rows for deletion. |
|
|
Copy a row and paste it on the next line down. |
|
|
The menu options for the grid row. |
|
|
Hide or display grid columns. |
|
|
Select one or all grid rows. Click this icon at the beginning of one row to select the row, or at the top of the grid to mark/unmark multiple rows for selection. |
|
|
Returns the content of the row to the calling application. |
|
|
Show the selected grid row in a form. This icon can be used if the selected grid row exceeds the screen width and not all item details can be seen without using the scroll bar. Clicking this icon to view all the grid row information. Click the Previous or Next buttons to display the previous or next grid row details. |
|
|
Displays the options for various grid items. |
|
|
Enables multiple cell selection in the grid. |
|
|
Grid text search. To search for a specific string in the search results grid, enter the search string in the text search box. The search result rows that contain the search string are highlighted, and each occurrence of the matching text in the row is displayed with bold font. Note: The current selected row is highlighted differently to the rows that contain the matching text. |
|
|
Grid text search up. Locate the next row up that contains the grid text search string. |
|
|
Grid text search down. Locate the next row down that contains the grid text search string. |
In-grid Multi-row Copy/Paste from an External Source
Where a grid is displayed and the grid columns are editable (using personalisation) and there are no read-only columns interspersed within the editable columns, then it is possible to copy data from an external grid (for example, Excel or tab delimited text) and paste it into the editable columns within the grid.
For example, on the sample grid for a job, it is possible to paste data into the following columns:
- Client Sample Name
- Description
- Priority
- Reportable
- Specification Code
- Product Code
- Registered On
- Received On
- Required On
- Generate Label
- Generate Paperwork
- Agreed On
- Analysed On
- Possible On
- Auto Validate.
For example, consider a job containing 100 samples. The user opens an Excel file and populates two columns (for example, Client Sample Name and Description) for 80 samples, selects the 80 rows for these two columns and uses the Excel copy function, then locates their 'cursor' into the first sample in the sample grid, and presuming that the Client Sample Name and Description are adjacent to each other in the sample grid, pastes (Ctrl-V) the data into the two columns for 80 samples down the grid, thereby populating the 80 rows in the sample grid with the 80 rows of data from Excel.
In-grid Multi-row Copy/Paste from/to a Grid
Where a grid is displayed and the grid columns are editable (using personalisation) and there are no read-only columns interspersed within the columns, then it is possible to select a range of contiguous rows and columns using ![]() Grid Multiple Cell Selection to then copy the data from the grid and paste it to another location within the grid.
Grid Multiple Cell Selection to then copy the data from the grid and paste it to another location within the grid.
In-grid Multi-row Copy/Paste of Repeating Data
Where a grid is displayed and the grid columns are editable (using personalisation) and there are no read-only columns interspersed within the columns, then it is possible to select a range of contiguous rows and columns using ![]() Grid Multiple Cell Selection to then copy the data from the grid or an external grid (for example, Excel or tab delimited text) and paste it into the selected cells, with the pasted data repeated where the selected area is larger than the copied data.
Grid Multiple Cell Selection to then copy the data from the grid or an external grid (for example, Excel or tab delimited text) and paste it into the selected cells, with the pasted data repeated where the selected area is larger than the copied data.
For example, consider a job containing 100 samples. The user opens an Excel file and populates two columns (for example, Client Sample Name and Description) for 10 samples, selects the 10 rows for these two columns and uses the Excel copy function, then locates their 'cursor' into the first sample in the sample grid and 'marks' (using the mouse) 100 rows for the two columns to be populated, and presuming that the Client Sample Name and Description are adjacent to each other in the sample grid, then pastes (Ctrl-V) the data into the two columns for 100 samples down the grid, thereby populating the 100 rows in the sample grid with the 10 rows of data from Excel, repeated 10 times (as it would if pasted in the same way into Excel).
In-grid Multi-Row Cut
Where a grid is displayed and the grid columns are editable (using personalisation) and there are no read-only columns interspersed within the columns, then it is possible to select a range of contiguous rows and columns using ![]() Grid Multiple Cell Selection to then copy or cut the data into the buffer.
Grid Multiple Cell Selection to then copy or cut the data into the buffer.
Filter Result Data
The ![]() Grid filter that displays in some CCLAS grids makes it easier for you to find the data you need. Click the filter icon to display entry fields under the column names where you can enter column attribute characters to further filter your search. For example, if you are searching for an Equipment Reference of WATER PUMPS, begin entering the characters into the column entry field. Only results containing the characters entered display in the results grid.
Grid filter that displays in some CCLAS grids makes it easier for you to find the data you need. Click the filter icon to display entry fields under the column names where you can enter column attribute characters to further filter your search. For example, if you are searching for an Equipment Reference of WATER PUMPS, begin entering the characters into the column entry field. Only results containing the characters entered display in the results grid.
When you enter characters in the column entry field, ![]() Contains displays beside the field. Click the icon to display a list of filter icons which you can use to refine your search.
Contains displays beside the field. Click the icon to display a list of filter icons which you can use to refine your search.
Available Filter Icons
|
Icon |
Description of the applied filter |
|---|---|
|
|
None—Display all items. Note: This icon displays when no text is entered in the filter field. |
|
|
Greater Than—Display only items with values greater than the value entered in the filter field. |
|
|
Greater Than or Equal—Display only items with values greater than or equal to the value entered in the filter field. |
|
|
Less Than—Display only items with values less than the value entered in the filter field. |
|
|
Less Than or Equal—Display only items with values less than or equal to the value entered in the filter field. |
|
|
Contains—Display only items with values which contain the text entered in the filter field. |
|
|
Does Not Contain—Display only items with values which do not contain the text entered in the filter field. |
Show or Hide Grid Columns
Click ![]() >>
>> ![]() Grid show or hide columns to add or remove existing columns from the grid view. This functionality is used to display more or less information associated with the results.
Grid show or hide columns to add or remove existing columns from the grid view. This functionality is used to display more or less information associated with the results.
Note: Where a column has its No User Toggle screen property checked (visible via Screen Personalisation), then the show/hide toggle is not available for that column, and therefore, the column does not appear in the Show or hide columns list. Changes to grid columns are stored as User Preference records, maintained by the MSEPRF—User Preferences application, for example: ria.grid.col.ccregn.detail.schemeTests.
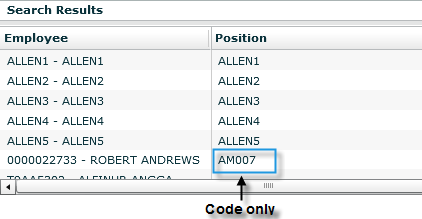
If the check box is selected, then the column displays in the search results grid. Use the Both selection drop-down to select which column data to display first.
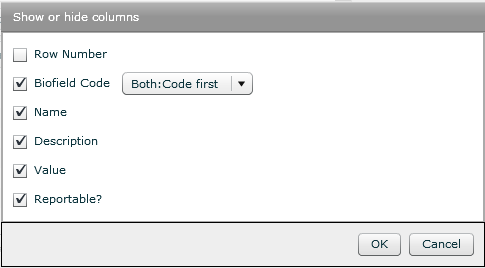
The available options are:
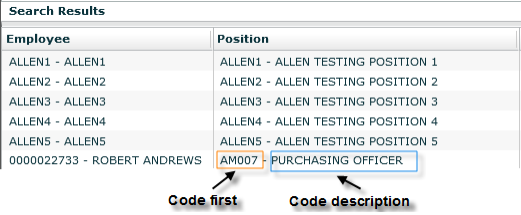
- Code first—Display the code before the code description, for example the position code displays first, followed by the position description in the search results grid.
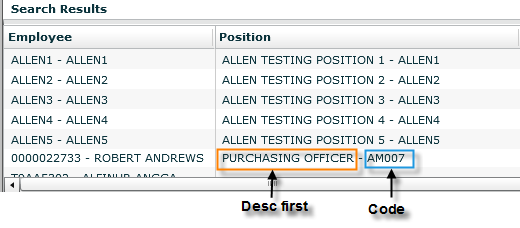
- Desc first—Display the code description before the code, for example the position description followed by the position code in the search results grid.
- Code —Display the code only, for example the position code only in the search results grid.
Click ![]() >>
>> ![]() Grid restore default to restore the columns to their default shown/hidden status and width.
Grid restore default to restore the columns to their default shown/hidden status and width.
Note: This action deletes the associated grid column changes that are stored as User Preference records, visible using the MSEPRF—User Preferences application.
Other grid functions
-
Resize Column Widths—The size of the column is changed by dragging the dividing line between the column headings to your preferred width.
-
Change Column Order—The order of columns is changed by holding and dragging the column heading to the preferred location in the grid. Once a mouse-down is made, the movement of the mouse left and right across the rows activates a vertical bar to indicate the target position in the grid. The column is moved to the target position upon mouse-up.
Note: Column re-ordering only lasts for the current session.
-
Column Sorting—The number beside the icons displays the rank of the column relative to other sorted columns. It is possible to sort the grid by more than one column.
-
Change Row Order—The order of rows is changed by holding and dragging the row to the preferred location in the grid. Once a mouse-down is made, the movement of the mouse up and down the rows activates a horizontal bar to indicate the target position in the grid. The row is moved to the target position upon mouse-up.
-
Row Sorting—For grids that allow row ordering, then the rows in the grid can be sorted from smallest to largest or from largest to smallest by clicking
 Sort ascending or
  Sort descending. The grid is sortable by more than one column. The number beside the icons displays the rank of the column relative to other sorted columns.
 -
Lock and Unlock Grid Column—Use this grid function to lock one or more columns in place to the left of the grid. This function is useful when scrolling across grids to view data. By locking columns, the columns stay visible to the left of the grid. To lock a column, right-click in the column heading and select Lock Column from the pop-up menu.
Note: The reconfiguring of columns and rows is not persisted across login sessions.
Multiple Cell Selection
A grid with ![]() Multiple Cell Selection accepts data in tab-separated value (TSV) format which can be copied and pasted into a grid.
Multiple Cell Selection accepts data in tab-separated value (TSV) format which can be copied and pasted into a grid.
Note: Multiple cell selection is dependent on the location of the current selected cell.
To enable multiple cell selection, click Multiple Cell Selection at the grid. The icon background is highlighted in pink when it is active.
- Use Control + Left click to select multiple cells in the grid.
- Use Shift + Left Click to select continuous adjacent cells.
- Use the Delete or Backspace keys to delete the highlighted cell’s value.
- Use Control + C to copy structured data.
- Use Control + V to paste the structured data into the highlighted cells.
Notes:
-
You must switch back to normal mode when you have finished using multiple cell selection.
-
When the multiple cell mode is enabled, the double-click action is disabled, and you cannot flow to any applicable target application by double-clicking on the row.