
Maintain non-electric detonators
Note: Refer to the manufacturer's product specifications when adding or editing a non-electric detonator.
Access non-electric detonator maintenance:
- On the DataBlast application menu, select Product Maintenance.
The Product Maintenance screen displays.
- Select the Detonators - Non-electric node.
The Product Maintenance ribbon menu displays.
To add a non-electric detonator:
- On the Product Maintenance ribbon menu, click Add Non-Electric Range.
A question about whether the detonator type is a millisecond connector (MSC) detonator range displays.
- Click Yes or No as required.
The <Product> screen displays.
- In the Product Details field group:
- Select the Supplier from the defined suppliers. See Maintain suppliers.
- Enter the Product Range Name. This is the supplier's name for the product. Maximum length: 16 characters.
- Select whether the product is:
- Surface Only
- Unidirectional
- Select whether to Show Product Delay on Trunk Lines.
- Enter the Supplier Range Short Name and Supplier Type Short Name if required for BLASTPLAN export. Maximum length: 5 characters.
- Enter the Unit NEQ: The net explosive quantity, which must be between 0 and 5 grams.
- Enter the Sleep Time.
- Select the Hazard Class from 1.1B, 1.1D, 1.4S, 1.5D, 3 and 5.1.
Note: The Product Range Name, Unit NEQ and Sleep Time are required.
- If the detonator type is MSC, add delays in the Detonator Delays table as required:
- Click Add Delay.
The <Detonator Delay> screen displays.
- In the Detonator Delay Details field group, complete the following fields as required.
- Nominal Delay: The quantity of explosive material determines the delay (in milliseconds).
- Display Name
- Short Name: Maximum length: 5 characters.
- Site Name: This is the name you use for the product at your mine site and must be unique. Default: The combination of the Product Range Name and Nominal Delay (which is the Product Name).
- Companion Length Detonator: Select from the defined detonating cords or lead-in lines. See Maintain detonating cord and Maintain lead-in line.
- In the Appearance field group:
- Enter the Arrow Style Map.
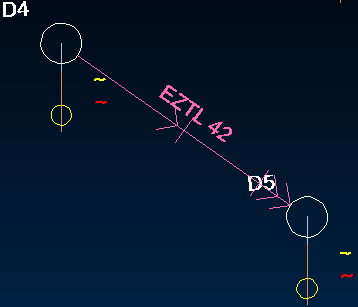
Note: For the style maps, use a combination of the letters A and L. When you wire up holes in an initiation pattern, an A displays as an arrow, and an L as a line. In the following example, the arrow style is AAL and the centre line style is LA.
- Enter the Centre Line Style Map.
- For the white and dark backgrounds, update the following fields as required.
- Product Colour
- Text Colour
- Enter the Arrow Style Map.
- In the Inventory field group, complete the following fields as required.
- Classification
- UN Number: United Nations number.
- Notes
- Reorder Point
- Reorder Units
- Minimum Quantity
- Unit Mass
- Case Count
- Case Width
- Case Length
- Case Height
- Case Measurement Units
- Click Apply.
- Click Add Delay.
- If the detonator type is not MSC, add delays in the Detonator Delays and Lengths table as required:
- Click Add Delay.
The <Detonator Delay> screen displays.
- In the Detonator Delay Details field group, complete the following fields as required.
- Nominal Delay
- Display Name
- Short Name
- In the Appearance field group:
- Enter the Arrow Style Map .
- Enter the Centre Line Style Map.
- For the white and dark backgrounds, update the following fields as required.
- Product Colour
- Text Colour
- Click Apply.
- Click Add Delay.
- If the detonator range is non-MSC, add lengths in the Detonator Delays and Lengths table as required:
- Select a delay.
- Click Add Length.
- Enter the Length.
- Enter the Site Name. This is the name you use for the product at your mine site and must be unique. Default: The combination of the Product Range Name, Nominal Delay and Length (which is the Product Name).
- Click Save.
- To edit a delay, select the delay and click Edit Delay; or double-click the delay.
- To deactivate a delay or length, uncheck Active.
- Click Apply.
- Click Save Changes.
To edit a non-electric detonator:
- Select the non-electric detonator.
- On the Product Maintenance ribbon menu, click Edit Product; or double-click the product.
- Edit the product as required.
- Click Save Changes.
To deactivate a non-electric detonator:
- Uncheck Active for the non-electric detonator.
The product displays with strike-through text.
- Click Save Changes.
