
Macros Window
To display the Macros window:
-
View ribbon >> Docking Windows >> Macros.
Note: If you have a running DTS session but no open schedule, you can access the macros screen by clicking Macros in the Schedule group on the Home ribbon tab. When you open the macros screen from the Home ribbon, you will only have access to the system macros, not schedule macros (see below for an explanation of macro types).
Macros allow you to customize DTS by adding your own functionality to DTS. A macro is a self-contained 'program' that performs a predefined sequence of actions. The commands contained within the macro determine the type and sequence of actions. The functionality of a macro can range from a very simple task to highly complex tasks with their own user interface.
Macro Types
There are two types of macros in DTS:
- System macros - shown in the top part of the docking window. These macros are system, or DTS, specific and apply to the entire DTS session.
System macros are loaded into the System macros list when the DTS session is started. Macros are not compiled during the load.
The code of a macro is compiled during its first run, which may therefore take slightly longer than any subsequent run.
 Macros are stored in a file called EPSMacros.epm which is typically found in the <USER>\AppData\Roaming\Sirius folder.
 - Schedule macros - shown in the bottom part of the docking window. These macros apply to the selected schedule only. Schedule macros are loaded into the Schedule macros list when the DTS schedule is loaded. Macros are not compiled during the load. The code is compiled during the first run, which may therefore take slightly longer than any subsequent run.
For example, below, there are two system macros and two schedule macros:

Enabling Macros
For security reasons all macros, system and schedule, are disabled by default. A yellow security warning bar will appear below the menu ribbon to alert you to the fact that macros exist and that they are currently disabled. Click the relevant button to enable macros.

- Enable System Macros - this button is shown when you start an DTS session and system macros exist. The message will continue to be displayed until you click to enable the system macros, or you close the warning bar by clicking the X button on the right-hand side. The corresponding System macros section in the docking window (top panel) remains disabled until you enable system macros.
- Enable Schedule Macros - this button is shown when you open an DTS schedule which contains schedule macros. The message will continue to be displayed until you click to enable the schedule macros, or you close the warning bar by clicking the X button on the right-hand side. The corresponding Schedule macros section in the docking window (bottom panel) remains disabled until you enable schedule macros.
Macro Description
The description of the selected macro is displayed at the bottom of the docking window. In addition, the docking window highlights which macro type, system or schedule, is currently active.
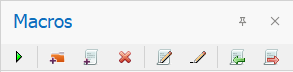
Macro Toolbar
The following table describes the buttons on the macro toolbar:
| Field | Description |
|---|---|

|
Run macro - select the macro you want to run from the list of available macros and click to execute the macro. This button is only enabled if a macro is selected. |

|
New folder - click to create a new folder within the system or schedule macro repository. You can create any number of sub-folders. To move macros to different folders/sub-folders simply drag/drop the macro. This button is disabled when the corresponding SECURITY WARNING is still in place. |

|
New macro - click to open the Macro Editor screen where you can add a new macro. This button is disabled when the corresponding SECURITY WARNING is still in place. See Macro Editor. |

|
Delete folder or macro - select the folder or macro that you want to delete, and click the delete button.
This button is only enabled if a folder or macro is selected.
|

|
Edit macro - select the macro you want to edit and click to open the Macro Editor form where you can edit the macro. This button is only enabled if a macro is selected. See Macro Editor. |

|
Edit name - select the macro you want to rename and click to edit the macro name. This button is only enabled if a macro is selected. |

|
Import - click to open the Import screen box. Select an DTS macro file to import.
DTS macro files are text (*.txt) or binary encrypted (*.epm) files. This button is disabled
when the corresponding SECURITY WARNING is still in place.
|

|
Export - select the macro you want to export and click to open the Save As screen box. Navigate to the folder location where you want to save the exported file, specify the name and type, and click Save. You can export the macro as a Text File (*.txt) or binary encrypted DTS Macro (*.epm) file. |

|
Attach to ribbon - all of the above toolbar icons can also be accessed from the context menu by right-clicking on a macro. The context menu has an additional icon to Attach to ribbon. Click this icon to open the Attach Macro to UI Element screen where you can connect the macro to a button on a user-defined ribbon. You can only connect system macros. This button is only visible for system macros. See Custom Ribbons. |
 Delete folder - the selected folder, and all sub-folders, are deleted
immediately. You are not prompted to confirm the deletion.
Delete folder - the selected folder, and all sub-folders, are deleted
immediately. You are not prompted to confirm the deletion.