
Generate Work Packages/Tasks
To access this facility:
-
Tools ribbon >> Tools >> Generate Work Packages/Tasks.
The Generate Work Packages / Tasks is a flexible feature that allows you to define and configure work packages. A work package consists of a predefined set of tasks and rules, that are used by the generation process to create secondary or derived tasks. Work package configurations include:
- Task sequence � links and dependency details determine the sequence of tasks, which can include parallel and nested tasks, as well as stand-alone tasks
- Task properties � define properties and attributes for each task. Values can be pre-set, copied from the primary task at the time of generating tasks, or be evaluated by applying a formula during the generation process
- Primary task/group selection - define the primary tasks/groups that a work package is applied to
- Generated task integration - define how the generated tasks link into and interact with the selected primary tasks/groups
The naming convention used in this topic is as follows:
- Primary task – An existing scheduled task.
- Primary group – Grouping of scheduled tasks, for example, By Description.
- Task table – A table showing primary tasks or groups.
- Generated tasks – Scheduled tasks created during the work package generation process; the generated tasks are also referred to as secondary or derived tasks.
- Generation process – The process of generating secondary or derived tasks from the work package specification.
Use this screen to:
- maintain work packages
- create work package tasks and their dependencies
- configure work package task properties and attributes
- specify which primary tasks/groups to apply the work package rules to
- select 1 of 4 options to describe the connection points and interaction of the generated tasks with the primary tasks/groups.
For example:
Create, Delete and Rename Work Packages
The list of work packages is displayed in the left pane of the Generate Work Packages / Tasks screen. Use the New, Delete and Rename buttons on the toolbar above the work package list to manage work packages.
Create Work Package Tasks & Dependencies
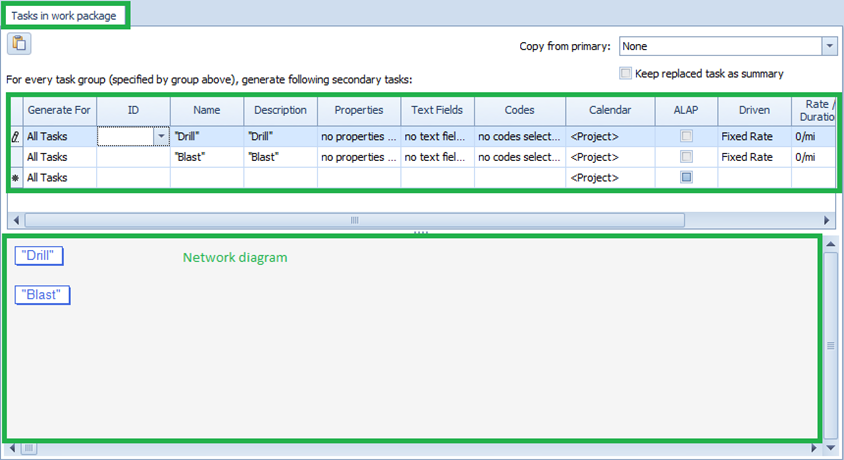
1. Create work package tasks
Work package tasks are created in the task grid on the Tasks in work package tab. There are 2 ways of creating work package tasks, viz. entering tasks manually into the task grid and and copying primary scheduled tasks from the task table and pasting them into the task grid.
- To create work package tasks manually, simply start typing the task name in the Name column. Tasks will appear in the network diagram at the bottom of the screen. You may need to select the blank row below the created task in order for the task to appear in the network diagram.
- To paste tasks into the task grid, you must first select the
primary scheduled tasks from the task table (see Using
the clipboard for assistance with this) before opening this
form. Then open this form, select the desired work
package from the list on the left-hand side, and click the
 button to paste the tasks from the clipboard into the task grid.
Tasks will appear in the network diagram at the bottom of
the screen.
button to paste the tasks from the clipboard into the task grid.
Tasks will appear in the network diagram at the bottom of
the screen.
2. Create work package dependencies
Dependencies between work package tasks, as well as links between work package tasks and the existing primary scheduled tasks, are created in the network diagram.
- To create a dependency between two tasks, place the mouse cursor
over one of the tasks until the move pointer
 is displayed. Click the left mouse button and, whilst holding down
the left mouse button, drag the mouse vertically over the edge of
the task until the link pointer
is displayed. Click the left mouse button and, whilst holding down
the left mouse button, drag the mouse vertically over the edge of
the task until the link pointer
 appears. Then drag the cursor onto the second task in the
relationship and release the left mouse button. The
Task Dependency
form is displayed on which you can select dependency details.
appears. Then drag the cursor onto the second task in the
relationship and release the left mouse button. The
Task Dependency
form is displayed on which you can select dependency details. - To edit a dependency, double-click on the line representing the dependency between two tasks and edit the details in the Task Dependency form.
- To move a task on the diagram, place the mouse cursor over the
task until the move pointer
is displayed. Click the left mouse button and, whilst holding down
the left mouse button, drag the task in a horizontal direction first
and then to the desired location. Release the mouse button once the
task is in the desired location.
Depending on the option selected in the Generate work package as follows group, the system auto-creates Start/Finish, Each Primary Task or Each Primary / Group elements in the network diagram. These elements represent the connection points into the existing primary scheduled task network, i.e. they show how the generated tasks will tie into the existing primary scheduled tasks. This topic is discussed in more detail in the Generate work package as follows section below.
Configure Work Package Settings
Work package task properties and attributes can be individually configured. Property and attribute values can be �fixed�, copied from primary tasks or based on a formula. See Generate Work Packages/Tasks for more details.
Generate Work Packages
These 4 options determine how the generated tasks will link into, or replace, the existing primary scheduled tasks during the generation process:
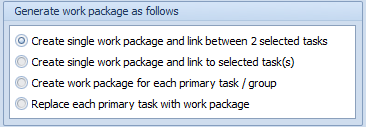
These 4 options are discussed in more detail below.
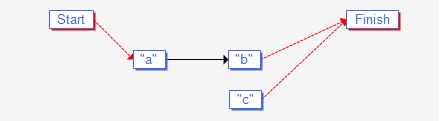
Option 1 - Create single work package and link between 2 selected tasks
This option inserts the generated work package task(s) between 2 selected primary tasks. When you select this option, the work package network diagram auto-creates a Start and Finish element, representing the 2 selected primary tasks. The primary tasks must be selected in this order, Start then Finish, and are not necessarily determined by their sequence in the task table.
The work package tasks (this can be a single task or a large network of effectively unlimited tasks) can be linked to the Start/Finish elements in any predecessor/successor combination. The only rule that applies is that the Start element has at least one successor and the Finish element at least one predecessor.
Press the Generate button to apply the work package. The Generate button is only enabled if you have selected two primary tasks (no more, no less) before opening this screen. You can also invoke the generation process from the Insert Work Packages\Tasks context menu (click the right mouse button from the task table to open the context menu).
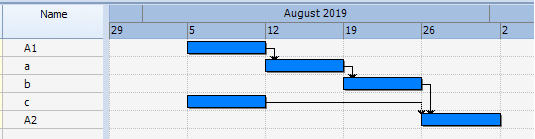
The following example shows the generated tasks/links for the work package above, where Start=A1 and Finish=A2.
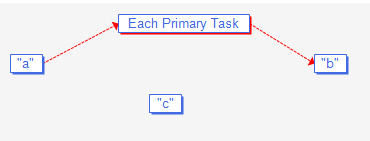
Option 2 - Create single work package and link to selected tasks
This option generates a single set of work package tasks and, optionally, links these to all selected primary tasks. When you select this option, the work package network diagram auto-creates an Each Primary Task element. This element represents each selected primary task.
The work package tasks (this can be a single task or a large network of effectively unlimited tasks) can be linked, but do not have to be linked, to the Each Primary Task element in any predecessor/successor combination.
Press the Generate button to apply the work package to all selected primary tasks. You can also invoke the generation process from the Insert Work Packages\Tasks context menu (click the right mouse button from the task table to open the context menu).
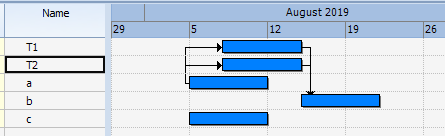
The following example shows the generated tasks/links for the work package above, where T1 and T2 are the selected primary tasks, and the link between �a� ∞ �Each Primary Task� is a �Start-Start� link with a 3-day lag.
Option 3 - Create work package for each primary task / group
This option generates work package tasks for each primary task or each primary group. When you select this option the For,Group primary tasks and Cross-group dependencies sections of the screen are enabled.
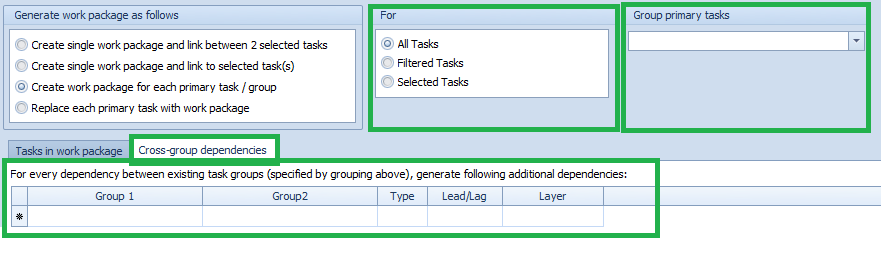
The For option specifies which primary tasks to generate tasks for (All, Filtered, Selected). One set of work package tasks is generated for each primary task as specified in the For option.
By specifying a Group primary tasks grouping, one set of work package tasks is generated for each primary group only, not each individual primary task. The For option determines which primary tasks to base the grouping on.
Cross-group dependencies are discussed in more detail further below.
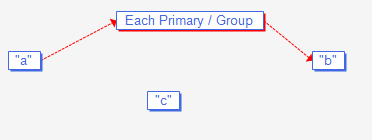
When you select this option, the work package network diagram auto-creates an Each Primary / Group element. If the Group primary tasks drop-down is blank, then this element represents each primary task, as determined by the For option. If a grouping is specified in the Group primary tasks drop-down, then this element represents each primary group.
The work package tasks (this can be a single task or a large network of effectively unlimited tasks) can be linked, but do not have to be linked, to the Each Primary / Group element in any predecessor/successor combination.
Select the target primary tasks, or set the filter as required. If the work package configuration combines Selected Tasks with a grouping in Group primary tasks, it is important to select the actual primary tasks belonging to the group(s) and not the group header(s) only. You can optionally select the group header(s). Press the Generate button to apply the work package. You can also invoke the generation process from the Insert Work Packages\Tasks context menu (click the right mouse button from the task table to open the context menu).
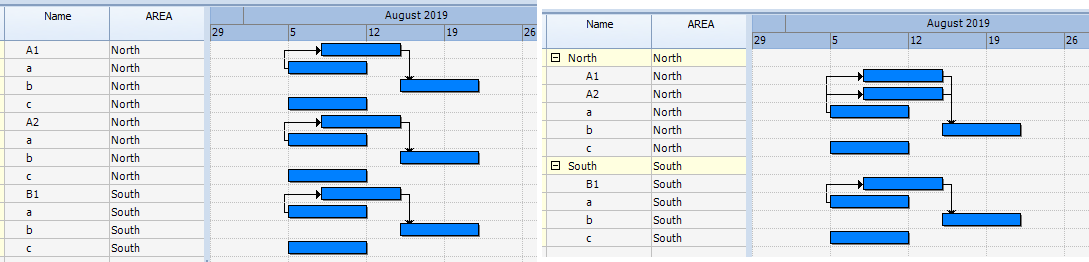
The following two examples show the generated tasks/links for the work package above, where A1, A2 and B1 are the selected primary tasks, and the link between �a� ∞ �Each Primary / Group� is a �Start-Start� link with a 3-day lag. The left view shows results without a grouping, and the right view shows results where the Group primary tasks drop-down has a grouping on Area.
Cross-group dependencies

This option is only applicable if a Group primary tasks grouping has been selected from the drop-down list. For every dependency that exists between two primary tasks of different primary groups, as specified by the grouping in the Group primary tasks, the Cross-group dependencies grid allows you to specify which additional dependencies to generate.
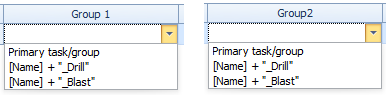
- Group 1 � represents the �Link From� primary task and all tasks that is generated for this primary task
- Group 2 � represents the �Link To� primary task and all tasks that is generated for this primary task
Additional links can be created between any Group 1 primary/generated tasks and any Group 2 primary/generated tasks
- Type, Lead/Lag, Layer � additional settings for each dependency
Cross-group Dependency Example
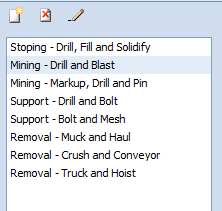
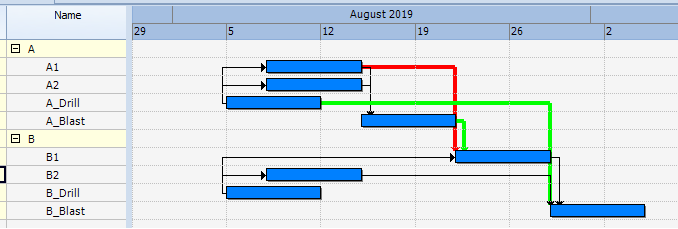
- 4 primary tasks A1, A2, B1, B2 grouped by the first character of the Name (groups A and B)
- Link between primary task A1 in Group A and primary task B1 in Group B (shown in red)
- A1 is the Link From task and is referenced in the Group 1 drop-down; B1 is the Link To task and is referenced in the Group 2 drop-down;
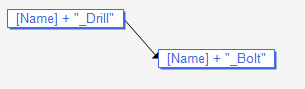
- Work package tasks (the Name of the generated tasks is created by appending _Drill and _Blast to the primary group [Name], in this case A or B)
- Work package link between [Name]+_Drill ∞ Each Primary / Group is a Start-Start link with a 3-day lag

- Group 1 drop-down values - represent the 'Link From' primary task A1 and all tasks to be generated for this task (A_Drill and A_Blast).
- Group 2 drop-down values - represent the 'Link To' primary task B1 and all tasks to be generated for this task (B_Drill and B_Blast).
The additional cross-group dependencies defined for this example are:
- Generated �A_Drill� ∞ Generated �B_Blast�
- Generated �A_Blast� ∞ Primary task B1

The generation process for this example will generate the following tasks and links:
- The generated tasks for primary group A are: A_Drill and A_Blast
- The generated tasks for primary group B are: B_Drill and B_Blast
- Links created as per work package specification: A_Drill ∞ A1 and A_Drill ∞ A2; A1 ∞ A_Blast and A2 ∞ A_Blast (shown in black)
- Links created as per work package specification: B_Drill ∞ B1 and B_Drill ∞ B2; B1 ∞ B_Blast and B2 ∞ B_Blast (shown in black)
- The original cross-group link between A1 and B1 remains untouched (shown in red)
- Additional cross-group dependencies are A_Drill ∞ B_Blast and A_Blast to B1 (shown in green)
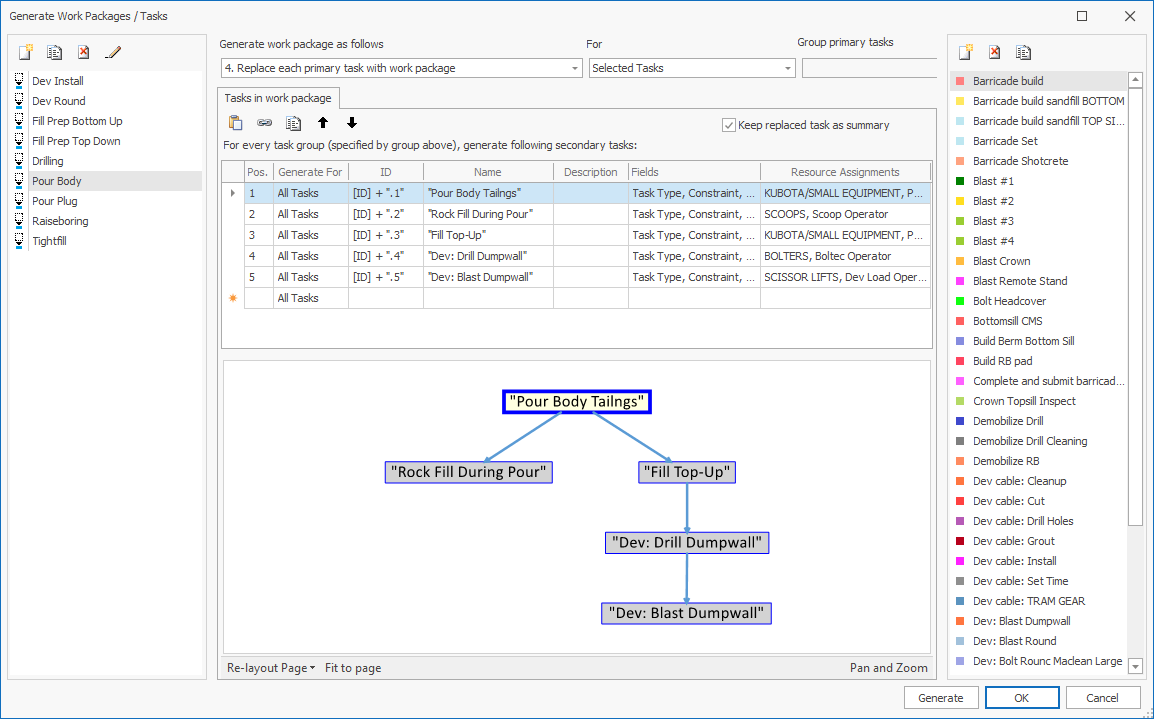
Option 4 - Replace each primary task with work package
This option is used to create secondary or derived tasks (e.g. drilling and blasting) from primary activities (e.g. loading). The primary task is replaced with the generated tasks. The replaced primary task can optionally be kept as a summary. When you select this option the For, Copy from primary and Keep replaced task as summary sections of the screen are enabled.
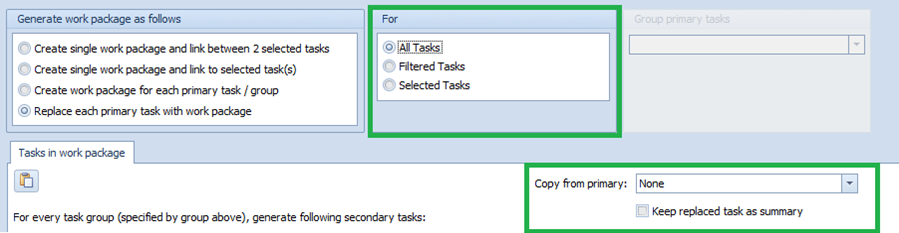
The For option specifies which primary tasks (All, Filtered, Selected) to replace with the generated tasks.
Copy from primary - see Generate Work Packages/Tasks.
A tick in the Keep replaced task as summary option keeps the primary task as a summary field. The summary field is not task.
The work package network diagram does not create any elements for this option. The generated tasks replace the primary task and there is no link between the generated tasks and the primary task. There is also no link between the generated tasks and the summary field. Any previous predecessor / successor links of the primary task will, however, be linked to the generated tasks.
Select the target primary tasks, or set the filter as required, then press the Generate button to apply the work package. You can also invoke the generation process from the Insert Work Packages\Tasks context menu (click the right mouse button from the task table to open the context menu).
The following two examples show the generated tasks/links for the work package above, where T1 and T2 represent the selected tasks. The Keep as summary field is not selected for the results in the left view, but is set to true for the results in the right view.
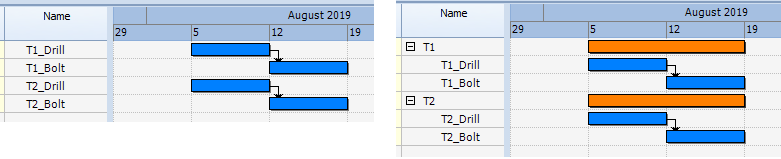
Note: The summary field will not show if the schedule is currently grouped
Note: For the example above, the Summary Bar in the bar chart options is configured to Show. This is not the default setting.
Related topics and activities