
Import Map Data from External Files
To access this screen:
-
Activate the Data ribbon and pick Import >> Mapper.
Studio Mapper collates field data and stores it in a manageable and reusable way. Each Studio Mapper project is linked to a database. Your application understands the structure of the Studio Mapper database and can import some or all of its contents directly, without the need to export data from Studio Mapper first.
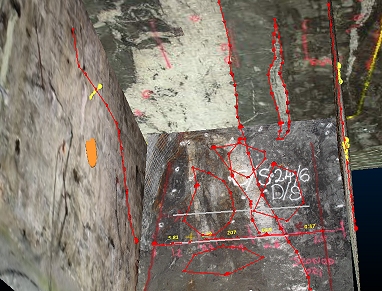
Studio Mapper displaying data for a mine area (front, left and back face display).
You do this using the Import Map Data from External Files screen, which is similar to the dialog used to export database contents in Studio Mapper.
You define the elements of the map database you wish to import using a series of controls that allow you to refine the scope of your import. You can import all possible data from the target mapping database, using a wide date range and no other filters, or you can restrict your import to a particular mine, area, map data type and date range, or anything in between.
First, use the Database browser to locate the folder that represents a map database. This will be the folder that contains
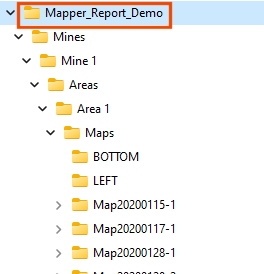
An example of a Studio Mapper database folder structure. The folder to specify in the Import Map Data from External Files dialog is highlighted
Once a database folder has been picked (local or network), a quick scan of the folder is performed to attempt to locate a Studio Mapper configuration file (this is used to manage the import and ensure data is attributed correctly). If a file with an ".mpcfg" extension if found (or, if multiple files of this type exist at the folder location, the first one to be found) it will be listed in the Config file field. Regardless, you can browse for a configuration file if you wish.
Maps Missing Dates
To ensure map data within a given range is imported correctly, any maps that don't have a creation date (usually because they were created in an older version of Studio Mapper) will be highlighted. You can continue to import any undated maps, using the Import - Maps Missing Dates screen.
To import Studio Mapper data into your application:
-
By default, Mine is set to All Mines, meaning all mines defined in the current mapping database will be used to import data. Pick a particular mine to further restrict your import. If All Mines is selected, Area is disabled as all areas of all mines are imported.
If a mine is chosen, you can either leave the default Area setting as All Areas, or pick a particular area. Only data of that area is imported.
-
Choose which of your field map data types you want to import:
- All – Check to select all items below and uncheck to unselect them.
Note: Items not present in the database for the selected Mine and Area are greyed out and are ignored during export.
-
Areas – Check to import channel sample area information.
- Channel Samples - Check to import channel sample and associated interval data.
- Collars, Surveys and Assays - Import additional exported .csv and Datamine format files containing categorized channel sample data.
- Comments - Annotated point data used for labelling the 3D map view.
- Features - Geological structures captured as either open strings or polygons, with optional attribution.
- Pictures - Import image data as a wireframe data file.
- Profiles – If checked, import face profile string data.
- Properties - Map summary properties including mine and area location, map dimensions and any assigned attributes.
- Sketches - String data as freeform sketches.
-
Vertical Sections (prefix) - Import longwall section sample data.
-
Wireframes – Check to import 3D wireframe or points map data.
- All – Check to select all items below and uncheck to unselect them.
-
Further restrict your import by only importing data Between one date and another. These timestamps are added to field data in Studio Mapper at the point of data creation, although it is possible that older/legacy map data may not include this information and this is handled separately (see "Missing Dates", below). Use the date pickers to provide a start and end (inclusive) date range.
-
Check Only Georeferenced Maps to restrict import to maps that have been georeferenced.
Note: If unchecked, face maps in local coordinates are imported, which could make your 3D scene very large.
-
Check Load in 3D window to automatically display imported data using a default overlay in the primary 3D window (and all linked windows).
-
Check Overwrite files to automatically overwrite existing files in the project folder of the same name.
Warning: Use this setting with caution as file overwrites can't be reversed.
-
Click Import to start the import of map data and (optionally) display it in the 3D window.
-
Optionally, load imported data references into memory using the Project Files control bar.
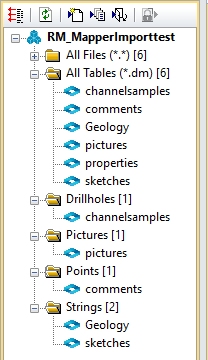
An example of a (new) project following a Studio Mapper map data import
Files of the same type from multiple mines/areas are combined (with the exception of pictures, which remain as separate file references).
Related topics and activities