|
|
Format Display - Overlays - Drillholes Tab Formatting static and dynamic hole overlays |
|
|
This topic relates to deprecated functionality. Design window functions are now superseded by those found in 3D windows. |
Format Drillhole Overlays
To access this dialog:
-
In the Format Display dialog's Overlays tab, Overlay Objects group, select a drillholes overlay, select the Drillholes tab on the right.
This tab is used to define the formatting settings for a static or dynamic drillholes overlay.
Field Details:
The Drillholes tab contains the following fields, and is identical for both static and dynamic drillhole overlays:
Display drillhole trace: if enabled, the drillhole trace (the underlying string that represents the geometry of the drillhole) will be drawn to the screen with any downhole columns that may be drawn. If disabled, the string will not be drawn (although any downhole columns will use the positional data to derive their correct positions).
Display drillhole columns: if selected, you can create, edit and display any configured downhole columns, aligned to the position of the drillhole trace. If disabled, downhole columns will not be drawn, and you will be unable to edit/create them.
Auto arrange: if selected, the downhole columns will be arranged so that an equal distance is covered either side of the downhole trace by column data. If disabled, column positions will be as they were last set using the drag-and-drop positioning procedure outlined in the previous section.
Snap to columns: if selected, any drag-and-drop operation involving the left-right alignment of downhole columns will snap the column positions to key areas, allowing for easier siting of overlapping columns, as opposed to a smoother scrolling method if disabled (which allows for more accurate, freeform positioning)
Drillhole Previewer: this displays a preview of the current drillhole trace and any configured downhole columns (see previous section for more details on using the previewer).
Insert...: adds a new downhole column to the current drillhole overlay.
Format...: formats the currently selected column, using the Format Column dialog.
Delete: removes the currently selected downhole column from the active drillhole overlay.
Font: edit the font used to label the downhole column indicators in the preview panel.
Drillhole Previewer Overview
The distinction between static and dynamic drillholes is important when applying overlay formatting; in-memory dynamic drillhole data will be listed as "Dynamic Drillholes" in the Format Display overlays list, and can be formatted in the same way as a static (file-based) drillhole object. Static drillholes are represented (by default) with the name of the underlying data object.
When a drillhole overlay (static or dynamic) is highlighted, the area on the right of the Format Display dialog will update to show a Style and Drillholes sub-tab.
The Drillholes section of the Format Display dialog features a preview section that can be used to identify the positions of existing downhole columns. The position of these columns can be rearranged as required using a simple drag-and-drop interface.
This section of the Drillholes tab provides an indication of the position of downhole columns that may be associated with the loaded drillhole data.
In the centre of the preview pane, the vertical line represents the position of the drillhole trace (please note this graphic is for illustrative purposes only).
For newly-created drillhole objects, the previewer will be initially empty. You can add a downhole column to any drillhole object. To do this, click the Insert button to access the relevant function, which should be run to completion for each column you require. For static (file-based) drilllhole data, this will require the selection of a field that is contained within the drillhole table, and if a dynamic drillhole is being formatted, you will be able to add a data column from any of the associated component files, using the Column wizard.
|
|
If no column indicators are currently selected, the new column will be added to the bottom of the list, however, if you have previously highlighted a column, the new column will be inserted directly above it. |
Columns are displayed within the previewer in a specific way;
-
Columns are always drawn according to a left-right rule.
-
The leftmost column will always be drawn at the top.
-
For columns that overlap, data will be drawn in a top-down order.
-
Column widths are indicated and are always drawn to scale.
-
Specific margin settings are shown for each column.
-
No two column indicators can share the same 'row'.
The display contains not only the name and relative position of each column, but also indicates the order in which data is drawn (why is this important? Consider an example where a histogram column is drawn after a line graph in the same alignment - it is possible that the latter may obscure the former). You can re-order the drawing order of columns that overlap by dragging and dropping items into the required vertical layout.


Using the Drillhole Previewer
Adding Downhole Columns to a STATIC drillhole overlay
-
In the Format Display dialog, select a static drillhole overlay and click the Drillholes tab.
-
Click Insert.
-
In the Select Column dialog, select a data column that contains the values you wish to represent in graphical format.
-
Click OK to launch the Format Column dialog, where you can set the Alignment, Border, Width/Margins, Filter, Template, Graph/Color or Text settings, using the appropriate tab (more...)
-
Click OK to add the downhole column to the drillhole trace - the preview will be automatically updated.
Adding Downhole Columns to a DYNAMIC drillhole overlay
-
In the Format Display dialog, select a dynamic drillhole overlay (this will always be named "Dynamic Drillholes") and click the Drillholes tab.
-
Click Insert.
-
In the Column Wizard, select if you wish to represent a data column from a drillhole component file (lithology, assays etc.) or a calculated System Field. Click Next.
-
Select the data table containing the values you wish to broadcast with your new column. Click Next.
-
Select the field that you wish to portray and click Next.
-
Click OK to launch the Format Column dialog, where you can set the Alignment, Border, Width/Margins, Filter, Template, Graph/Color or Text settings, using the appropriate tab (more...)
-
Click OK to add the downhole column to the drillhole trace - the preview will be automatically updated.
Formatting an existing downhole column
-
Select the column indicator in the preview pane. It will be highlighted.
-
Click Format (alternatively, you can double-click the column indicator or right-click the column and select Format from the context menu).
-
Click OK to launch the Format Column dialog, where you can set the Alignment, Border, Width/Margins, Filter, Template, Graph/Color or Text settings, using the appropriate tab (more...)
-
Click OK to update the selected column.
Viewing Margins in the Previewer
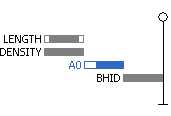
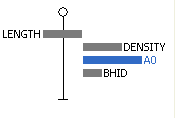
All downhole columns that have specific margin settings will be formatted to show the left/right margin widths at the scale they have been set. Margins for each column are independently configured using the Format Column dialog, e.g.:

The overall width of each column is shown to scale - this can also be adjusted with the Format Column dialog. Overlapping items of different widths will always be aligned to the left edge of the column indicators in the same group, e.g.:

|
|
Related Topics |
|
|
Format
Column Display Dialog |

