|
|
Command Help |
|
Command Name |
Menu |
Quick Key |
Link to Command Table |
|
create-ramp-string |
crs | Click here |
Description
Draws a ramp string using a start point (selected interactively in any 3D window) and defined start azimuth, gradient, radius and other parameters.
How to Use
-
Select the required snap and data selection settings using the Home ribbon's options.
-
Run the command to display the Create Ramp String dialog.
-
Following the Status Bar prompt 'Select start point of ramp string', select (click on) the start point of the ramp in the 3D window.
-
In the Create Ramp String dialog, enter the Start azimuth value (range 0-360 degrees)

- If a point on a string has been selected as the start point of the ramp string, then the azimuth of the selected string segment is shown as the default value in theAzimuthdialog
- If an absent value (-) is entered, the value defaults to '0' i.e. azimuth North.
-
Enter the Gradient of String value and the convention to be used (degrees, ratio or %).
-
Select either a Straight ramp type or select Radius, and enter the turning radius.
-
Specify an End Limit type, which will be either:
-
an End Azimuth (limit the ramp length by it's end azimuth)
-
a Half Circle
-
Quarter Circle
-
an elevation limit (the ramp will continue to proceed until the target elevation is reached).
-
Select if the ramp is to curve (according to a plan view) in a Clockwise or Counter-clockwise direction.
-
Choose whether the ramp overall distance is measure over a Horizontal or Vertical plane, or along the gradient of the generated string (Slope).
-
Choose the resolution of points in your ramp curve by specifying either the Segments in a full circle (default = 40) or the Segment length. Segment length is always calculated based on the slope distance, not the horizontal distance.
-
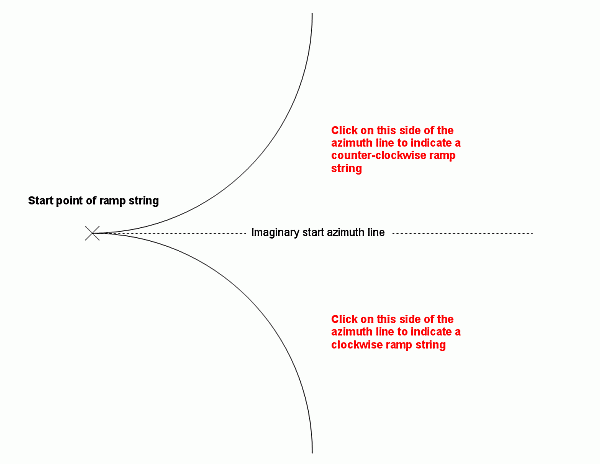
If prompted in theStatus Barto 'Indicate direction of ramp using cursor' then, in the3Dwindow, click on either one or the other side of an imagined start azimuth line, to indicate a clockwise (towards the right) or counter clockwise (towards the left) ramp (string) direction.

- This prompt is only displayed if the Radius value is not '-'.
-
The clockwise or counter clockwise direction of the ramp (string) is indicated by clicking in the following relative positions as shown below:

More information
- If no strings object exists in memory, a new object will be created when this command is run, displaying details of the new object immediately in theCurrent Objects toolbar and the Loaded Data control bar.
- Right-click for snap; left-click for placing points without snapping.
- If the first point of a ramp is snapped to an existing string, the starting azimuth of the ramp string will be calculated based on the string to which the origin was snapped. If the snapping point is the first point of the guide string, the azimuth will be the opposite direction of the first edge, otherwise the azimuth will be set to the azimuth of the guide string edge.
- If snapping is toggled on, points may be snapped using the right mouse button.
- If you are using a 3-button mouse, the middle button (or the button that emulates this function) will not perform any function in relation to this command.
|
|
This command can be completed by double-clicking (or tapping) anywhere in a 3D window. |
|
|
Related Topics |
|
|
Create Ramp String |

