
Manage Profiles
To access this screen:
-
Activate the Setup ribbon and choose Setup >> Manage Profiles
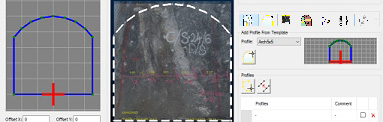
Drive profiles can be added to a map face as either a freeform or predefined shape.
Predefined profiles are created using the Profile Manager. Once created, profiles are stored within your database, and selected using the Mapping control bar's Profiles tab. Profiles created by the Profile Manager are based around primitive shapes, although they can be modified afterwards using the wide range of string editing tools.
Profiles are defined by their geometry and origin. The origin will be used to align the profile with the selected map in either a map or global 3D window (if the map is georeferenced already). Local coordinates maps can be enhanced with a profile string, and this data will be transformed to world coordinates along with the map as part of map georeferencing.
Profile data is stored in a portable XML format, so can easily be migrated from one database to another, or directly imported to a Profile Manager running on another PC, for example. XML files are stored in the currently active database's Templates folder, in a file called "profileTemplates.xml".
To create a new drive profile:
- Display the Profile Manager.
-
Click Add.
-
Set the Name of the profile.
Tip: Use a profile naming convention to easily recognize profile names later on.
- Choose the basic Profile type. That is, its basic shape:
Pointlist - A shape defined by a list of vertex positions. This option lets you edit the X or Y positions of any vertex within the profile shape, permitting any freeform shape.
If the Profile type is Pointlist, the coordinates table becomes editable. Enter positive or negative numeric values into the table to update the preview graphic below.Rectangle - A shape permitting a custom Width and Height.
Circle - A circle with an editable Diameter.
Arch - a shape defined by Width, Height and Arch Radius, for example:
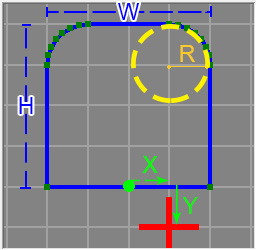
Where:
- H and W represent the configurable Height and Width.
- R represents the turning radius of the arch curves
- X and Y represent the offset from the default intersection point (the 0,0 origin or the 2D shape). In this case Offset X = 1 and Offset Y = -1 (see below).Note: If defining a square or arch profile, you can also automatically resize map profiles when adding them, adjusting the height and width automatically. See Face Map Profiles.
- Review the preview graphic to ensure the profile shape is as you want it. All coordinates are local to the origin of the profile, represented by a red cross. This is the point through which your design string will pass if no offset values are specified (see below).
- Specify the editable properties for the selected Profile type.
-
The red cross in the preview image represents the bottom centre of the target map face. When a profile is added to a map face, the red cross will be lined up with that position to locate the profile.
If required, offset the red cross, and therefore the relative position of the profile on the map face, by specifying OffsetX and OffsetY values.
-
Click Close to dismiss the Profile Manager.
Your Profile panel will now let you select your new profile and add it to a map face. See Face Map Profiles.
To Import and Export Profile Data:
Profile data is stored as an independent configuration file within your database. This data is transferable between Studio Mapper systems.
- To export all current drive profiles to an external file, click Export, choose a folder location and click Save.
- To import profile data, click Import, locate a drive profile configuration file (,xml) and click Open.
To copy a drive profile:
It may be useful to copy a drive profile, say, where an existing profile is close but needs editing to get the right shape.
- Expand the Profile list and choose the profile you wish to copy.
-
Click Copy.
A copy of the selected profile is created and loaded.
- Edit the Name of the profile copy.
- Use the profile editing functions to form the right shape.
-
Click Close to dismiss the Profile Manager.
-
Your Profile panel will now let you select your new profile and add it to a map face. See Face Map Profiles.
To delete a drive profile:
Warning: You can't undo this action.
- Expand the Profile list and choose the profile you wish to copy.
-
Click Delete.
-
Confirm you wish to delete.
The profile is removed from the system.
Related Topics and Activities