
Drafting Snap Settings
To access this screen:
-
Home ribbon >> Snap >> Mode >> Object Snap Settings.
Use the Drafting Snap Settings screen to choose the precise positions and geometric relationships that can be used when snapping digitized or edited points to string and line data. For example, you can snap to the endpoint or midpoint of an existing string edge, continue a string perpendicular or parallel to another edge, or use the intersection of two edges.
This screen refines line-based snapping and works in combination with the Snap Mode screen. Use Snap Mode to select the types of data and object overlays that can provide snap targets. Then use Drafting Snap Settings to select how Studio derives positions from eligible string and line geometry.
You can enable more than one object snap mode at a time. When the pointer is close to a valid target, a visual indicator identifies the position that is applied if you place the point. The pointer remains at its actual location while the point preview uses the indicated position. If several modes identify valid positions, Studio displays and uses the highest-priority candidate.
Settings
-
Object Snap On - Activate the selected object snap modes. Clear this checkbox to prevent the modes from being applied.
-
Select All - Select every object snap mode.
-
Clear All - Clear every object snap mode.
Object Snap Modes
-
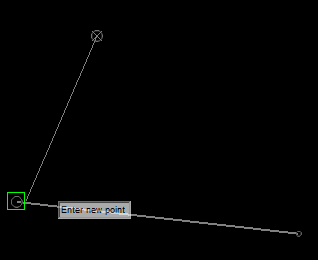
Endpoint - Snap to the nearest final vertex of a string, according to the string direction. When a snap target is identified, a green square appears in the 3D window, for example:
-
Midpoint - Snap to the exact midpoint of an existing string or drillhole segment. The midpoint is calculated from the actual segment and not from extended geometry. The midpoint snap target is shown as a green triangle.
-
Centre - Snap to the centre of circular, arc or elliptical geometry.
-
Geometric Centre - Snap to the centroid of a closed string or polygon. This is useful for irregular shapes that do not have a circular centre.
-
Node - Snap to a defined point or node.
-
Quadrant - Snap to one of the four principal quadrant positions on circular, arc or elliptical geometry.
-
Intersection - Snap to the position where two string edges intersect.
-
Extension - Snap to a position on the projected continuation of a string edge beyond its endpoint.
-
Insertion - Snap to the insertion point defined for text, block or attribute data.
-
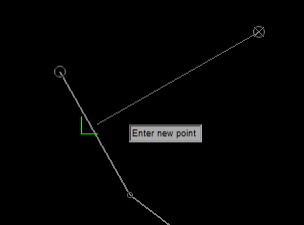
Perpendicular - Snap to a position on another string that makes the next edge perpendicular to that string. Line snapping must also be enabled. The perpendicular indicator is a green angle indicator, for example:
-
Tangent - Snap to a position on circular or arc geometry where the next edge forms a tangent.
-
Nearest - Snap to the nearest valid position on an object. Use this when the position does not need to coincide with a specific vertex, midpoint or other geometric feature.
-
Apparent Intersection - Snap to the nearest string edge, following the direction of the most recently digitized string vertex pair and projecting this direction until it meets the natural intersection of another string. This is useful when continuing a development drive string, for example.
-
Parallel - Snap along a direction that makes the next edge parallel to an existing string edge.
Activity steps:
-
Load or digitize string reference data. This data acts as the snapping destination for new string data.
-
Use the Snap Mode screen to enable snapping to suitable string or line data and select the object overlays that can provide snap targets. See Snap Mode.
-
Open the Object Snap Settings screen.
-
Select Object Snap On.
-
Select one or more Object Snap Modes. Use Select All or Clear All to change all modes if required.
-
Click OK.
-
Start a string or point digitizing or editing command.
-
Move the pointer close to eligible string or line geometry.
A visual indicator identifies the active snap candidate.
-
Place the point when the required snap indicator is displayed.
The point is placed at the indicated snap position.
Related topics and activities
