
Evaluate 2D Strings
To access this screen:
- Report ribbon >> Evaluate Dynamic >> Strings.
-
Using the command line, enter "dynamic-evaluation-report".
-
Display the Find Command screen, locate dynamic-evaluation-reportand click Run.
Dynamic evaluation allows you to select one or more outlines and evaluate a block model (containing element grades) to find the tonnes, volume, and grade of elements over a specified depth. You can also report tonnes falling outside of the model if you wish, as a separate dilution reporting category.
This screen is used to determine how previously designed or loaded evaluation string boundaries are to be used to create an evaluation zone (or zones) for the purpose of a model evaluation report.
For more information on defining evaluation zones with strings, see Dynamic Evaluation Reports.
The screen allows you to specify the following evaluation criteria:
-
The resource model to use – this would already be populated with the single model that is loaded into the 3D window.
-
The legend and column to use for evaluation – this would be already populated with the applied legend, but may be changed to use a specific legend that is consistent throughout the use of the model.
-
The Density – this would be already populated but you may specify a default value instead of using a column from the block model.
-
The block identifier – this is assigned to the strings when the evaluation is performed.
-
Grade columns – the columns specified in this list are all the columns that occur in the block model. Select only those that are of interest for the evaluation.
-
Limit type – this displays the type of evaluation to be performed. Either an absolute elevation can be used with limits or the current elevation as specified in the Design/VR window with limits. The limits shown above are 0m upwards and 15m downwards, therefore evaluating a 15m bench from the specified elevation of the block model.
Many evaluations can be performed at the same time. Invoking the same command and specifying an Fe legend, an Fe name and requesting the Fe field in the output will drive both evaluations from the same selected strings.
This is because:
-
Different legends may be used with the same metal column (such as CuO) thereby allowing the user to evaluate the differences between legends.
-
Different metals such as CuO and Fe may be evaluated against different legends at the same time.
-
Different densities may be applied.
-
Different limits may be used to indicate how the grade varies with depth. This may be appropriate when benches are mined in 5m intervals over a 15m bench height. For this absolute elevation should be used.
This data may be modified once the evaluation is underway, so it is not all that important to provide accurate values in here.
This screen is used to define how the control string is to be projected, which model to evaluate, the evaluation legend and so on. These settings can have a significant impact on the evaluation results, so facilities have been incorporated to precisely control how an evaluation volume is created, and support for multiple strings is supported, even to the extent that each block of evaluated results can be identified in a saved results file, if required.
A block model must be loaded in order to progress with the dynamic evaluation.
Loading design outlines or creating them in your application does not populate the screen automatically. To do this, the outlines must be selected. This can be performed after the screen has been displayed.
The limit for projection distances is based on the elevation of each mining block string and not the intersection elevation of the block model in the 3D window.
Note: String projection can be applied in a vertical direction or orthogonal to the currently active section.
A high-level view of a typical evaluation work flow would involve:
-
Medium-term planning is a process that is carried out on a regular basis. The output, for example, is a set of working outlines that indicate the grade and tonnage in the resource or reserve model over the period.
-
In addition to this, the planning department uses the outlines to produce the blast holes for each month’s drilling programme.
-
The mine planner, will typically define a series of outlines (as string data) to represent the mining area.
-
The mining zones are then evaluated.
Block Identifier Settings
Block identification is important where multiple evaluation strings are to be used for the purposes of the same evaluation and when those results are not combined. When there are multiple blocks (perimeters/closed strings) to be evaluated, and you have chosen not to combine the results, the Block Identifier field can be used to identify the source of evaluation data in the resulting results file (saved using the Table View screen).
If you do not intend to use multiple mining blocks during the evaluation, or you wish only to combine the results of all evaluation zones into a single set of records, this group of controls is not relevant and can be ignored.
See Dynamic Evaluation Reports for more information on the impact of combining evaluation block results.
Each mining block string used in the evaluation can be referenced in the report using its block identifier field. This can be any field, and a new field can be created if required. New block IDs will be written into the field for each string if no ID is currently present, or if the Overwrite existing IDs option has been selected.
The new Block IDs will start at the value specified in the “Default” option, and will increase by 0.01, by default, for each string. For example, the first evaluation boundary will give rise to evaluation records with a BLOCKID of 1.01; the second area will be reported with a BLOCKID of 1.02, and so on. The value by which the block ID is incremented can be specified.
Data Writeback
Both string and wireframe dynamic evaluation functions provide an option to update your input string or wireframe data with per-block evaluation results. This writeback functionality could be useful, for example, if you need to share mine planning solids with other teams (such as the operational team) or as a guide for design reviews.
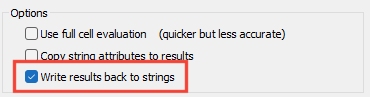
To enable this behaviour, select the Write results back to option in the evaluation settings screen, such as on the Evaluation 2D Strings Properties screen:
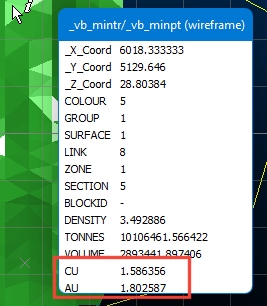
Following dynamic evaluation processing, the input string or wireframe data is appended with additional attributes, depending on which Grade Columns were selected above, for example:
Run an Evalution
Dynamically evaluating a model in relation to projected perimeter string data can involve the following steps.
Activity steps:
-
Load a block model and closed perimeter string data.
-
Either accept the default Model Name or select another block model object from the drop-down; the selected model will be used for the evaluation. The current block model is displayed by default.
-
If Include volume outside model in report? is checked, the volume represented by your project evaluation string (either vertically or with respect to the currently active section) will report sub-volumes that fall outside of the model. If dilution is reported, you can choose a dilution reporting Category Name (see below).
-
An Evaluation Legend can be used to define the categories within which tonnes and grades are reported. See Evaluation Legends, above. Pick a Legend and Column to define your reporting categories.
-
It's important to define how product density is set, to ensure accurate results. To do this, configure the following:
-
Default – Define a global density value (default '1') to be used for evaluation. This value will be used where no density Column has been specified, or absent values are found within that column/field in the block model.
-
Column – Select a block model field which contains density information. The standard density column/field is 'DENSITY', if present in the selected block model, is automatically detected and selected.
-
-
Configure your Block Identifier settings. See Block Identifiers, above.
-
Default – Accept the default start identifier value, or define a new one; this value is incremented by '0.01', by default, for each mining block. The default start ID is '1.01'.
-
Increment – For each wireframe which is evaluated, the block identifier is increased by the amount specified in this box. The default is '0.01'.
-
Overwriting Existing IDs – Check to overwrite any existing records in the results table; use this option when updating evaluation results as a result of either new block model information, or if the wireframe(s) has been modified.
-
Column – Accept the default or select another column to identify and store Block ID values; this column exists on the wireframe and is saved to the results table.
-
-
Consider including unmined and Mined Values in your evaluation.
-
Decide if a mined-out Column should be updated during evaluation. The standard field is MINED and if present in the block model, will automatically be detected and listed as the default (default <None>). Block model cells that have a MINED value of '0' are treated as having been unmined.
A value of '1' indicates that the block model cell has been completely mined out. Values between '0' and '1' indicate the portion (fraction) of the block that has been mined. If this option is selected then the proportion of the cell that is included in the results is the MINED value multiplied by the volume of the cell contained within the wireframe.
Note: If a MINED field is chosen and Update mined value is checked, the model values in this field are rewritten according to the option selected (see below). If unchecked, no changes are made to the model object.
If a MINED column is picked, choose how values are calculated and stored:
-
Incremental – Incremental Mined mode assumes that where the block has been mined before, the current mined volume includes the previous mined volume (the previous volume has expanded). The largest of the previous and current mined percentages is stored in the MINED field, and the difference between the two is used for the evaluation.
-
Additive – Additive Mined mode assumes that where the block has been mined before, the current mined volume does not include the previous mined volume (for example, they are adjacent). The value stored in the MINED files is the sum of the previous and current mined volume, and the current volume is used in its entirety for the evaluation.
-
-
-
Choose the Grade Columns to report.
-
Select (only) the required grade fields from the list.
Note: By default, BLOCKID, DENSITY, TONNES, MINED and VOLUME are checked if they are detected.
For each selected grade column, choose how the grade column is treated, select from :
-
Tonnes Weighted – Calculate an average grade or value where each data point is weighted according to the tonnage it represents. This ensures that larger-tonnage blocks or zones have a proportionally greater influence on the average than smaller-tonnage ones.
Note: Ore deposits are rarely uniform. Different parts of an orebody may have different grades (such as % metal content), and different volumes (tonnages). Simply averaging the grades without considering the tonnage could give misleading results.
-
Volume Weighted – This mode represents a similar concept as "tonnes weighted," but the weights are based on the volume of each unit (for example, block, sample, or zone) rather than its mass (tonnes).
-
Field Weighted – In this case, calculate the average grade where each data point is weighted according to the content of another field. This field is specified in the Weight Col.
-
Volume * Field Weighted – Where the weighting field (Weight Col) is a factor, not an absolute value, use this mode to multiply the volume of each unit by a factor when considering weighting.
-
Tonnes * Field Weighted – As above, but this time use the weighting column as a factor for tonnage.
Note: If Field Weighted, Tonnes * Field Weighted or Volume * Field Weighted is selected, This weighting field must be present in the input model. If values for the weighting field (or the input grade field) are absent the resulting evaluated value for that record is absent.
-
Accumulated – Field values are accumulated and no weighting is calculated (for example, a field containing values for time may be selected to use this option). This is the method used to calculate the values for VOLUME and TONNES.
-
Dominant Value - The most dominant value, by volume, is used as the result of the evaluation.
Note: This is the only permissible method used for alphanumeric fields.
-
Tonnes Dominant Value - The most dominant value, by tonnage, is used as the result of the evaluation.
-
-
-
Set projection Limits. Use the parameters in this group to control how the selected string(s) are projected when the evaluation volume is generated:
-
Projection Distance – Select this option to define the upper and lower vertical projection distance for the selected mining blocks using the defined Up and Down projection distances. This will define an evaluation volume according to a relative projection from the selected string(s), for example, 5 meters above and below the control string.
Projection, by default, will be applied vertically but this can be altered to an angle orthogonal to the current 3D section (Current Section). The Default projection distances or Column-based values are applied in the chosen direction.
-
Absolute Elevation – Select this option to define the upper and lower elevation limits for the selected mining blocks using the defined Maximum and Minimum elevations.
Note: When the Absolute Elevation limit option is selected, the two group controls on the right change to Maximum and Minimum.
-
-
Select general evaluation Options:
-
Use full cell evaluation – If checked, then the centroid of the subcell is checked to see whether it is inside the perimeter(s). If the centroid is inside, then 100% of the subcell volume is used for the evaluation; if the centroid is outside then 0% of the subcell volume is used. Leaving this option unchecked means that the true volume of the subcell within the perimeter is calculated and used for the evaluation. Full cell evaluation is faster, but less accurate.
-
Write results back to strings – Update your input wireframe data with per-block evaluation results. An attribute will be added to the input wireframe data for each Grade Column selected above. This writeback functionality could be useful, for example, if you need to share mine planning solids with other teams (such as the operational team) or as a guide for design reviews.
-
-
Click OK to evaluate the strings using the parameters set. This opens the Table View screen, displaying the dynamic evaluation report.
Related topics and activities