
Create Drive
To access this screen:
-
Using the command line, enter "create-drive"
-
Use the quick key combination "cdr".
-
Display the Find Command screen, locate create-drive and click Run.
The Create Drive screen is used to extrude a designed profile shape along one or more design strings. You can either use a preset shape or set up a custom outline by defining the positions of the outline vertices.
A profile object is used to store the details of your profile; this data is transferrable to other projects and systems using an XML format file. Profile data is not stored in memory as a 3D object and, as such, is only accessible (and editable) using the Create Drive screen.
This command would be used to construct a 3-dimension volume by extruding a profile shape along one or more design strings, typically representing an underground drive layout, although it can be used to extrude a profile shape along a design string for any purpose.
The output volume is closed (i.e. end-capped) and stored as a wireframe object that can be accessed using other structural tools in your application.
To select an existing drive profile to extrude along selected string data:
-
Select string data to become an extruded drive.
-
If a drive Profile was created previously, select it.
Note: the listed profiles are not accessible as standard 3D objects (instead, they are defined as transferrable XML data). You can select an existing profile to modify, or you can Add a new shape (see below).
-
Click Apply to Selected Strings.
To create a new drive profile and extrude it along selected string data:
-
Select string data to become an extruded drive.
-
Click Add.
A new profile is created, ready for configuration.
-
Edit the Name to something recognizable.
Tip: it can be useful to include the basic profile shape and dimensions in a profile name, for example; "Arch 3x2". A standard naming convention is also recommended.
-
Choose a Profile type. you can choose a preset shape (which can be scaled) or you can define each vertex of the outline independently. The following options are available:
-
Pointlist—a shape based on a list of vertex positions. This option lets you edit the X and Y positions of any vertex within the profile shape.
For example, consider a 2 x 2 profile shape with an intersection point at the bottom centre of the drive (this is the point at which the string intersects the profile during extrusion):
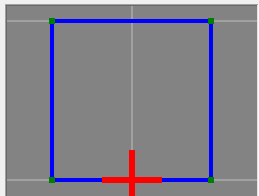
In this case, starting at the bottom left and going clockwise, the X, Y coordinates in the table are:
-1, 0
-1, 2
1, 2
1,0
Tip: to modify a standard shape, select it first and define its parameters. Then select Pointlist and modify the vertex coordinates.
-
Rectangle—a shape with an editable Width and Height.
-
Circle—a circle with an editable Diameter.
-
Arch—a shape defined by its Width, Height and Arch Radius. For example:
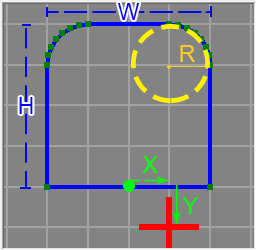
Where:
H and W represent the configurable Height and Width.
R represents the turning radius of the arch curves.
X and Y represent the offset from the default intersection point (the 0,0 origin or the 2D shape). In this case Offset X = 1 and Offset Y = -1 (see below).
Note: if you are defining a square or arch profile for a map face, you can also automatically resize map profiles when adding them, adjusting the height and width automatically. See Map Profiles.
-
-
If you are defining a standard shape profile (not a Pointlist type) you can optionally offset the intersection point of the profile using the Offset X and Offset Y fields.
Note: when an offset is applied, the coordinates table above updates automatically to show the new local, relative coordinates.
To export the current profile to a shareable file for others:
-
Complete the procedure above to configure a new profile shape.
-
Click Export.
-
Enter a file name.
-
Click Save.
The exported file can be imported by anyone using the create-drive command.
To import a previously exported drive profile and extrude it along selected string data:
-
Click Import.
-
Locate a previously saved .xml profile configuration file.
-
Click Open.
The Create Drive screen updates to show the imported profile shape and parameters.
Related topics and activities
-
create-drive (command)