|
|
Pit Design Tutorial Use the design tools in Studio OP to create a detailed pit design |
Overview
Designing an open pit is an iterative process involving consideration of many design criteria, constraints and objectives. There is no single way to design a pit - every engineer does it slightly differently. Our objective in this tutorial is to show in detail how to use the various design tools in Studio to create a detailed pit design using three different methods.
The design process, naturally, starts from a geological resource or ore reserve which is defined by a block model. In this tutorial you will use installed tutorial data, including a simple geological model from which phase information will be derived.
|
|
|

In this tutorial you will learn how to:
- Import and view the ultimate pit shell from a pit optimization program
- Load and view the orebody model, terrain model and other design data
- Create design strings, contours, berms, switchbacks and road definitions, manually and automatically
- Update a phase DTM with designed pit infrastructure
- Add an adaptive and fixed road, including box cut and embankments
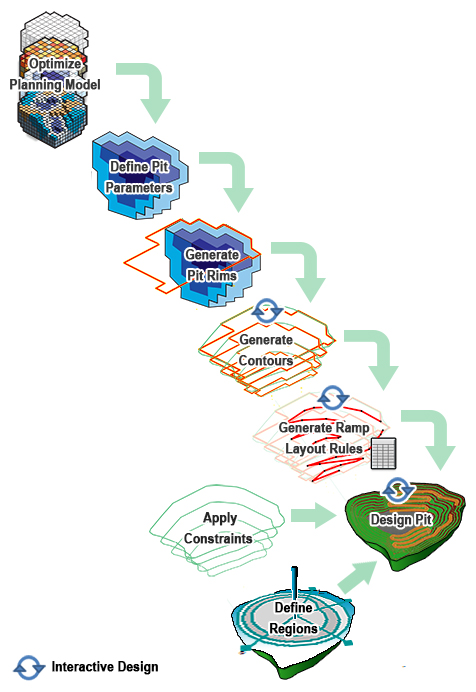
Generally, the pit design process in Studio OP follows the following logic:

Pit Optimization
Optimization of the planning model and pit rim generation are managed by external software. You would normally use a pit optimization program like NPV Scheduler to determine the economic limits to the pit design. NPV Scheduler comes with a comprehensive set of tutorials of its own.
If you do wish to generate your own ultimate pit shell with NPV Scheduler, just import the block model file _vb_mod1.dm from the "DmTutorials" database to your NPV Scheduler project directory and follow the procedure explained in the NPV Scheduler tutorial. To save you time, this has already been completed and the results of the optimization are contained in the following database files:
|
_vb_npvmod1 |
block model containing only
blocks lying within the ultimate pit with fields |
|
_vb_npvsurftr and _vb_npvsurfpt |
wireframe of the ultimate pit surface |
The Sample files listed can all be found in the C:\Database\DMTutorials\Data\VBOP\Datamine directory:
The pit optimization was generated using the following design parameters:
|
Face Angle |
60 degrees |
Rock Density |
2.5 t/m3 |
|
Road Width |
20 meters |
Mining Cost |
0.95 $/t |
|
Road Gradient |
1:10 (10%) |
Processing Cost |
3.63 $/t |
|
Berm Width |
8 meters |
Gold Price |
11.25 $/g |
|
Bench Height |
20 meters |
Copper Price |
2094 $/t |
|
Ultimate Pit Slope |
30 degrees |
|
|

The remaining items fall within the scope of Studio OP's automated pit design tools, and will be covered in this tutorial.
Throughout these exercises, you will access a wide range of editing commands.
Data is progressed throughout the tutorial so all exercises should be completed in order.
Copyright © Datamine Corporate Limited
JMN 20045_00_EN

