
Hole Sets
Your application makes it easy to create sets of holes so that you can choose a subset of holes to display in section, plan or 3D views.
The Holes tab of the workspace window, by default, displays two groups of holes: All holes and Active hole. Neither of these allows deletion of holes. Both All holes and Active hole can be used to create a set which can be edited such that only the holes of interest are present.
Creating Hole Sets
There are two main methods for creating a hole set, and the method you choose will probably depend upon your preferred way of working:
To create a hole set from the Format Overlays screen:
-
On the Manage ribbon (Plots, Logs, or Tables window displayed), select Format >> Overlays, then click the Hole Set tab.
-
Click New set... and the New Hole Set screen opens.
You have the choice of using the active hole, all the holes, the holes from a table or the holes from another set as the basis of the new hole set.
If you choose to create the hole set from a table, a screen listing all loaded tables will facilitate your selection.
Following this, a new set of holes will be added.
To create a hole set from the Holes control bar:
-
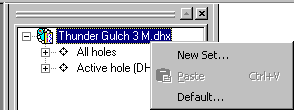
In the Holes control bar, select the top-level object and right-click it.
-
Select New Set... from the context menu.
As in Method 1, you will be asked to select which holes you wish to include in the set.
Following this, a new set of holes will be added to the tree.
Related topics and activities:
