
|
|
Example - Scheduling Calendar Setting up a production calendar for scheduling |

Setting up a Scheduling Calendar
The Calendars dialog is used to configure period settings for the project.
Periods are consecutive lengths of time in which scheduling can be performed. A label can be generated containing various pre-set variables such as week day, start time, etc. These label options are accessed within Period Format via the context menu and must be selected prior to generation.
In this exercise, you will define a calendar that is split into 16 periods; the first 8 periods will each represent a week and the following periods will represent a month.
A calendar's scheduling time periods will commonly extend as they stretch into the future; more detail is needed (e.g. daily or weekly planning) for the near future, whilst the details later on can be more 'strategic' and stretch over weeks or months.
Prerequisites
-
You have completed Scheduling Data Settings
Exercise: Setting up a scheduling calendar
- In the Scheduling Data Setup
dialog, expand the Calendars
menu on the left and click the subordinate Calendars item:
- The Periods panel is displayed, showing a predefined table of time periods. If any are shown, clear the existing calendar items by selecting Delete All (above the periods table on the right).
- The Start Date for the schedule is today's date and the Start Time is midnight - this is fine for this example.
- You are going to define the first 8 time periods
with a 1-week duration; in the Period
Length field, ensure the value is "1" and the
time unit is [Day(s)] e.g.:

- In the Number
of Periods field, enter "8" and click Generate.
The first 8 periods (each = 1 week in duration) are added to the
table below, e.g.:
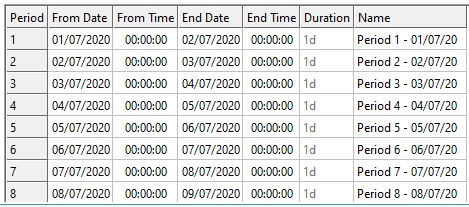
(Your dates will differ from those shown above). - The following 8 periods are 1 month in duration,
so change the Period Length
drop-down list value to [Month(s)] and click Generate
again. The list of time periods is appended, and now includes
16 items:
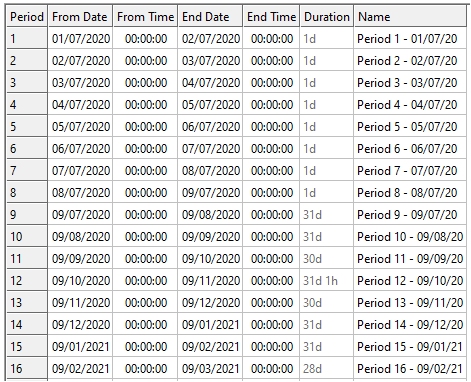
Note the Duration column: the first 8 periods are "1d" and the remainder represent a calendar month's duration in days. Duration is always expressed as days in this table. - Click Apply to update the time periods settings for your project.
Exercise: Defining a Maintenance Calendar
With the calendar set you will now define a maintenance calendar based on your period timings. Unlike the Mine calendar which applies to the whole site, Maintenance calendars can be applied to individual machines or trucks and cause a reduction in working capacity during the downtimes.
The Maintenance calendars can be populated manually or via copy and paste from an excel sheet with the same formatting as the calendar.
- Within the Calendars section right click on Maintenance and select Add.
- A New Calendar will be added, rename this by changing the Calendar Name to “Example Downtime”.
- by the right hand side ‘Non-standard days (Downtime)’ section click Add.
- The Define Time Period dialog will be shown. Within this enter the Date of Period 1 and the time as "00:00:00", to "05:00:00" then click OK.
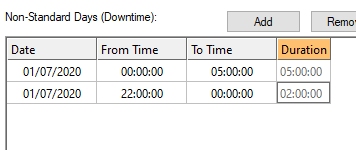
- A downtime of 5 hours will then be added to the list of downtimes. It is at this point that, if you have a list of timings to add in this format, you can paste them into this downtime grid. For now you will add one additional downtime for the same day between "22:00:00" and "00:00:00".
- Click Apply after adding
both downtime periods. The Downtime
list should look similar to the image below albeit with dates
matching the schedule periods you have picked:
Exercise: Defining a Product for scheduling
Now that you have a calendar, you are going to designate the CU attribute as a mineable product, and set a price for the 16 periods of the schedule.
You have to create a calendar beforehand in order to do this as an End Period must be specified for which the product price remains valid. With more complex schedules this allows you to specify a fluctuating product price over time.
- In the Scheduling Data Setup dialog return to the Data Settings | Field Treatments panel.
- Select the [CU] attribute in the left-hand list.
- To nominate CU as a product, select the Is Product check box. This will mark CU as a product to be included in profit for Auto Scheduler in a later exercise.
- Expand the Price Units drop-down list and select [Kg] - your price unit will be $ per kilogram.
- Use the drop down End Period list in the first row of the table and select the final period (16) from the list.
- Enter a price of "5.6". This denotes that the CU product price ($5.6 per kilogram) will be used for all 16 periods of the schedule.
- Click Apply to update the product specification for your scheduling project.