|
|
Generate a mining blocks reserves table |
Evaluate Mining Blocks
To access this dialog:
-
Activate the Reserves ribbon and select Mining Blocks | Evaluate
This task will only be enabled if:
- All pits in the project are supported by a block model, mining blocks and a topography.
This managed task, part of the Reserves workflow, is used to evaluate the mining blocks generated using either of the available methods (automatically or by defining outlines manually). The reserves table will contain the tonnes and grades, plus other attribute values, of the mining blocks and are used when scheduling. The model used for the evaluation is the one defined for the block’s pit in the Define Planning Model task.
This is one of two tabs available for the Evaluate task with the other being Report Settings, used to set up export of reserves data to Microsoft Excel®
Mining blocks must have been generated to run this task.
|
|
If no other overriding evaluation legend is specified, the legend you set up on the Evaluation panel will also be used to evaluate any automatically-design pit shells as part of the Auto Design task. This makes it really easy to adjust your pit shell design/road network and see the impact on evaluation results. |
The Evaluate Mining Block Solids Panel
The main part of the task is dedicated to a table showing, for each pit, the evaluation legend that is used to calculate reserves. Select a table row to enable that pit, and if you wish, edit the evaluation legend using standard legend management controls:

-
If a legend has already been defined for the current evaluation, and is associated with your project or a loaded .elg legend file, you can select it from this drop-down list.
-
Select the data column containing the values to be categorized into evaluation 'bins'
-
Generate a default range legend for the selected Column, or select it if it already exists
-
Launch the Legend Manager and define or edit a legend using a range of tools.
-
Show a preview of the legend in a small dialog on screen.
-
Specific to the Reserves Evaluation task, clicking Use Default will allow you to set the evaluation legend to the default for the selected model.
|
|
You will need to define an evaluation legend and parameters for all pits in your project before you can select Evaluate Blocks. |
The following options are also available on this panel:
- Add attributes from a file...:
you can select an external file that contains attribute(s) that
you wish to add to your reserves file(s). Data will be copied
to the reserves file providing a match between BLOCKID attributes
can be found. Use the browser to select a file and these attributes
will be added (if they do not already exist) the next time you
choose to Evaluate Blocks
(see below).
Any text that is displayed in red indicates that the path and file specified do not exist on the local system. If an invalid file/path is specified, it will be ignored when the contents of the Evaluate panel are next saved.
|
|
An external file must contain a BLOCKID attribute. |
- Fill the volumes outside....: once an evaluation legend has been defined (this option is disabled until then), you can enable this if you wish to manage the volumes that do not sit within the specified model boundaries (i.e. the volume(s) sit outside the model). Specify an attribute name that will be used to populate the data table with a volume, using the nominated default density (as set at the Define Planning Model stage).
- Evaluate Blocks: this
evaluates your mining blocks against the currently defined evaluation
legend, then creates a Datamine table (called "reserves")
in memory.
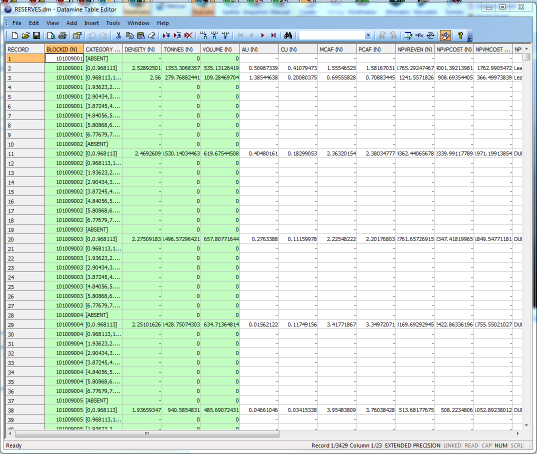
This option is only available if evaluation parameters have been defined for all pits listed at the top of the task panel. - Show Reserves: if a
reserves table has been generated, click this to display it in
Datamine's Table Editor,e.g.:

Studio OP and Evaluations
Evaluations are always performed using legends. The evaluation legend that is used to evaluate block reserves is defined on this panel. The default legend is created using the field that was mapped to Category in the Define Planning Models task.
|
|
The evaluation legend settings defined in the global Project Settings dialog is not used to generate a reserves table - the legend specified on this panel is used instead. Editing the global evaluation legend settings in Project Settings will have no effect on the reserves table generated as part of the Evaluate Blocks managed task. |
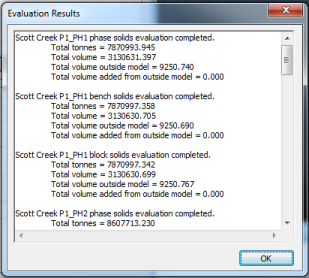
Once an evaluation is complete, you will be shown a short report detailing, for each phase, the following information:
- The total tonnes
- The total volume
- The total volume outside the model: the volume detected that falls outside the loaded block model hull/boundary
- The total volume added from outside the model - this is only
reported as a non-zero value if the
Fill the volumes..... option (see above) was selected before
evaluating reserves. In the following example, the option was
disabled:

This information is provided in dedicated blocks for your project's phase solids, strata solids (if any exist), bench solids and block solids (either manually or automatically generated).
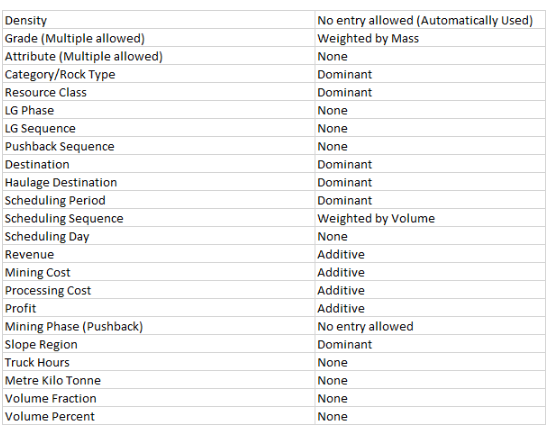
Fields - Evaluation Options
The table below describes, for each assigned field type, the possible evaluation options:

|
|
Related Topics |
|
|
Evaluation
Report Setting
Auto by Bench Auto All Manual Outlines Legends Manager DialogAuto Design Task |


