|
|
Defining one or more planning models for your project |
Define Planning Model

To access this task:
-
Activate the Setup ribbon and select Model | Define
Studio OP uses mine planning block models to evaluate the mining block reserves and assign the mining blocks with attributes such as rocktype, density and grade. This enables the blocks to be scheduled to meet planning targets. Planning models are added to a Studio OP database and assigned to pits using the Define Planning Models task.
A planning model is usually based on a reserve model and will have been created from a strategic planning exercise, for example, by using NPV Scheduler.
Multiple planning models can be defined and validated in a Studio OP project. They are then available to be assigned to pits.
Only one model can be assigned to each pit. The same model can be used for separate pits.
|
|
Models of the following formats can be specified using the Define Planning Model task:
|
Field Mapping
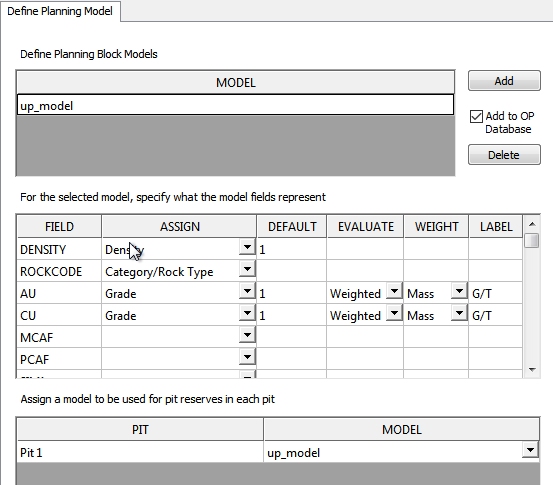
When a model has been added, when you select it in the list of models, Studio OP allows you to define the meaning of its fields. It uses this information to automatically carry out analysis and tasks where possible.
|
|
Where multiple models have been loaded, you can update the attributes list by selecting a model description in the list at the top of the screen. |
Models output from strategic planning products NPV Scheduler or Whittle will contain information that can be mapped. The field types that can be mapped are:
-
Density
-
Grade (Multiple allowed)
-
Metre Kilo Tonne
-
Optimised Phase*
-
Volume Fraction
-
Volume Percent
Field Assignments for Phase Definition
If you wish to use reserves data within the automatic design tools, you will need to make sure that the phase attribute within the input planning is assigned as either:
Either of these field assignments will allow you to generate an isosurface and pit contours (and resulting design) based on a model's phase attribute.
Where possible, this field will be automatically assigned. For example, If either PIT_NO or PSB_PIT exist in the same model, they will be assigned as the optimised phase attribute. If both are available, PIT_NO will be assigned.
You should make sure the phase attribute is assigned correctly as it influences the behavior of subsequent pit design and reserves calculation tasks. Without such a field assignment, it will not be possible to generate isosurfaces from the planning model and use them as a basis for contour/constraint string generation for use in automated pit design.
Field Assignment for Slope Region Zones
Studio OP's Slope Region task will permit slope regions to be defined according to a planning model attribute (regions can also be defined manually or by imported boundary strings).
If you would like to use a planning model attribute, it has to be defined as a [Slope Region] type.
The following field names and their types are recognized by default:
Apart from Grade, only one assignment is permitted. For example; if you have a model from Datamine's NPV Scheduler application, that has a SCH_SEQ and MAO_SEQ fields, only one can be assigned to be used as the sequence field.
The list above is in order of priority where the field names with highest priority appear further down the list.
|
|
Field assignments are listed in alphabetical order |
Weighted Evaluation Setup
Evaluation can be performed on Grade/Quality fields and be set to Additive, Weighted or Dominant. If a weighted field is used, the Weight column must be set to either Mass, Volume or another model field.
Optionally, you can apply addition field weighting by specifiying a second numeric attribute, using the Weight2 column. For example, you could weight evaluation results against mass and a fixed expansion factor.
Assigning models to pits
The bottom part of the task is where you assign a model to be used within each pit. Pits must have already been defined using the Manage Pits task.
- Specify a new model using Add, or remove an existing model from the project by selecting it, then using Delete.
- By default, the model file will be copied (from wherever it
currently exists) to the local project folder. You can choose
not to store the model in the local database by disabling the
Add to OP Database check
box. If disabled, the model will remain in its current LAN or
WAN location and no local copy will be made. Instead, a Datamine
"link file" is created in the local project folder instead
- this will automatically redirect to the remote location.
This is useful where a reserves model is shared by multiple business functions and needs to remain as the sole master copy, for instance. It has an additional benefit of not incurring a delay in copying large model files between locations.
The path length in a linked file is limited to 56 characters. Any local or network path that exceeds this limit will not be interpreted correctly. Mapping a network drive to the local system is recommended in this scenario as this can be used to reduce the length of the path that is required.
- Once a model has been defined, map the model fields to a particular description (e.g. does the field represent density, rock type, grade etc.)
- Assign a model to be used for pit reserve calculations, for each pit.

|
|
Related Topics |
|
|
The
Reserves Workflow
Pits - Manage Pits |
Copyright © Datamine Corporate Limited
JMN 20045_00_EN


