|
|
Creating a New Project Creating a new Studio 3 project file for the open pit design tutorial. |

Overview
In this part of the tutorial you are going to the create a new project, add files and then save the new project.
Prerequisites
-
Check that you have the tutorial data installed on your system. These are located (with a standard installation) under C:\Database\DMTutorials. This path should exist and contain two sub-folders; Data and Projects. These contain data and project files that will be used in the various exercises.
-
If you cannot locate these folders, please reinstall Studio OP. If this does not resolve the issue, please contact your Datamine support consultant.
-
Read through the pages under the tutorial heading "Principles".
Exercise: Creating and Saving a New Project
In this exercise, you are going to create a new Studio project "OPDesign1" , in a new folder C:\Database\MyTutorials\OPDesign, add the relevant data files and then finally save the project. This includes the following tasks:
-
Creating a tutorial folder and copying in files
-
Creating a new project
-
Checking and saving the project.
Creating a Tutorial Folder and Copying In Files
-
In Windows Explorer create the folder C:\Database\MyTutorials\OPDesign.
-
Browse to and open the folder C:\Database\DMTutorials\Data\VBOP\Datamine.
-
Copy these 5 files:
-
_vb_npvmod1.dm
-
_vb_npvssurfpt.dm
-
_vb_npvssurftr.dm
-
_vb_stopopt.dm
-
_vb_stopotr.dm
-
-
Paste the files into your new tutorial folder C:\Database\MyTutorials\OPDesign.
-
Browse to and open the folder C:\Database\DMTutorials\Data\VBOP\Datamine\OPM.
-
Copy all 39 files:
-
_vb_c_pit240.dm
-
_vb_c_pitcrest100.dm
-
_vb_c_pitcrestadj-20.dm
-
_vb_c_pitcrestadj100.dm
-
_vb_c_pitrampds.dm
-
_vb_c_pitrampout.dm
-
_vb_c_pitramptoe-40.dm
-
_vb_c_pitramptoe80.dm
-
_vb_c_toecons.dm
-
_vb_pitbase-40.dm
-
_vb_pitmod1.dm
-
_vb_q_pit-20.dm
-
_vb_q_pit-20adj.dm
-
_vb_q_pit.dm
-
_vb_q_pit100.dm
-
_vb_res_designpit1.dm
-
_vb_q_pit20.dm
-
_vb_q_pit80adj.dm
-
_vb_q_pit80adj2.dm
-
_vb_tr_pit0.dm
-
_vb_tr_pit0Crests.dm
-
_vb_tr_pit-20.dm
-
_vb_tr_pit200.dm
-
_vb_tr_pit220.dm
-
_vb_tr_pit260.dm
-
_vb_tr_pit260Crests.dm
-
_vb_trc_pit-20.dm
-
_vb_trc_pit.dm
-
_vb_trc_pit0.dm
-
_vb_trc_pit110.dm
-
_vb_trc_pit140.dm
-
_vb_trc_pit240.dm
-
_vb_trc_pit240pt.dm
-
_vb_trc_pit240tr.dm
-
_vb_trc_pit70.dm
-
_vb_trc_pit80.dm
-
_vb_trc_PitTopoInt.dm
-
_vb_trc_PitTopopt.dm
-
_vb_trc_PitTopotr.dm
-
-
Paste the files into your new tutorial folder C:\Database\MyTutorials\OPDesign.
-
Minimize the Explorer Window.
Creating a new Project
-
Start Studio OP using the desktop shortcut -or- Start | Datamine | Studio OP.
-
Use the Start page to select New Project.
-
If the Studio Project Wizard (Welcome ...) dialog is displayed, click Next.
")
The welcome dialog isn't shown if the Skip this page in future option was selected the last time a new project was created.
-
In the Studio Project Wizard (Project Properties) dialog:
- Ddefine the project Name as 'OPDesign1'
- Browse for the Location 'C:\Database\MyTutorials\OPDesign'
- Select the Automatically add files... option
- Click Project Settings...: -
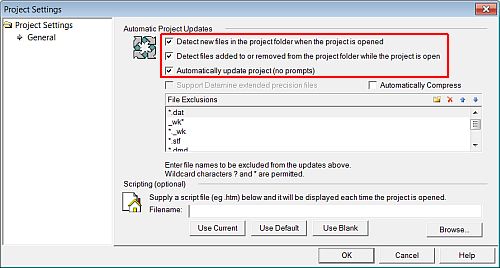
In the Project Settings dialog, Automatic Project Updates group, select the options shown below, click OK:
-
Back in the Studio Project Wizard (Project Properties) dialog, click Next.
-
In the Studio Project Wizard (Project Files) dialog, check that 42 files have been added automatically, click Next.
-
In the Studio Project Wizard (Your project is ready to create) dialog, click Finish.
Checking and Saving the Project
-
In the Project Files control bar, check that all of the files, selected in the previous sections, have been added to the project and that they are listed in one or more of the various data folders.
-
Save your project.
Copyright © Datamine Corporate Limited
JMN 20048_00_EN