
Create Model Prototype
To access this screen:
-
Model ribbon >> Create >> Auto Prototype.
-
Using the command line, enter "create-model-prototype"
-
Use the quick key combination "cmp"
-
Display the Find Command screen, locate create-model-prototype and click Run.
The Create Model Prototype screen is used to define, preview and generate rotated or non-rotated block model prototypes, using parameters, an existing file or selected objects.
Note: This screen uses the PROTOM Process.
Block Model Prototype Origin
The 'origin' of a model prototype is the lower, left-hand corner of the block model when viewed in a combination of plan view and west-east section in Studio's generic World Coordinate System.
-
When a non-rotated block model prototype is created and saved to file, the XMORIG, YMORIG and ZMORIG default attributes values are the same as those displayed in the X Origin, Y Origin and Z Origin fields.
-
When a rotated model prototype is created, the default values for the XMORIG, YMORIG and ZMORIG are set to zero, as this represents the block model origin in the rotated coordinate system.
The 'origin' and 'maximum' coordinate values are located at the corners of the block model parent cells, and not at the cell centers. Likewise, the 'length' values represent the distance to the corners of the respective X, Y or Z model edges. See Block Models.
Previewing a Prototype
You can preview your prototype either by dynamically updating a 3D view each time a setting is changed, or by manually updating the preview when you're happy all settings are defined.
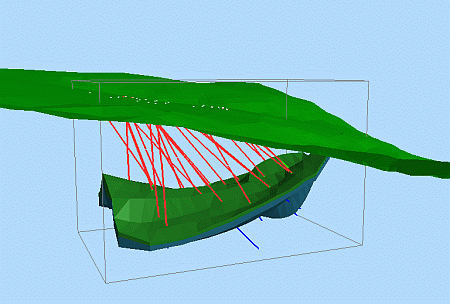
The limits of the block model prototype are shown as grey lines along each edge of the cuboid enclosing the block model prototype space. This should be viewed along with other relevant 3D data - for example, the wireframe models which will later be used to generate the block model(s). The aim of this is to make sure that the model prototype limits enclose the correct 3D space. In the example below, the preview lines are shown in grey along with drillhole and wireframe model data.
Note: the model prototype preview is temporary. It disappears when the Create Isoshells screen is dismissed. To preserve the prototype, an output Model prototype file name must be specified.
Define a Prototype Manually
You can define your prototype absolutely if you know the required dimensions, location and cell resolution.
-
Display the Create Model Prototype screen.
-
Define the parent cell size of your prototype using the X Size, Y Size and Z Size fields. All values must be above zero.
-
Define the origin on the model prototype (in world coordinates) using the X Origin, Y Origin and Z Origin fields. Values can be positive or negative. See Block Model Prototype Origin, above.
-
Specify the length of the prototype in each direction using X Maximum, Y Maximum and Z Maximum fields. Editing these values automatically adjusts the Cell Count (see below).
-
Optionally, set the Cell Count in each direction using the relevant Number of cells field. This automatically updates the associated Maximum field (see above).
-
If you are defining a Rotated model prototype:
-
Check Rotated model.
Note: this option is unchecked by default, but is automatically checked when either the Fit 2D rotated prototype or the Fit 3D rotated prototype options are selected - see below).
-
Using the Rotations table, define up to 3 axes and their associated rotation.
Positive rotation angles result in a clockwise rotation about an axis when viewed along an axis in the direction of the origin. The XYZ axes are those from Studio's generic World Coordinate System, where:
-
X axis is positive East.
-
Y axis is positive North.
-
Z axis is positive upwards.
Note: at least one axis and rotation angle must be defined. Angles can have a range of -360 to 360 degrees.
-
-
-
If you need one, define a Data margin to extend the model prototype beyond the extents of the selected loaded data objects. X, Y and Z margins are values above zero.
-
If Equal margins is checked, changing any axis value automatically updates the other two to the same value.
-
-
Specify your Output file name by defining a Model prototype name and location. You can use the Project Browser to update an existing project file or define a new name and location.
-
Assess your manual prototype using a Preview option:
-
Dynamic Preview—automatically display the generated block model prototype limits in the primary 3D window. The hull indicator updates after every parameter change.
-
Preview now—preview the block model prototype limits in the 3D window using the current parameters.
-
-
Optionally, check Save to permit the current settings to be Restored in a later model prototype creation session.
-
Click OK to generate a model prototype file using the specified parameters.
Note: the model prototype isn't automatically loaded.
Define a Prototype from Loaded Data
It may be useful to define a prototype based on the outer hull of other data, such as desurveyed drillholes, or an implicit wireframe model, for example.
-
Display the Create Model Prototype screen.
-
In the Set from Data section, you can:
-
Use an existing Model prototype as a basis for further editing. To do this, use the browse button to display the Project Browser and load any block model file.
Once a model prototype is chosen, click Copy existing prototype to update the prototype details (size, origin, length and so on) automatically.
Note: If copying from a rotated model prototype, Rotated model is automatically selected and the angles used in the prototype appear in the Rotations table.
Note: When an existing model (rotated or unrotated) is loaded, and a new origin is selected, the model origin snap to a new origin where the new blocks align with the previous unrotated or rotated model. This can be useful when you want to create a smaller model where the cells align (in X, Y, Z according to the XINC, YINC and ZINC attribute values).
-
Select one or more Loaded data objects. A prototype is then calculated based on the extents of all selected data. You can also use the pick button to choose a visible 3D data overlay to enable it in the list.
You can then:
-
Fit unrotated prototype to data—select this option when generating non-rotated prototypes. The Model Size and Cell Count parameters are updated using the combined extents of the selected object(s).
Note: If you select this option, the X/Y/Z Origin fields are automatically populated with values divisible by the current Cell size settings, as it can be difficult to work with origins that are not whole numbers and it’s easier to spot errors when your numbers are whole or aligned with your blocks.
-
Fit rotated prototype to data using angles—select this option when generating prototypes for rotated models defined by the angles specified in the Rotated model group.
Note: this option is unavailable if Rotated model is unchecked.
-
Fit 2D rotated prototype to data—select this option when generating prototypes for rotated models defined by one rotation in a single plane. The Model Size, Cell Count and Rotated Model parameters are updated using the combined extents of the selected object(s).
-
2D Plane—if Fit 2D rotated prototype to data is selected, choose one of the following plane options:
XY
Rotation is in the horizontal 'plan view' plane,
XZ
Rotation is in the horizontal vertical (West-East) plane,
YZ
Rotation is in the horizontal vertical (North-South) plane.
- Fit 3D rotated prototype to data—select this option when generating prototypes for rotated models defined by at least two rotations. The Model Size, Cell Count and Rotated Model parameters are updated using the combined extents of the selected object(s).
-
-
-
If you need one, define a Data margin to extend the model prototype beyond the extents of the selected loaded data objects. X, Y and Z margins are values above zero.
-
If Equal margins is checked, changing any axis value automatically updates the other two to the same value.
-
-
Specify your Output file name by defining a Model prototype name and location. You can use the Project Browser to update an existing project file or define a new name and location.
-
Assess your manual prototype using a Preview option:
-
Dynamic Preview—automatically display the generated block model prototype limits in the primary 3D window. The hull indicator updates after every parameter change.
-
Preview now—preview the block model prototype limits in the 3D window using the current parameters.
-
-
Optionally, check Save to permit the current settings to be Restored in a later model prototype creation session.
-
Click OK to generate a model prototype file using the specified parameters.
Note: the model prototype isn't automatically loaded.
Related topics and activities