
Advanced String Design
To display this screen:
-
Project Settings >> Points and Strings (check Show advanced digitizing controls).
-
Run the new-string or extend-string design commands.
If you are digitizing in Advanced mode with either the new-string or extend-string command, this screen lets you constrain the length, gradient, azimuth and azimuth change of subsequently digitized string segments.
Note: If Advanced mode is deactivated, both commands return to Freeform mode and no popup appears during digitizing.
If digitizing is constrained, edges adhere to the settings provided.
For example, to only permit azimuth changes of 45 degrees whilst drawing, use Angles Multiples of and check both Apply String Constraints and Azimuth. Similarly, ensure all new string segments are of a fixed Length, with the new segment pointing towards the new click positions by only enabling the Length constraint.
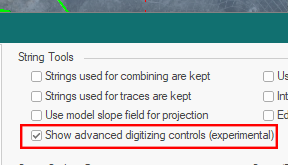
new-string and extend-string can run in an enhanced mode. By default, both commands behave as before, but there's a new project setting that allows advanced settings to be applied during digitizing to constrain the orientation of the next string segment you create. Located on the Points and Strings screen, check Show advanced digitizing controls to activate enhanced mode for new-string and extend-string:
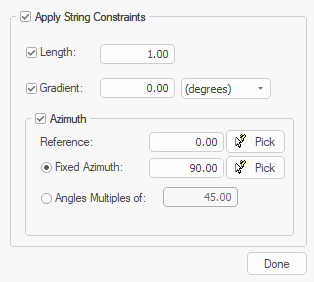
The next use of either command displays a popup allowing you to constrain the length, azimuth and gradient of the next string edge. For constrained angle changes, you can also ensure azimuth changes are made in fixed amounts from the previous string segment:
This can help to ensure operational and design constraints are honoured during digitizing, saving time later by editing and adjusting design data. Help files for both commands have been updated to explain how to use the new controls. You can also press F1 when the new popup displays during digitizing.
Tip: Reposition this screen so it doesn't obscure application or 3D window data. Next time you use it, the screen appears in the same place.
Note: Advanced string controls are ignored and not applied if you are using Auto Node or Rapid Digitize Mode for digitizing.
Snapping with Advanced Digitizing
If Advanced string controls are enabled, snapping can be affected. Where digitizing constraints (segment length, azimuth, azimuth change or gradient) are enforced, snapping will attempt to honour both these constraints and the objective of snapping. In most cases, the results will be ambiguous, so the following logic applies:
-
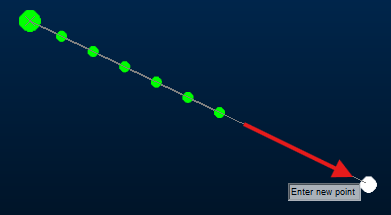
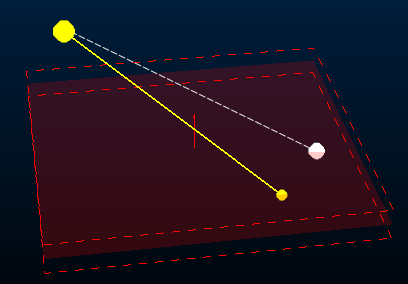
If (only) the Length of new string segments are constrained, snapping will determine the azimuth and gradient of the next string segment(s) but the length constraint is enforced. For example, in the image below, a string is extended multiple times by 15m intervals by snapping to the white dot (click any image to expand it):
-
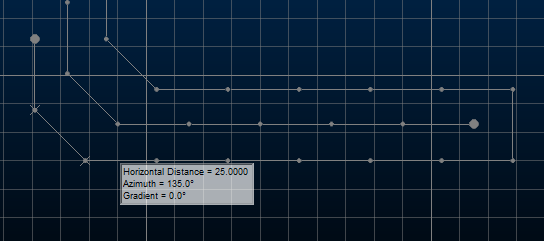
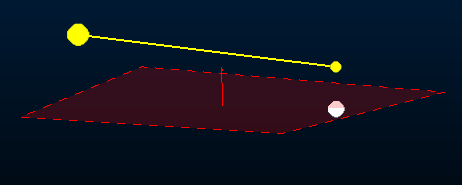
If (only) the Azimuth is specified, it is honoured but the distance between the latest string vertex and the snap point determines the segment length. The change in gradient (if any) between the latest string vertex and the snap point is honoured:
-
If (only) the Gradient is specified, the gradient is enforced. Azimuth and distance are determined by the snap position:
Where constraints are used, including in combination, these take precedence over selected snap positions. In a similar way, if you specify command line coordinates, and constraints are in effect, the coordinates are honoured only so far as they don't violate digitizing constraints.
Digitize a String
To digitize a new string, or extend an existing one, using advanced string design controls:
-
If you have any reference data you wish to use during digitizing (say, a drive reference string, sample station points, pit entry location and so on) load it and ensure it is visible in at least one 3D window.
-
Open the Project Settings screen, select the Points and Strings tab.
The Points and Strings settings screen displays.
-
If not already checked, check Show advanced digitising controls.
Note: As a project setting, you must save your project to preserve this digitising mode between project sessions.
-
Click OK and display a 3D window.
-
Run the new-string ("ns") or extend-string ("ext") command.
The Advanced String Design popup displays, either in the top left of the screen, or in its last used position.
-
Check Apply String Constraints. If unchecked, strings are digitized or extended in Freeform mode.
-
Define your string digitizing constraints:
-
Check Length and enter a distance. All subsequent string segments will be this length.
-
Check Gradient and define the gradient value and the convention used (degrees), (percent) or (ratio).
-
Chec Azimuth and set your Reference (baseline) azimuth by either entering a value (the convention selected above is used), or by Picking an existing string edge in the 3D window.
From here, you can either:
-
Choose a Fixed Azimuth (again, by setting manually or picking existing data). All subsequent segments follow this azimuth, meaning subsequent clicks typically extend the line in the same direction by adding multiple edges, or;
-
Choose Angles Multiples of to allow azimuth changes, but only by the specified amount.
-
-
-
Click (left or right to snap) in any 3D window to digitize new string segments.
-
Click Done to complete digitizing.
Related topics and activities