Evaluation Settings
To access this dialog:
This screen displays when string-based evaluation commands are launched, and captures the evaluation settings to be used in each case.
Depending on the command that is in use, a specific set of controls display. The table below describes the options available for each command. See further below for activity steps.
|
Near Projection Distance |
Far Projection Distance |
Default Density |
Mining Block ID |
|
|
- |
- |
Default Density |
Mining Block ID |
|
|
Near Projection Distance |
Far Projection Distance |
First BlockID Identifier |
BlockID Increment |
|
|
Near Projection Distance |
Far Projection Distance |
First BlockID Identifier |
BlockID Increment |
Note: you can evaluate against either model or drillhole data. This is set using the Project Settings screen (Mine Design >> Evaluation Control).
Activities
Evaluate using a single string
To evaluate a block model using a single outline string, projected to create an evaluation volume:
-
Digitize or load an open or closed string into any 3D window.
-
Load or create a block model or drillholes, at least some of which must be enclosed by the projection of the loaded string.
-
Run the command.
-
Select the evaluation string. Only one can be picked.
The Evaluation Properties screen displays.
Note: if an open string is selected, an evaluation area is assumed to be the closed equivalent of the selected string. That is, an area formed by adding a string edge from the last to the first vertex.
-
Define the Near Projection Distance and Far Projection Distance.
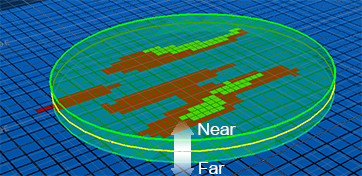
The near distance can be considered the distance towards the 3D 'camera' along the line of sight. Conversely, the far distance represents the distance 'away' from the current 3D viewpoint. Projections of this type always consider the current view direction, and these distances must be positive (although zero is accepted in either case).
A volume is then calculated by projecting the selected string in both directions. For example, in the image below, the yellow circle has identical near and far projection distances, and the cylindrical volume formed is used to evaluate the loaded block model:

-
The default First Mining Block ID value is either the current BLOCKID value of the string or 0.01 more than the last BLOCKID value entered. Change this if you like.
Note: it is advisable to restrict BLOCKID values to two decimal places.
-
Enter a Default Density. This is used if a DENSITY field does not exist in the input model or drillholes, or it exists and absent values are found. By default, this is 1.
Note: Default Density persists between static evaluation commands, but can be adjusted in any of them, if appropriate.
-
Click OK to display the Evaluation Results screen.
Evaluate using 2 Strings
To evaluate two selected strings, against either a block model or drillholes, produced by linking the selected to create a wireframe:
-
Digitize or load at least two open or closed strings into any 3D window.
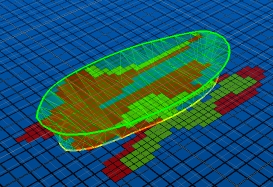
An evaluation volume is formed by linking the first and second strings, for example:

-
Load or create a block model or drillholes, at least some of which must be enclosed by the wireframe formed by enclosing the two evaluation strings.
-
Run the command.
-
Select the first evaluation string.
-
Select the second string.
Note: if either selected string is open, an evaluation area is assumed to be the closed equivalent of the selected string. That is, an area formed by adding a string edge from the last to the first vertex.
-
Enter a Default Density. This is used if a DENSITY field does not exist in the input model or drillholes, or it exists and absent values are found. By default, this is 1.
Note: Default Density persists between static evaluation commands, but can be adjusted in any of them, if appropriate.
-
Click OK to display the Evaluation Results screen.
Evaluate all loaded and visible strings
To evaluate model or drillhole data by projecting all visible strings perpendicularly to the current view plane:
-
Display the Project Settings: Mine Design screen and choose to evaluate against either drillhole or block model data.
-
Load one or more outline strings and display them in the primary 3D window.
-
Load or create a block model or drillholes, at least some of which must be enclosed by the wireframe formed by projecting the loaded strings.
This data must be visible before evaluation.
-
Run either the evaluate-all-strings or evaluate-all-strings-plane command.
The difference between the two command is evaluate-all-strings always projects string data using the current viewplane, whilst evaluate-all-strings-plane projects using the "mean plane" of the loaded string data. This can be useful if there is an obvious planar trend indicated by the evaluation outlines.
-
Define the Near Projection Distance and Far Projection Distance.
The near distance can be considered the distance towards the 3D 'camera' along the line of sight. Conversely, the far distance represents the distance 'away' from the current 3D viewpoint. Projections of this type always consider the current view direction, and these distances must be positive (although zero is accepted in either case).
A volume is then calculated by projecting all loaded strings in both directions. For example, representing one of the loaded strings, the yellow circle below has identical near and far projection distances, and the cylindrical volume formed is used to evaluate the loaded block model:

All loaded strings are projected in this way, forming potentially multiple volumes.
-
The default First Mining Block ID value is either the current BLOCKID value of the string or 0.01 more than the last BLOCKID value entered. Change this if you like. The BLOCKID values assigned to each evaluation block is incremental. This is the initial value, which will be increased by the BlockID Increment (see below) for subsequent blocks.
For example, if three evaluations are formed from three separate evaluation strings, and the First Mining Block ID is "0.01", if the Block ID Increment is "0.01" the 2nd and 3rd blocks will have a BLOCKID of "1.02" and "1.03" respectively.
Note: it is advisable to restrict BLOCKID values to two decimal places.
-
Enter the Block ID Increment. This is the amount the BLOCKID value increases in the results table for each distinct volume formed by projection.
-
Enter a Default Density. This is used if a DENSITY field does not exist in the input model or drillholes, or it exists and absent values are found. By default, this is 1.
Note: Default Density persists between static evaluation commands, but can be adjusted in any of them, if appropriate.
-
Click OK to display the Evaluation Results screen.
Related topics and activities:

