
|
|
Stereo Mode Stereo view mode |

Stereo Mode
To enter this mode, use the following method:
-
First, define the required 3D stereo settings using the Home ribbon'sProject | Optionsdialog. More...
-
Select the View ribbon, and then Projection | Stereo.
Introduction
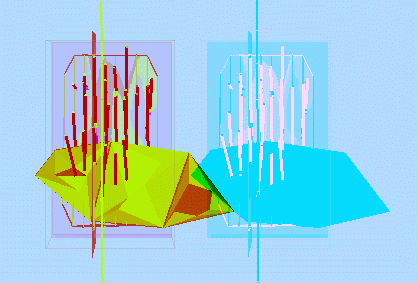
Stereo Mode is used to view and navigate through data in a stereographic view.
")
|
Use stereo mode for:
|

Setting up a Typical Dual-output Graphics Card and Defining 3D Stereo Settings
The following notes refer to the method for use with graphics adapters which have two outputs. Although NVidia cards are used as an example here, any modern graphics card which supports a 'stretched' desktop over 2 monitors will work. Other manufacturers include Matrox, and ATI (although the necessary 'stretched' desktop support is limited to Windows 2000 in the ATI drivers ). Please note that an 'expanded' desktop, as set by the General option "expand my desktop to this monitor' will not work, only the 'stretched' or 'spanning' option provided by the graphics card own drivers. You will also need two (preferably identical) projectors set up one above the other on an adjustable stand, a pair of polarizing filters, 3D polarizing glasses and a polarization-preserving projection screen (often called a silver screen for front projection)..
Graphics Card Settings:
-
With the normal monitor connected, right click on the desktop and choose Properties.
-
In the Display Properties dialog, select the Settings tab.
-
Set the screen resolution suitable for your projectors, click the Advanced button then choose the Monitor tab and set the Refresh Rate to a value supported by your projectors.
-
Connect both projectors to the video card - you may need a DVI - VGA adapter for the second output socket.
-
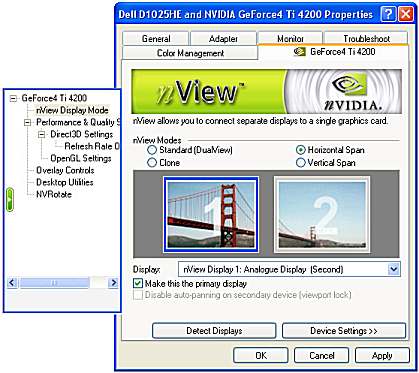
Choose the GeForce tab and expand the side menu if necessary. Click on the nView Display Mode to show the following panel:
-
Choose Horizontal Span and click OK. You will be informed that your desktop has been re-configured and asked if you want to keep these settings. Press <Enter> to accept them as the projectors may take some time to re-set and the settings might revert to their original state before you are able to confirm. Check that the Start Bar is now displayed across the full width of both displays (although the desktop will now be split across the two projectors).
-
Using the normal desktop with both projectors and the stereo glasses can be quite confusing, as you see a double image overlapping the left hand side and the right hand side of the desktop. In most cases, choosing a desktop Screen Resolution equal to a single monitor resolution (e.g 1024x78 rather than 2048x768) will temporarily mute the display on one of the projectors, making it a lot easier to use the desktop in a stereo set-up. With the appropriate settings chosen, InTouch will automatically re-enable the second projector when its needed for stereo mode, and the mute it again afterwards.
Stereo Settings:
-
.
-
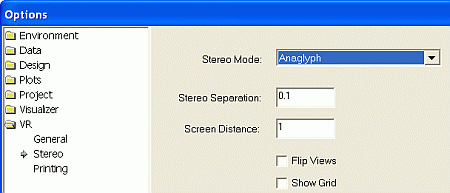
In the Options dialog, select the settings shown below, then click OK:
-
Place the polarizing filters in front of the projector lenses. One of the filters should be rotated so that its polarization axis is at 90 degrees to the other. The easiest way to check this is to overlap the two filters before mounting both in the stand; rotate one filter against the other until it blocks all light - this is now at 90 degrees. You should also ensure that the filter polarization axis matches those in the glasses (usually at 45 degrees to the horizontal). Overlap one of the lenses of the glasses over the projection filters - one should look black and the other transparent. If necessary, rotate the filters to align with the glasses and then remount in the stand. Align the two projectors, so that their images overlap as closely as possible. It may be necessary to reposition them on their stand, change the pitch and roll of the stand, and the zoom on either projector to get them close. The overlap does not necessarily have to exact (you won't notice the error when wearing the 3D glasses), but try to get them as close as possible (especially vertically).
-
Press <F11> to change to Fullscreen mode. You should now have a stereo image when viewed through the polaroid glasses (you may have to wait for a moment while both projectors adjust to the new image). If the image is not in stereo, try using the glasses inverted - you may have the polarizing filters in the opposite orientation to that required by the glasses and if so, simply use the Tools | Options menu above and check the Flip Views option and this should be fixed.
-
To get the best stereo image, you may need to adjust the Stereo Separation and to do this while viewing the stereo image press the <CTRL> key plus / or * on your numeric keypad. Repeated use of these keys will gradually increase or decrease the stereo separation. You may also wish to adjust the Screen Distance to change the distance that the stereo image appears behind the screen; for this adjustment use the <CTRL> key plus + or - on your numeric keypad.
-
The Screen Distance can be controlled using the mouse (if the mouse has a middle button or a wheel). The user presses and holds down the <Shift> key and presses the middle mouse button (or the wheel). This activates the LookAt Mode and the Screen Distance is automatically updated.
-
The following list is a summary of hotkeys which can be used and which are essential for using the system in Fullscreen stereo mode:
Key
Action
<Shift> + <F>
Floating viewpoint
<Shift> + <N>
Next Viewpoint
<Shift> + <P>
Play Simulation
<Shift> + <S>
Stop Simulation
<Shift> + <I>
Inside View
<Shift> + <O>
Outside View
<Shift> + <C>
Control Current Object
(<Shift> + <Z>)
Zoom Plan
(<Shift> + <Y>)
Zoom looking North
(<Shift> + <X>)
Zoom looking East
<Shift> + <L>
Level Viewpoint
<Shift> + <A>
Look At Mode (click the cursor over the object to look at)
<Shift> + <?>
Toggles Information Mode
F11
Toggle Fullscreen/Window mode
'<' and '>'
Move to the next and previous defined views
<Ctrl> + '/'
Reduce Offset and Separation *
<Ctrl> + '*'
Increase Offset and Separation *
<Ctrl> + '-'
Increase Screen Distance *
<Ctrl> + '+'
Decrease Screen Distance *
<Ctrl> + '.'
Toggle view flip *
<Ctrl> + Wheel click
Adjust the stereo parameters so that the new LookAt point appears at the real screen distance away from the user.
View Navigation Controls
The view navigation controls available in Stereo Mode are not unique, but depend on the other selected view modes e.g. Floating viewpoint.
Enhanced Look At Mode
Continually varying the view and navigation settings can be cumbersome but Enhanced Look At Mode. can be used to perform many of these functions.
This mode is an extension of the normal Look At mode, and initiated in the same way (<Shift> + <A>). When selecting the point of interest, holding <Ctrl> will indicate that the stereo settings should be optimised for the point being selected. This will automatically change the stereo settings to make the selected point appear as though it were floating exactly level with the display screen, which is the optimal depth for stereoscopic viewing.
While Look At mode remains enabled, the stereo parameters will be constantly modified to ensure the object looks its best, no matter how close or distant the virtual viewer may be. When Look At mode is exited, the stereo parameters will remain fixed relative to the viewer, rather than the previously selected point. If the stereo effect is too strong at any point, the Stereo Separation hotkeys (<Ctrl>+ </>) should be used to bring the stereo pair closer together until it is comfortable to view the image. The precise value will vary according to hardware installation, but once initially set, it should rarely require changing.
Run through the following exercise to get a better understanding of Enhanced Look At mode:
-
Point the view direction towards your data (e.g. an open pit wireframe).
-
Use enhanced Look At to select a point on the object.
-
Fly towards the shape – the stereo will be automatically adjusted so that the selected point looks good throughout the approach.
-
When close to the object, toggle Look At mode off.
-
Fly backwards away from the object (but still looking at it). The object will appear to move behind the screen, but will start to look ‘flat’.
-
When you are a reasonable distance from the object, use Enhanced Look At mode to select a point on the object. The object will stay the same size on the screen, but should look a lot more ‘3D’.
-
Toggle Look At mode off.
-
Fly towards the object. It will appear to come out of the screen, but very rapidly become difficult to see properly.
-
When this happens use Enhanced Look At mode to correct the view.
You need to aim with one eye when selecting an object with the cursor (e.g. for enhanced Look At mode). If you find you have trouble selecting, try the other eye.
When doing a stereo presentation, try moving around by selecting different features using enhanced Look At (you can also spin around them in this mode). To free-fly, use enhanced Look At mode to select a nearby surface, then fly close to it, and deselect the Look At mode. As you fly around, any objects further away that the previous surface was, will appear behind the screen and any which are closer will appear in front. Try to avoid any objects which will be too close, as these can be difficult to see.