|
|
Studio UG Tutorial - Naming Conventions Specifying how schedule activities will be named |
Underground Planning Tutorial - Naming Conventions
Naming Conventions are used to modify the attributes, properties and names associated with project data; this enables Studio UG to be tailored to the individual requirements of your projects. Conventions are comprised of a filter to define the scope of data over which the convention will be applied (e.g. all FXS data, derived activities, wireframes etc.) and the naming convention itself.
These filters reference attributes which will be present in your design data.
The convention is the specification of the string used to name the activity that is generated from the filtered design data.
In this section, you'll set up four naming conventions; two will be applied to distinct groups of fixed cross-sectional data (for this tutorial, the filter that differentiates which FXS data gets which convention is determined by the DESC field of each of the specified string files), one for wireframe activities and one for derived activities.
- Set up your attributes.
- Define your convention which references those attributes.
- Define the filter to be used to isolate the data to which your convention applies.
- Complete the assignment by linking the filter to the convention.
This is achieved using the Settings panel, and tools found in the Naming Convention Assignments group.
Your project requires three naming conventions. Two require custom filters to define the scope of data to which they will be applied. The other one is applied using system filters (the same convention is assigned to two groups of data (derived activities and wireframe data) using two separate filters.
All four conventions are defined using a similar process and the general principles described here apply to all naming convention scenarios.
Prerequisites
-
You have completed the previous section (Design Files).
Exercises in this section
This section contains the following exercises:
- Naming Convention Attributes Setup
- Naming Convention Setup
- Naming Convention Filters Setup
- Complete Naming Conventions Assignment
Exercise 1: Naming Convention Attributes Setup
Before you define a naming convention, you need to define the attribute(s) that will be referenced within it. In this detailed example, the convention will be used to label activities with the structure type (e.g. "decline"), level elevation (e.g. "840") and the region in which the activity exists (e.g. "INFR").
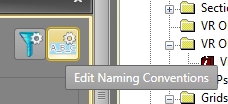
Attributes are set up using the Edit Attributes panel, which can be accessed from the Edit Naming Conventions panel (it can be accessed from various parts of your planning system).
- In the Naming
Convention Assignments panel, click Edit
Naming Conventions:
- In the Edit
Naming Conventions panel, click "+" on the left
to add a new convention to the (empty) list:
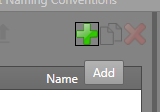
- "NewNamingConvention" is added to
the list, and a table appears on the right (ignore the warning
for now):

- Double-click the default description and edit it to read "INFR" - this convention will be used to denote a particular region of the mine.
- This convention will be used to set up an activity
name of the following format:
[Structure type]_[Region Description]
An example activity name could be "Cubby_EAST". Two attributes are needed to define this convention (DESC and REGION respectively), and they don't exist in the Studio UG database yet.
You need to define them. Click Edit Attributes to open the Edit Attributes panel:
- The only attributes listed are system attributes
required by Studio UG.
These are locked and not editable. Defining attributes can either
be done manually, or by extracting them from a Datamine file,
which can often save time.
The tutorial data already includes the attributes and data definitions that you need, so in this case, you can generate them. Click Generate.
- The file fxs_decline.dm contains attributes you will need for your convention, so select it in the browser and click Open.
- In the Field Selector dialog, select all of the Use check boxes (not all attributes will be used for naming convention purposes - it's just easier to define them all for later exercises now).
- Click OK.
- Your attributes are now transferred to the
Attributes panel, and
are defined for your project.
Click OK in the Attributes panel to return to the Naming Conventions panel and continue defining your first convention.
Exercise 2: Naming Convention Setup
Now that you have defined the attributes you wish to use in your naming convention assignments, you can start to define the actual convention used to construct an activity name.
- In the Edit
Naming Conventions panel, edit the contents of the table
on the right so they read:
Type: Attribute
Text: (not editable for the selected Type - blank)
Attribute: DESC (this is the attribute that will be used to define the design types later on)
From Index: 1
To Index: 8
Padding Type: Right
Character:_ (underscore)
This defines the first element of the "INFR" naming convention; a string, 8 characters long based on the DESC field value of the FXS design data, followed by an underscore. - The second element of the naming convention
for "INFR" is a reference to the region of the mine
to which the activity relates. In this case, the REGION field
contains this information.
Click the "+" sign above the table on the right and add the following information to the table:
Type: Attribute
Text: (not editable for the selected Type - blank)
Attribute: REGION
From Index: 1
To Index: 4
Padding Type: None
Character:(blank)
Your table now looks like this and is complete for the INFR naming convention.
- Two more conventions are needed for your project; one to name activities relating to stoping and the other to reference development activities.
- Add a new convention using the "+" icon on the left of the panel. Rename this convention to "Development".
- Use the tools on the right to set the table
up for "Development" like this:

This sets up convention in this format: [Structure Type]_[Level number]_[Region Description]
An example activity name could be "Cubby_200_EAST" - Similarly, create another convention called
"Stopes" and set it up like this:
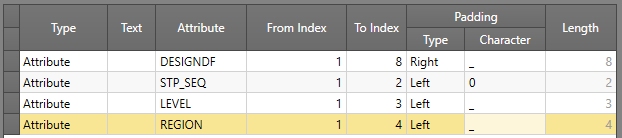
Stope activity names are set up for this project in the following format: [Design Definition Type]_0[Stope Sequence Number]_[Level number]_[Region Description]
An example activity name could be "DECLINE_0144_200_EAST" - Click OK to return to the Setup panel.
Exercise 3: Naming Convention Filters Setup
You also need to specify the scope of data to which your naming
convention will apply. This is done using a Filter.
A Filter is a one or multi-component
rule that describes a subset of your design data.
Your first filter will be used to define a naming convention that will
be applied to a specific set of structures, each of which needs to
be easily identifiable in the resulting schedule.
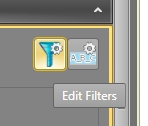
- To get started, click Edit
Filters:
- The Edit Filters
panel is used to define the name and rules for your filter. Select
the green "+" icon on the left to add a [NewFilter]
item to menu list below (the list already contains some default
filters - these are always present and not editable):
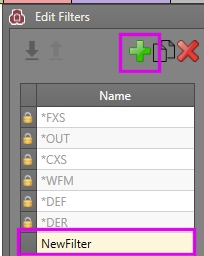
- Double-click the [NewFilter] field and enter the description "FXS_NAMING1". This will be the convention that applies to the first set of activities relating to your fixed cross sectional data.
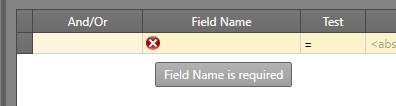
- On the right of the panel, a warning has appeared
in the Field Name cell.
This is because you haven't defined an attribute that will used
to filter your design data:
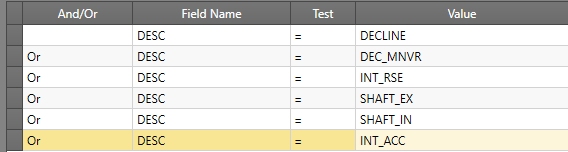
- You're going to set up a filter so that
only design data that has specific values for the DESC
attribute will be subject to a particular naming convention (which
you'll finalize shortly).
The first FXS naming convention will be used where the DESC value for the design data matches any of the following values:
DECLINE
DEC_MNVR
INT_RSE
SHAFT_EX
SHAFT_IN
INT_ACC
For now set up the first row of the table so that it matches the image below:
- Click "+" to add another condition to the filter. This will be an "OR" condition, meaning data will pass the filter if it matches the definition, regardless of other filter elements.
- Importantly, change the [And] to read [Or],
then populate the second row like this:

- Complete the filter expression for the "FXS_NAMING1"
convention by adding the following filter elements:
That's the first filter complete; it defines a group of structures within the project that will carry a specific naming convention (in this case, it will be the "INFR" convention you defined earlier). - The remaining filters for your project can
be loaded from an XML file downloaded earlier.
One more naming convention filter is needed, but others are needed for dependency configuration later.
To import filter information, click Import in the top right corner of the panel:
- Navigate to and open the file "Filters.xml" that is found in the "XML" sub-folder of your current directory.
- All remaining filters and definitions are
added to the Edit Filters
panel.
Have a look at them to get an idea of how they are constructed (particularly "FXS_NAMING2") then click OK to close the Edit Filters panel.
Exercise 4: Complete Naming Conventions Assignment
Assigning a convention requires a Filter
and a Naming Convention to
be defined. You've already done this for your project, so the final
step is to associate the two elements.
- In the Setup panel (Naming Convention Assignments group), click the associated "+" icon.
- Edit the Filter name by selecting [FXS_NAMING1] from the drop-down list.
- In the Naming Convention
cell, select [INFR]
This naming convention will be applied to all infrastructure activities throughout the mine, and will use the "INFR" convention you set up manually in a previous exercise. - For the second convention assignment, click "+" and define [FXS_NAMING2] (a filter imported from XML earlier) and the [Development] Naming Convention.
- The last two conventions use the same convention ("Stopes"): assign the [*WFM] system filter to the [Stopes] Naming Convention.
- Finally, assign the [*DER] Filter
to the same [Stopes] Naming
Convention (you want to use it for both wireframe and derived
activities).
Your table should look like this: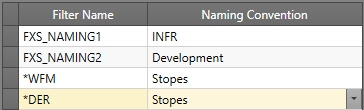
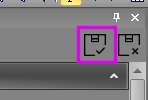
- Save your planning settings using the Save
button at the top of the panel:
Your naming conventions are now set up for your project. In the next exercise you'll set up your block model and its interrogation rules.
