
Highlighting 3D Data
In the 3D view, the highlighting principle remains the same as in the other graphics: once samples are selected, they are consistently highlighted across all graphics using a contrasting colour. However, the 3D environment provides additional, more advanced selection modes accessible from the 3D toolbar.
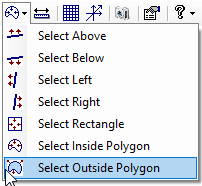
- Select Above / Below / Left / Right: Select samples on one side of a line.
- Press and hold the left mouse button, then move the cursor to draw a line.
- Click again to finalise the line.
- Samples located above, below, left, or right of the line segment are highlighted depending on the chosen mode.
- Select Rectangle: Select samples within a rectangular area.
- Press and hold the left mouse button, then drag to draw a rectangle.
- Click again to finalise the rectangle.
- All samples inside the rectangle are highlighted.
- Select Inside / Outside Polygon: Select samples based on a custom polygon shape.
- Click once in the 3D view to begin drawing the polygon.
- Move the cursor to add vertices.
- Click again to close the polygon.
- Depending on the chosen mode, samples inside or outside the polygon are highlighted.
These different modes are compatible with the following shortcuts:
- SHIFT: Add the selected samples to the current selection.
- CTRL: Toggle the selection status of the selected samples.
- If a sample was already selected, it is removed from the current selection.
- If a sample was not selected, it is added to the current selection.