
Using the clipboard
The Windows clipboard is used as an intermediate store which can hold either text or binary information.
Data stored in the clipboard can be pasted into other parts of the same or another program. The binary information is proprietary to DTS and can only be used inside DTS. Text information can be used by any other program that deals with text data (such as Microsoft Excel or Notepad, for example).
DTS supports the clipboard in the following ways:
| View | Type | Description |
| Task table Crosstab table Resource bar chart table |
Text | 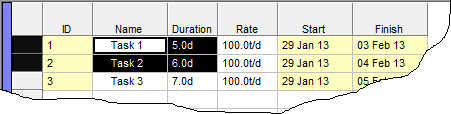
To select text data from any table in DTS, click on the cell at the top-left corner of the range you wish to copy, then keep the mouse button pressed and drag to the bottom-right corner of the range you wish to copy. In this example it would have been the cell with the text "Task 1" (top-left) and the cell with the text "6.0d" (bottom-right). This highlights the range that is copied. To complete the copy process, select Copy or Copy (Text) With Header from either the Edit menu or from the pop-up menu that appears when you right-click on the selected range. Note: The black highlighted blocks on the left-hand side of the screen are simply an additional guide when selecting ranges towards the right-hand side of the screen. |
| Task table Crosstab table Resource bar chart table |
Text | 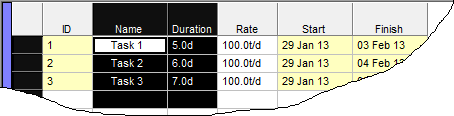
To select entire columns of text data from any table in DTS, click on the left-hand column of the range you wish to copy, then keep the mouse button pressed and drag to the right-hand column of the range you wish to copy. In this example it would have been the column "Name" and the column "Duration". This highlights the range that is copied. To complete the copy process, select Copy or Copy (Text) With Header from either the Edit menu or from the pop-up menu that appears when you right-click on the selected range. Note: The black highlighted blocks on the left-hand side of the screen are simply an additional guide when selecting ranges towards the right-hand side of the screen. |
| Task spreadsheet Crosstab table Resource bar chart table |
Text & Binary | 
To select entire rows in any table in DTS, click on the top row-selector (grey box on the left-hand side of the table) of the range you wish to copy, then keep the mouse button pressed and drag to the bottom row selector of the range you wish to copy. In this example it would have been the rows 2 and 3. This highlights the range that is copied. To complete the copy process, select Copy or Copy (Text) With Header from either the Editribbon or from the pop-up menu that appears when you right-click on the selected range. In this example, 2 things have happened; DTS has copied the text of the selection into the clipboard, and also copied the entire tasks with IDs 2 and 3 to the clipboard (this includes all task data including all fields that are not displayed in the table). At this point, the clipboard has 2 sets of data (one text, one binary). When pasting this data back into DTS, the binary format will take precedence. When pasting this data into other applications, the text format is used (by the relevant program), since other programs do not know what to do with the binary data. |
| Bar chart | Text |
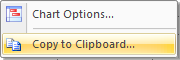
When you right-click on the bar chart view, the above menu is displayed. Select Copy to Clipboard to start the process of copying the bar chart Crosstab values to the clipboard. The Copy to Clipboard form is displayed, which is discussed in more detail below this table.
|
| Crosstab view | Text |

When you right-click on the Crosstab view, the above menu is displayed. Select Copy to Clipboard to start the process of copying the Crosstab values to the clipboard. A form is displayed on which you can set the start and end dates of the range of values you wish to copy. To copy the Crosstab values for the entire project, leave these date fields empty. To change the Crosstab layout, select a different time scale and/or select a different layout from the Crosstab Options form. |
| Grids in forms | Text | 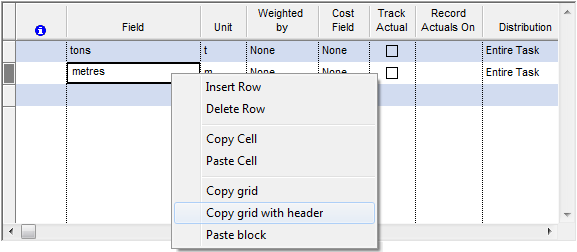
Right-click the mouse when the cursor is over any grid on any form to display the above pop-up menu. Choosing Copy Cell will copy the contents of a single cell to the clipboard. Choosing Copy grid or Copy grid with header will copy the entire grid contents to the clipboard. |
| Any control in a form | Text | Right-click on any edit control on any form, then select Copy to copy the highlighted text to the clipboard. |
Copy to Clipboard Screen
The Copy to clipboard screen is displayed when exporting the bar chart Crosstab to the
clipboard (as mentioned above).
This screen is divided in three sections:
- Data format
- Task table
- Range
The following table describes the fields on this screen.
-
Data format
Select the format in which you want to copy the data.
- As on Screen (tasks vs. date) – Copy data in the same format as the basic Copy to Clipboard option, but allows for the other selection options to be incorporated.
- Transposed (date vs. properties) – This option performs data alterations and transposes the data before copying it to the clipboard. Each date bin that contains data for a task is exported as a separate row in the clipboard.
-
Task table
Select the columns from the Task Table that are going to be copied to the clipboard.
- All columns – Copy all columns currently defined in the Task Table as well as the Date field.
- Visible columns – Copy only those columns that can be seen as well as the Date field.
- Required columns – Copy only the Date and the ID columns.
-
Range
Select the activities that are going to be copied to the clipboard.
- All data – Copy all Activities regardless of the current filter.
- Filtered data – Copy all Activities in the current filter.
- Selected data – Copy only those Activities that are currently selected.
- From date / To date – If you enter a From or a To date, then all activities that fall within the date range are exported.
-
Export – Copy the data to the clipboard.
Note: When copying numbers to the clipboard, depending on a project setting, numbers is copied to the clipboard formatted as on the screen, or unformatted (i.e. with all decimal places displayed). See Advanced Project Settings for more information.
Related topics and activities