Items List
The 3D Viewer is organized into items. Each item contains one Isatis.neo object: either
-
 Points,
-
 Boreholes: Contains the 3D boreholes. Click on
  to expand the content of the boreholes (if not expanded) and access to:
-
 Tops: Contains the boreholes tops,
-
 Labels: Contains the boreholes labels,
-
 Samples: Contains the boreholes samples,
-
 Markers: Contains the boreholes markers,
-
 Logs: Contains the boreholes logs,
-
 Trajectories: Contains the boreholes trajectories.
-
-
 Surfaces: defining a constant or a variable as elevation on a 2D grid.
-
 3D Grid,
-
 3D Sub-blocks,
-
 Polygons,
-
 Meshes: Contains the display of facets associated to the mesh.
-
 Vectors: To display rotations,
-
 Sections: To display a saved plane or fence.
You can choose to display or not an item by ticking or not the corresponding box. If several items are selected, the activation/deactivation will be applied to all the selected items.
Each item has its own properties which can be activated or deactivated.
All items can be selected using Ctrl+A.
Note: Use the ![]() and
and ![]() signs to expand / shrink the layer tree to display / mask the related content.
signs to expand / shrink the layer tree to display / mask the related content.
Several actions can be performed on the item.
-
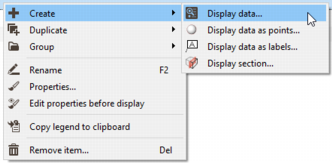
 Click Create to add a new item and:
-
 Display data to add and define a new item.
-
 Display data as points to add and define a new points item.
-
 Display data as labels to add and define a new labels item.
-
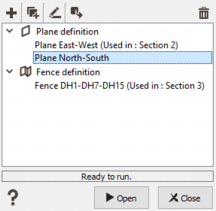
 Display section to add a new plane/fence item. From this panel you can import, copy, rename, export or delete sections. Planes/fences have to be previously stored from a 3D view to be reachable from the dialog window.
-
 Click Import section to pop up the Import section task and import a section definition contained in an xml file.
-
 Click Duplicate to copy the selected section.
-
 Click Rename and enter the new name for the selected section.
-
 Click Export section to pop up the Export section task and export the selected section in an xml file.
-
 Click Delete to definitely remove the selected section(s) from the project.
-
The display will use the default properties defined in the Setting up Preferences. Note that to add an item in the list, you simply need to select it in the Data tab and to drag and drop it in a 3D scene.
-
-
 Click Duplicate / Duplicate item to directly duplicate the selected item with same properties (same point size, same shape, same color (variable), labels active or not...). A new item xxx 2 will be created.
-
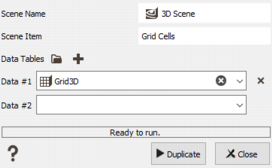
 Click Duplicate / Duplicate item for data table(s) to duplicate the selected item but the variable which will be used for the properties can be defined on another data table. When selecting this action, a popup window will present the list of compatible data table(s) to copy to. Select the one(s) you want to base the definition of properties on. The name of the new item will use the new dataset name and if the variables defined for color, size, ... properties exist, they will be automatically selected in the properties of the new item.
 -
For a better organization of the different displayed items, you can group them under a same group (i.e. folder), if you want to group together all your wireframes or to group your estimation results by domain for example.
-
 Click Group / Group items to create a folder which groups together the selected items. The group name is directly editable. By default, it is named "Group" but if the selected items have the same suffix, this one is used for the default name. An item can also be added to an existing group by a simple drag-and-drop.
 -
 Click Group / Explode items to move the selected items (or all the items if you directly select a group) to the first level (outside from the group). If after this operation a group is empty, it will be removed from the list.
Note: The item order impacts the display rendering. A priority is given to the topmost items through the automatic definition of a "depth offset". This offset avoids a flickering effect of two superimposed items by creating an ordering between them.
-
-
 Click Rename (or press F2) and enter the new name for the selected group / item.
-
 Click Properties to pop up the Properties Window from where you can edit the properties of the item. You may also pop up each graphic object properties dialog box by double-clicking it in the items list.
-
 Click Edit properties before display (press Shift when drag and dropping) to activate the creation mode of deactivated items with the Properties ready to be customized. There is an automatic pop up of the Properties Window for the new item. Using this mode, all the created items (with a drag and drop, or using the ’+’ button) are added to the item list but not displayed (they are unchecked). The properties are easily reachable. This mode is especially useful in case of a big dataset to apply filters. When the button is blue
  the special mode is active. Click again on the button to deactivate the mode.
-
 Click Copy legend to clipboard to copy in the clipboard the color scale used for the display of the selected variable. This one can then be copied in a Word document for example. This action is only available if a variable has been selected for the Color properties of the item.
-
 Click Remove item to remove the current item from the items list. If several items are selected or a group is selected, all items are deleted at once.


