
Copy Grid to Grid
Objectives
This functionality is designed to copy one part of the variables or macro-variables of a Grid File into another Grid File.
A part of the input grid is selected according to block indices specified by the user, then copied into another Grid File which can be either new (the coordinates of the new grid system will then be automatically calculated from the input one), or already existing. It is also possible to extract a slice from a 3D grid.
When copying variables to a new grid file, a new grid will first be created with the same grid system as the input grid file (its bounds will be defined by the user). The two grids then match up and the process is simply to copy the samples from one grid to the other. In that case, only the indices of both grids will be taken into account for the search of the "superposed" nodes.
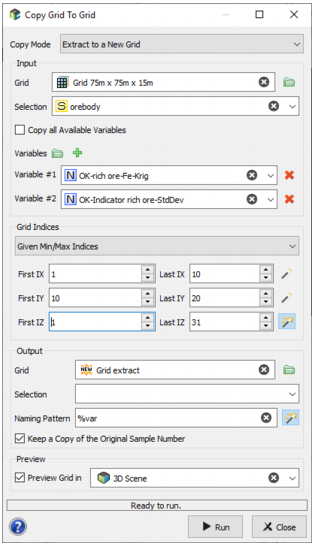
Choosing the Copy Mode
Three Copy Modes are available:
- Extract to a New Grid: the output grid is created by the task run. If a file of this name already exists, a message asking the user to overwrite is printed.
-
Copy to an Existing Grid: the output grid already exists, so that the geometry of the input grid and of the output must be compatible (2D/3D, resolution, cells alignment and orientation).
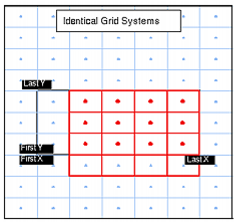
Below is an example of Copy Variable Grid to Grid in 2D when the output file is already existing. The blue grid represents the Input Grid File while the red one represents the Output Grid File. The blue lozenges represent the nodes that will be copied from the input file (they are determined by First X, Last X, First Y and Last Y and the bounds of the Output Grid File) and the red points represent the nodes which will get values in the output file.
- Extract 3D Grid Slice to a 2D Grid: the input grid corresponds to a 3D grid and the output will be a slice along a Z value (whose extension along X/Y can be smaller than that of the input grid). This mode does not support a rotation of the input grid.
Input
-
Click Grid to open a File Selector or directly drag-and-drop from the Data tab the grid you want to consider to select the input Grid. This Grid File can be 2D or 3D according to the selected File Mode. A selection may be applied.
Then define the variables to be copied. The variables can be numerical, categorical, selections or macrovariables. By default all the variables of the grid will be copied. Uncheck the Copy All Available Variables option if you want to copy only some of them.
-
Grid Indices: This section is not available if the selected mode is Copy to an Existing Grid.
-
Given Min/Max Indices: You have to enter the indices of the first and last cells respectively along the X, Y and Z axes (First IX, Last IX, First IY, Last IY, First IZ, Last IZ), thus defining a block, the contents of which is to be copied. Clicking on the magic wand button will automatically set the values to the minimum and maximum indices of the input grid.
If you have selected the Extract 3D Grid Slice to a 2D Grid mode, you will have to define the minimum and maximum indices for X and Y, and to define the Z level (IZ) you want to extract.
-
Fit to a Selection: Selecting this option will automatically copy the variables in order to cover the selection variable defined in input. The cell values outside the selection will be set to undefined.
If you have selected the Extract 3D Grid Slice to a 2D Grid mode, you additionally have to define the Z level (IZ) you want to extract.
-
Output
-
Click the green folder icon to open a File Selector to choose a Grid, or directly type the grid name for a new grid, to define the output Grid File into which the variables will be copied.
If this file does not exist, it will be created using the same grid system (cell size etc.) as the input file, the origin and numbers of nodes of the output grid being fitted by the indices specified by the user.
With Extract to a New Grid and Extract 3D Grid Slice to a 2D Grid modes, be careful as if you enter the name of an existing file, it one will automatically be overwritten (but a confirmation message will be popped up).
- Selection: Only available if you have chosen the Copy to an Existing Grid mode. Only the cells of the output grid inside the selection will be considered to copy the different variables.
- Naming Pattern: By default the names of the output variables will be the same as the input variables (using the %var pattern). You can modify this pattern to add a prefix or a suffix to the variable name.
- Check the Keep a Copy of the Original Sample Number option to automatically copy the Sample Number of the input grid.
Displaying the Output Grid
The output grid as well as the copied variables can be displayed in a 3D view in the standard way (Drag & Drop from the Data Explorer to the 3D view) at the end of the run. However it is possible to preview the grid before by checking the option to validate the grid geometry. A temporarily layer is created in the corresponding 2D/3D scene. If the grid resolution is too fine, only the grid bounding box will be displayed.