
Import Grid (CSV/XLS)
This page describes how to import a grid (2D or 3D) from a CSV/XLS file to Isatis.neo.
The loading procedure is divided into 6 steps:
- Mode
- Input ASCII/XLS File
- File Decoding
- Grid Geometry
- Variables Definition
- Summary
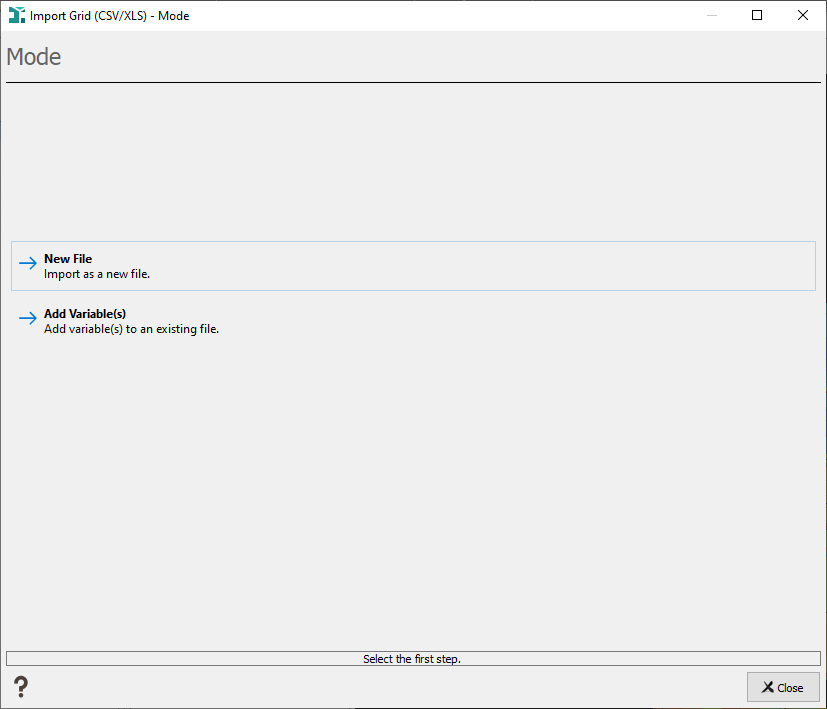
Modes
Two import modes are available:
- New File: to import gridded data in a new file. If the file already exists, a confirmation to overwrite will be asked running the import.
- Add Variable(s): to add new variables to an existing grid. Merge data by adding some new variables to an already existing Isatis.neo data table. An additional step will be added to ask in which existing file you want to add variable(s). The principle is that the organization of this appended data is identical to the one of the initial data file (in other words, the samples are the same). You should pay attention to the order of the samples stored in the file. If a variable already exists in the first set, it will be replaced by the new values of the second set. This mode enables you to enter datasets containing a large number of variables which would not fit in one single file (remember that all the variables corresponding to one sample must be present on one single record of the input file).
Input File
This step allows you to select the CSV/XLS file you want to import.
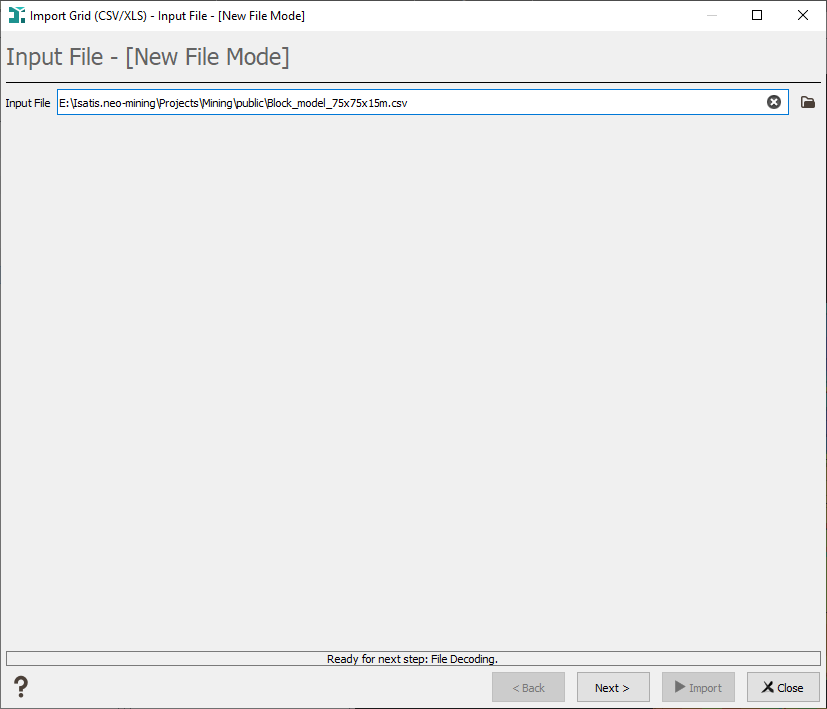
Input File: Select the CSV/XLS file, click the folder icon to pop up a window file selector.
File Decoding
The second panel depends on your file format (ASCII or Excel).
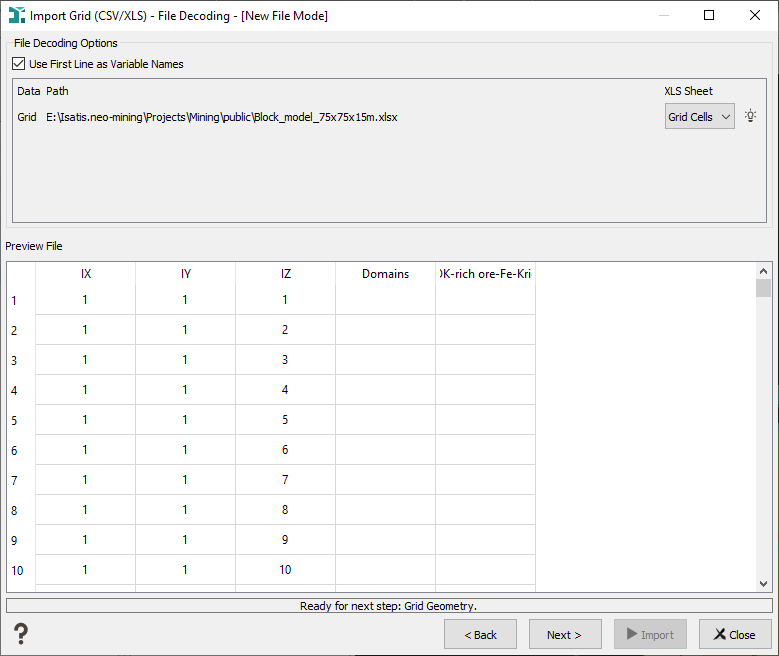
Excel File
This page enables you to verify your file is correctly read.
- Use First Line as Variable Names: tick this option to specify that the first line of your Excel spreadsheet contains the name of the different fields.
- Your Excel file may contain several data spreadsheets. Use the XLS Sheet selector to specify from which sheet the data will be read.
The preview zone shows you the first lines of the file selected by the Preview file toggle to help you choosing your options.
ASCII File
This page allows you to define the way the ASCII file is organized. The parameters defining the organization of the file are:
- Column Separator: Define the given character that separates the columns (, ; / #...).
- Column Delimiter: Some ASCII files contain comment lines that must be ignored. These lines usually begin with a specific character (/, # for example). Enter the corresponding character, all the lines beginning with this character will be skipped.
- Text Delimiter: If the data have some alphanumerical variables, they are usually delimited by characters such as « or ’’. Enter here this specific character.
- Use the First line as Variable Names: Select this option if the first line of the file contains the names of the variables.
- Interpret Consecutive Separators as Single: If you do not select this option, two consecutive separators (that is say the character you define just above) will be interpreted as a missing value.
- Codec: The option is reserved for advanced users. Select here the codec in which the ASCII file is coded. The default codec System works in most of the cases.
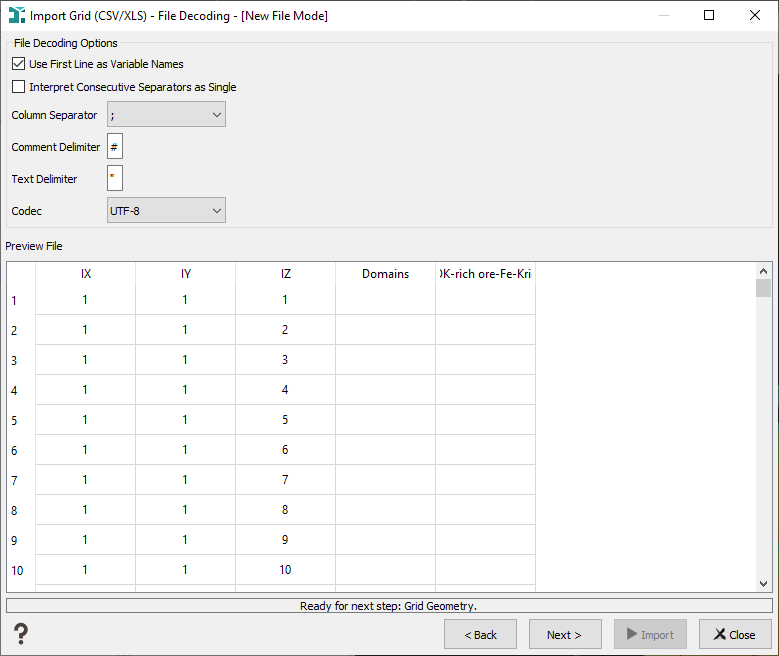
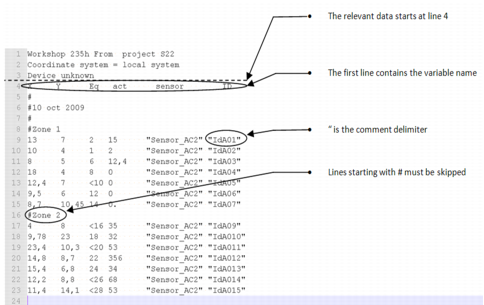
The preview zone shows you the first lines of the file to help you choosing your options.
Grid Geometry
The fourth step enables you to define the grid geometry.
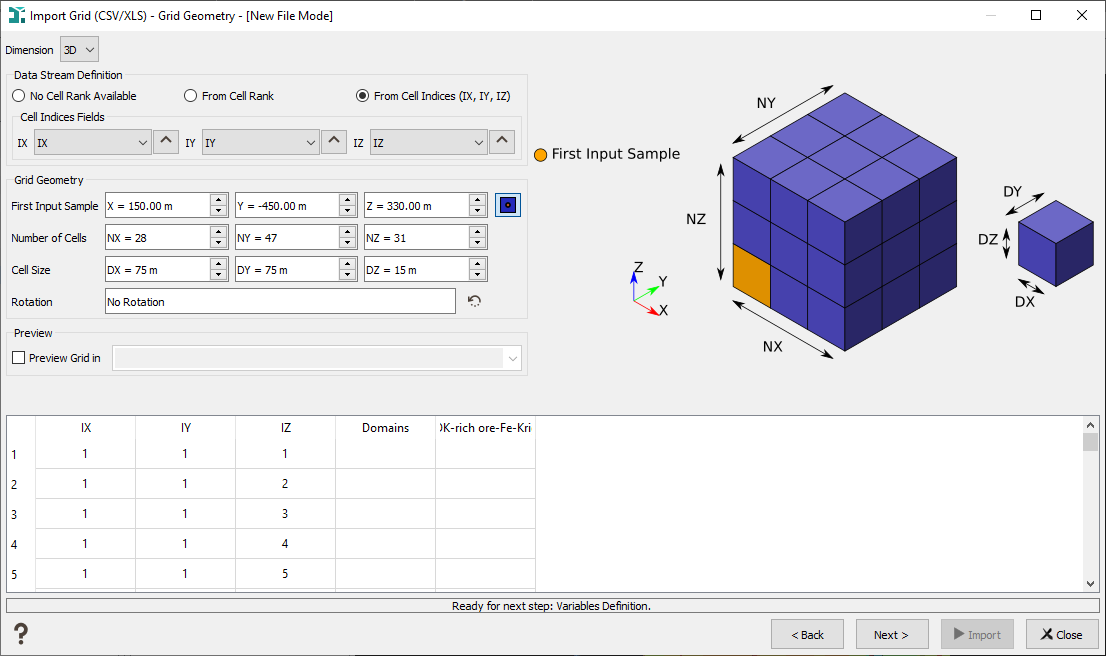
- Select the Dimension of the imported grid, 2D or 3D.
-
Data Stream Definition: three modes are offered. They describe the way the gridded data are organized/sorted in the imported file and which information is available to help the data reading.
- No Cell Rank Available: choosing this mode, you only assume the data sorting i.e. the order the cells will appear in the file. All the cells (NX x NY (x NZ)) must be present in the imported file. Z+/Y+/X+ is the fastest way to sort your data to be imported.
- From Cell Rank: the cell rank is read from a dedicated variable (the cell numbering starts from 1). The way we number the cell is defined by the +/- X/Y(/Z) selectors. For example, if we put Z+/Y+/X+, we will consider that Z increases first, then Y increases and X increases. If some cells are undefined, these ones can be missing from the imported file. As we read the cell rank, this mode is slower than the No Cell Rank Available mode.
- From Cell Indices (IX, IY, IZ): the cell indices (IX, IY, IZ) are read from dedicated variables (cell indices start from 1). The arrow next to the variable selector enables to indicate in which way the associated variable is sorted (i.e. decreasing or increasing order). If some cells are undefined, these ones can be missing from the imported file. As we read the cell indices, this mode is slower than the No Cell Rank Available mode.
-
Grid Geometry:
-
Specify the coordinates of the First Input Sample of the grid. It depends on the cell order (the drawing helps you to locate the first input sample).
Choose the right icon to inform if the defined coordinates correspond to the center of the cell
 or to the cell corner
  .
. The first input sample will be used to determine the grid origin which in Isatis.neo is always located at the center of the front bottom left and corresponds to the cell indices IX=1, IY=1 (IZ=1).
- Specify the Cell Number of the grid along the X, Y (and Z) axes (U, V and W if you have a rotation).
- Define the Cell Size of the grid along the X, Y (and Z) axes (U, V and W if you have a rotation). Here, you can only deal with regular cells.
- If needed, you may enter a Rotation of the grid around the origin.
-
- Preview: Tick the option and select here an existing scene (2D or 3D) in which you will be able to preview the geometry of the defined grid. If the Cell Size is small in comparison to the Cell Number (i.e. if the grid resolution is high), .
Variables Definition
The fifth panel enables you to define the variable properties.
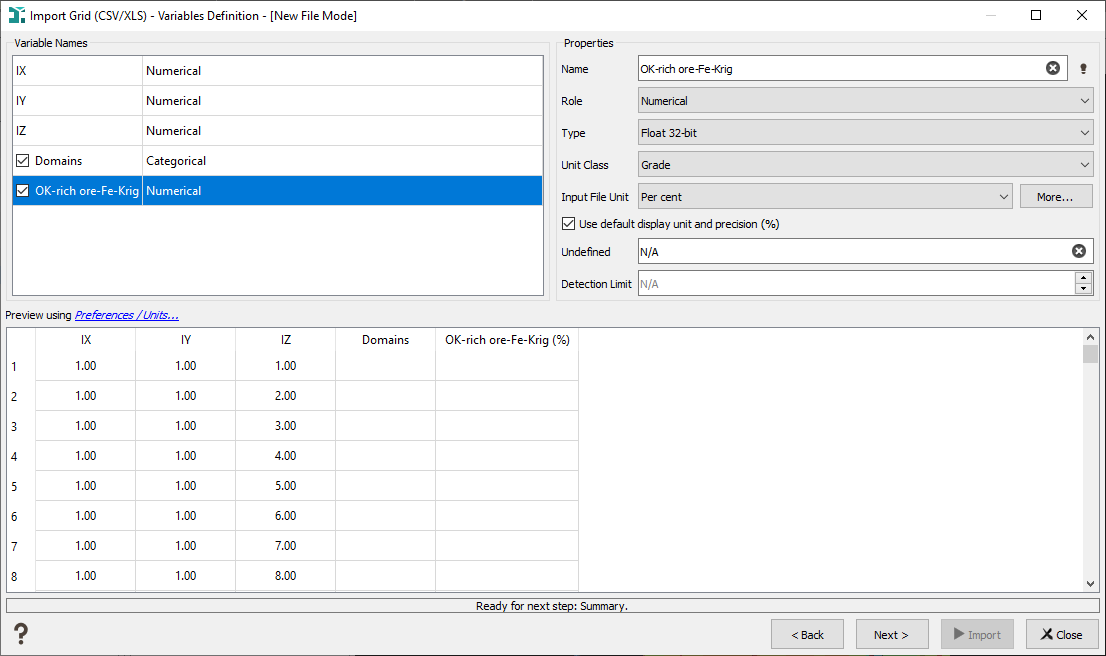
Click a variable in the Variables Names list and edit the Properties:
- Name: Enter here the name of the variable, if you have selected on the second panel the option Use First Line as Variable Name, the name of the variable will automatically appear in the preview table.
-
Role: Select one of the following role for the variable:
- Numerical variable: numerical variables can be float or integer variables and are stored in 32 or 64 bits. Storage format for float variables is a question of variable precision. A 64 bits format guarantee a better precision but it will take more place on the machine. In Isatis.neo, coordinates are stored in 64 bits. For the integer variables, it depends on the variable values. An integer 32 bits allows the storage of values until 231, and until 263 with an integer 64 bits.
- Categorical variable: this kind of variable is made to deal with categories (with a maximum of 32767 categories). A category is associated to a specific string of characters (corresponding to an integer value) and to a dedicated color. The different categories of the variables are managed via a catalog. Categories are exclusive and they can not overlap themselves or a category can not contain two others for example.
- Text: text variables may be loaded in Isatis.neo. They are mainly used for selections and displays.
- Selection: a selection variable corresponds to a binary variable which can take the value 0 or 1 (equal 1 when the data point is inside the selection, 0 otherwise). A sample will be selected if the value of the selection variable is set to 1 and masked off if the value is 0. No undefined value is allowed in a selection variable. Many operators of Isatis.neo use a selection during input/read data table or output/write data table. In the input phase, this means that some samples will not be used during the calculation. In the output phase, this means that you do not want the operator to be applied to the masked samples.
- Unit Class: Enter here the unit class of the variable.
- Input File Unit: Select here the unit of the variable. If the Unit that you want to use is not proposed in the list, you can define your own unit by clicking on the More button.
- Tick the Use default display unit and precision option to define the Input File Unit as the unit used each time you will do something on this variable in Isatis.neo (display, statistics...). Otherwise the unit defined in the Preferences for the associated unit class and its associated precision will be used.
- Undefined: Usually undefined values are marked with a specific string in the file such as -99999, N/A or Undef. Enter here the correct undefined value.
- Detection Limit: Enter here a value that you want to consider as the detection limit. All the values of the measure variable below this detection limit will be replaced by the value of the detection limit.
Note: During the import operation a detection limit variable is created. This variable is attached to a given measure and takes either 0 or 1. If the detection limit is equal to 0 for a given sample, it means the value of the attached measure is higher than the detection limit, while if the detection limit is equal to 1 it means the value of the attached measure is lower than the detection limit.
The Preview zone shows you the first lines of the file to help you choosing the properties of the variables.
Click Unit Preferences to modify the Display Unit of the different variables.
Summary
This last page sums up the variables definition.
Select the Display toggle to display the imported data in a defined scene at the end of the run.
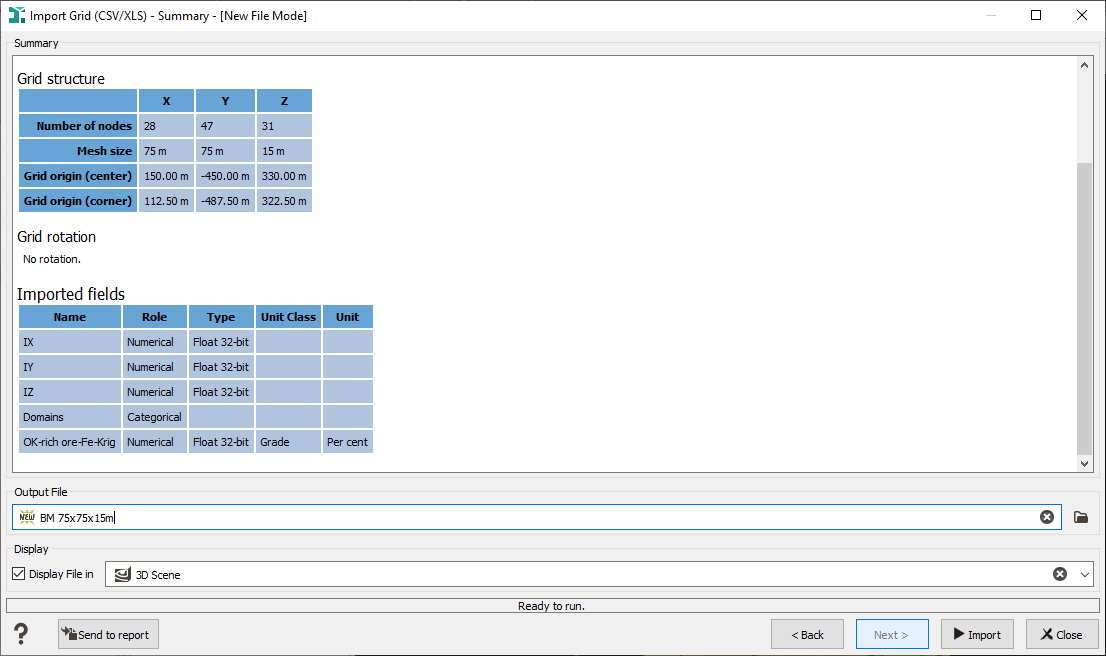
Once you have defined all the parameter click Import to end the task.