
Borehole Import
Input

The borehole import is designed to load tables that represent the holes.
-
Data tables:
- The Tops/Collars which correspond to the Collar is mandatory.
- The Deviations which correspond to the Survey.
- Then, the user needs to inform the content of the hole. Press the Add button below the table. A new line is created using the table type Core samples/Assay. A selector allows to change the type: options are Core samples/Assay, Logs and Markers. Use the buttons Add and Delete on the bottom of the first table to add or delete a line/table. Each entry will correspond to one output table in the borehole output file.
- Table name (from Fusion): The list of available tables in the database is visible in the table selector. You can only choose one table per line.
- New table name: write the name of the data table that will be created in Isatis.neo. By default, the name is the one of the selected table.
- The Table preview displays the first 200 lines of the selected table, and updates the Sample Count with the total number of rows returned from the table. The preview is automatically updated.
-
Import options: Choose the Desurveying method to build the hole trajectories.
Note: Refer to the Technical references: Desurveying Methods to better understand the different algorithms.
Variable Assignment

This page enables you to define the variable properties. The imported tables are listed on the top left corner as a data tree. The selection of one data table will allow the definition of the variables inside. The Variables list contains a checkbox to import or ignore a variable, the variable name (defaults to the column name in the database), the imported role (see below) and the Input variable type (storage type of the column in the database).
Click a variable in the Variables list in the middle and edit the Properties on the right-hand side.
- Output name: Enter here the name of the variable. By default it is the same name as in the Input table.
-
Role: It defines the type of information of the variable. The different roles impact the use or not of other parameters (e.g.: output type, unit class). Select one of the following role for the variable:
- Coordinates: this is the X, Y or Z coordinate of the data points gravity centers. Importing a file, each coordinate value must be defined. Otherwise an error message will occur.
- Numerical variable: numerical variables can be float or integer variables and are stored in 32 or 64 bits (chosen in the "Output type" field). Storage format for float variables is a question of variable precision. A 64 bits format guarantees a better precision but it will take more disk space on the machine. In Isatis.neo, coordinates are stored in 64 bits. For the integer variables, it depends on the variable values. An 32-bit integer allows the storage of values until 231, and until 263 with an 64-bit integer.
- Categorical variable: this kind of variable is made to deal with categories (with a maximum of 32767 categories). A category is associated to a specific string of characters (corresponding to an integer value) and to a dedicated color. The different categories of the variables are managed via a catalog. Categories are exclusive and they can not overlap themselves or a category can not contain two others for example.
- Text: text variables may be loaded in Isatis.neo. They are mainly used for creating selections and for displays.
- Selection: a selection variable corresponds to a binary variable which can take the value 0 or 1. A sample will be selected if the value of the selection variable is set to 1 and masked off if the value is 0. No undefined value is allowed in a selection variable. Many operators of Isatis.neo use a selection during input/read data table or output/write data table. In the input phase, this means that some samples will not be used during the calculation. In the output phase, this means that you do not want the operator to be applied to the masked samples.
- Unit class: Enter here the unit class of the numerical variable.
- Input file unit: Select here the unit of the numerical variable. If the Unit that you want to use is not proposed in the list, you can define your own unit by clicking on the More button. The values are read using this unit and generally converted to the International System unit of the chosen unit class. Then when used / printed / ... it will be converted to a Display Unit.
- Tick the Use default unit option to define the Input File Unit as the unit used each time you will do something on this variable in Isatis.neo (display, statistics...). Otherwise the unit defined for the associated unit class in the Preferences will be used.
- Undefined (optional): Usually undefined values are marked with a specific string in the file such as -99999, N/A or Undef. Enter here the correct undefined value.
- Detection limit (optional): Enter here a value that you want to consider as the detection limit. A selection will be created for this variable and set to true (=1) when the values of the measured numerical variable are greater than the detection limit.
The Preview zone shows you the first lines of the file to help you choosing the properties of the variables. The display unit comes from the Preference settings. They can be quickly changed by clicking on the Display unit preferences button in blue color. The table is automatically updated.
Summary
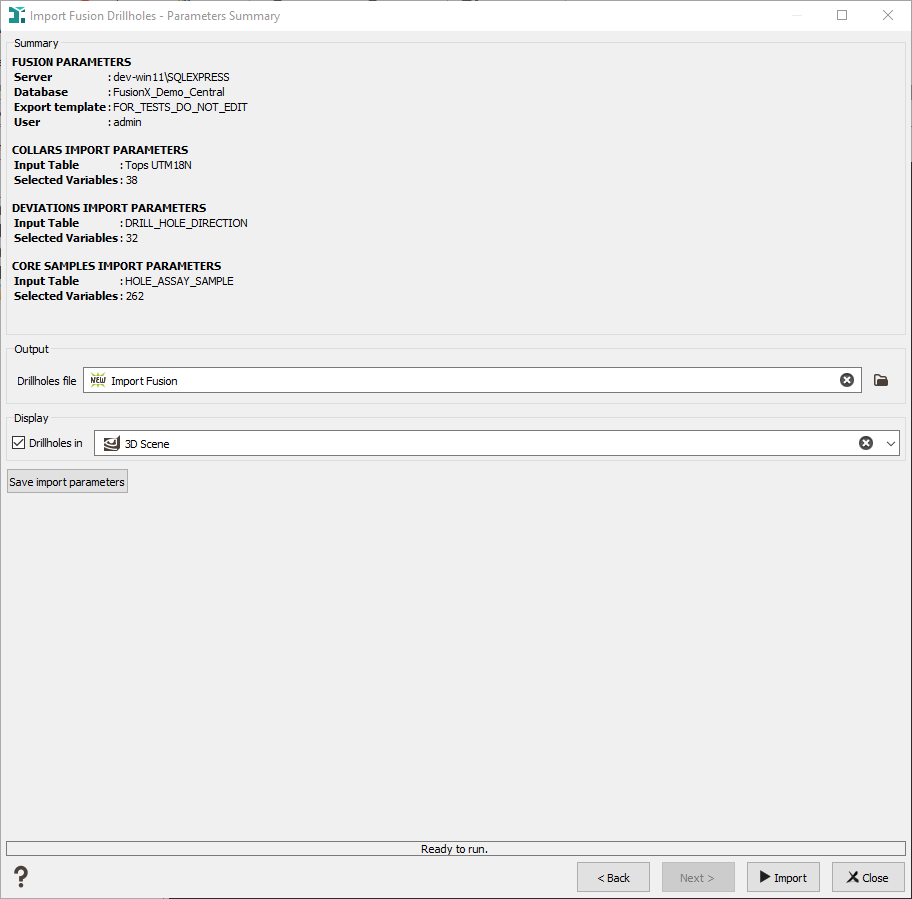
The last page of the wizard is a summary of the selected data source and associated tables.
Output parameters:
- Boreholes file: Name the boreholes file to create in the Isatis.neo project.
- Display: Option to directly display the output file in a selected scene after the import. The boreholes will be colored based on the values of the first numerical variable, from the first data table.
-
Save import parameters: Option to save the parameters used for the import into a .JSON file. This file can be reloaded later in order to automatically set up the connection parameters, data table selection and variable assignment.
By default, the file is located in the public folder of the current project. In the Messages window, a direct link to the new .JSON file is printed.
This file may be loaded later at the very beginning of the Fusion import, in the page "Fusion Data Source" by ticking the option Load previous import parameters and selecting the .JSON file to load.
The imported boreholes have been added to the data explorer. The borehole file is the main name and as sub-files are present the data tables.

A summary of the import (fusion parameters, selected variables, number of samples...) is displayed in the Messages window. The first 10 warnings are displayed at the end if several errors occurred during the desurveying. The complete error log is a .HTML file containing all the errors. It is stored in the Public folder.