|
|
Downhole Formatting: Width/Margins Setting the dimensions and padding of downhole formatting |
Downhole Formatting: Width/Margins
Note: A Datamine eLearning course is available that covers functions described in this topic. Contact your local Datamine office for more details.
The information in this article is relevant to both the Log View Properties - Columns tab and the Format Downhole dialog (3D window formatting).
In either case, you access this screen by selecting the [Alignment] menu option, which is relevant to the following downhole formatting styles:
- Text
- Bars with Annotation
- Bars
- Braces with Annotation
- Ticks with Annotation
- Arrows with Annotation
- Line Graph
- Histogram
- Filled Histogram
- Trace
- Angles
- External Image File
The Width/Margins menu is used to set up padding/margin for your downhole columns. This can be useful if you wish to push your downhole formatting away from the sample or the opposite and can also impact how graphs and other items are drawn. You can also use this to change one of the "... with Annotation" styles from one type to another, and to apply prefix and/or suffix symbols.
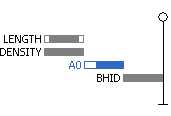
Margins are represented in the Drillhole
Properties - Columns tab
as unfilled areas, e.g.:
|
|
The settings described here apply to the currently active 3D window and all linked external windows. Independent windows will be unaffected. |
-
Set the Width excluding margins in millimeters. You should set this width first, before setting margins. If no margins are specified, you will not see a Width including margins field.
-
If required, set the width of Left Margin and Right Margin and select a Width and a Style. The column width is automatically adjusted. The combined value of margins + un-margined distance is shown in the Width including margins read-only field.
-
Adjusting the Width excluding margins will only update the Width including margins read-only field.
-
Adjusting the Left or Right margin value will maintain the Width including margins value, but will adjust the Width excluding margins value accordingly.
-
If you attempt to set a margin that cannot be fitted into the Width excluding margins, the alternate margin will be adjusted to accommodate.
-
To apply prefix or suffix symbols within your left and/or right margin (a margin must be above zero to use one), use the Style drop-down list to select arrows, braces, lines, ticks or other combinations.
-
Select a Margins Color or select the Same color as contents check box.
- Choose Apply to view changes.


