
Map Images
To access this panel:
-
Using the Mapping dialog, activate the Pictures tab.
Note: The Images panel is not available if creating a wireframe map.
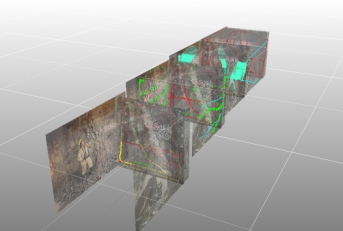
A face map "face" can include one or more images. Images can overlap if required (useful for multi-part mosaic images).
By default, each image is scaled to cover the active face, but its aspect ratio will always be maintained. If editing an image, only global scaling is permitted (you cannot stretch an image in one direction, say).
- Images are normally used to pinpoint geological structures, and form a basis for digitizing contact or outline strings. All common image formats are supported.
- Images will be copied to the current database once added to a map (in the map folder's Pictures sub-folder).
- Images are georeferenced with the mapping geometry and features. Georeferenced images can be edited in either the 3D World or Map view.
See Map Types.
Pictures for all faces are listed in the Images table (the Face column denotes to which face the image is applied). You can also use this table to hide/show and delete images from the map.
Tip: If you are using a portable device, automatically display a screen keyboard for easier data entry at the face. Enable screen keyboard mode using the Setup ribbon's On-Screen Keyboard command.
Existing images can be hidden or shown using the visibility check box on the left of the table. You can delete images from the map using the X button.
You can undo any image repositioning edits using the Reset
button:![]()
Adding an image to a face involves selecting the face to which you wish to apply an image, then the image itself.
- Either click the Add Image
button on the Pictures
tab of the Mapping dialog,
or use the Project
Data bar's context menu system:

- Select an image to apply to the currently-selected face.
- The image will be automatically stretched in width or height to completely fill the existing face plane. Where the aspect ratio of the image and face differ, an image overlap will occur.
Note: When you add a picture to a map face, it is copied from its original source location to the relevant folder of the currently active database. Map images are always stored within the connected database as this allows face image data to become available to all connected users.
If you wish, you can edit the position and/or scale of the map dynamically
(see below)
To edit an existing map image:
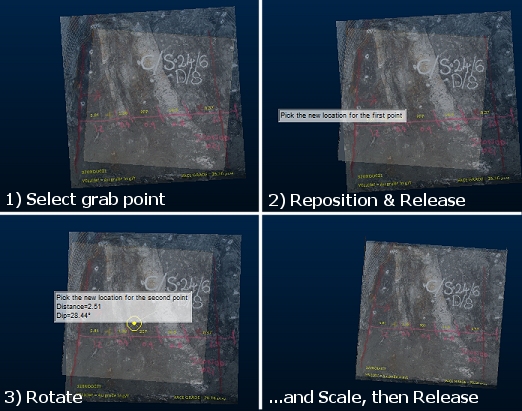
You can edit an image's position, scale and/or rotation by either:
- Using the Edit Image
button in the Mapping
dialog (Pictures tab)

- ...or right-clicking an image object in the Map Database folder of the Project Data bar and selecting Move...
Editing is available if the current map already contains an image.
- Tap or click and hold to set a grab point.
- Drag the image to a new position and release the mouse button/lift the stylus or finger
- Click or press and drag the mouse/stylus/finger to drag the image towards or away from the initial point (scale the image) and or around the initial point (rotate the image).
- Release the mouse button/stylus/finger to set the image at its new scale and position.
For example:
Related topics and activities