
Create a Wireframe or Points Map
To access this screen:
-
Activate the Map ribbon and select New. Choose a Map type with a 3D Image map configuration.
-
Using the Project Data control bar, expand the Map Directory folder. Right-click the Maps folder and select Add Map. Choose a Map type with a 3D Image map configuration.
A Wireframe or Points map, unlike a face map, implies a fully 3D surface, not one or more linked face planes.
Both map types are similar, and supported by both map and 3D world views, with georeferencing to allow the former to be displayed in the latter.
Maps can be comprised solely of wireframe or point data, or a combination of both. You can utilize one or more data files in a map (of either or both types).
Note: The term "wireframe map" may be used throughout this documentation to refer to both wireframe and points varieties. "Points map" will explicitly reference maps comprised of points data only.
Georeferencing is achieved using the Georeference Wireframe Map screen.
Typically, textured surface data is imported, with all common textured surface formats available, including .ply, .obj, .tiff and many others. As the import of data is governed by Datamine's powerful Data Source Drivers facility, you can also choose to pre-process imported surface data, such as subsampling a SiroTiff file, for example. These import options are specific to the type of data being imported.
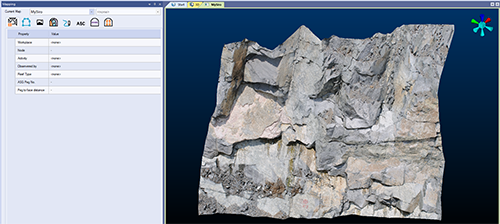
An example of a newly-loaded wireframe map type, ready for feature capture
However, like any other map, feature digitizing, sketching and other map enhancements are achieved in the same way; digitizing points directly onto the loaded surface (along the line of sight), meaning polygonal features and contacts are also 3D in nature.
The same applies for channel samples, although these are straight line and won't snap to all aspects of the surface (only the first and last points of the channel).
To create a wireframe map, the corresponding configuration file entries must exist, notably a <WireframeMapTypes> collection, with associated properties. Dimensions aren't relevant to this map type as this is determined by the imported data. Similarly, there are no mapping 'planes' either as you digitize straight onto the 3D surface.
Creating a new wireframe map, or activating one automatically enables the following digitizing modes:
-
The centre of 3D Map window rotation is set to the centre of the wireframe map.
-
Always Snap mode is activated. See Snapping to Data.
-
Snapping to the surface of the loaded map is automatically enabled.
-
Rapid digitize mode is enabled. See rapid-digitize-switch ("rap").
Points Maps
In addition to importing a wireframe, you can also import points. This could be, for example, a cavity monitor scan of a freshly-exposed drive face, or a surveyed open pit surface.
Note: You can utilize one or more points files in a map, and even combine points and wireframe file data. For example, a points map may indicate important points for snapping during digitizing whilst the underlying textured surface can be used for image-focused polygon and contact snapping.
Points can be used for mapping in the same way as wireframes. Points are automatically 'snapped' during digitizing, ensure features and contacts adhere to the implied surface structure. The density of points available determines the precision with which you can digitize map features.
Ideally, points in the imported data are mapped to RGB attributes to differentiate geological features although where shape obviously delineates structures, this may not always be required.
To create a new Wireframe or points map:
- With the New Map screen displayed, either accept the default name (or edit it) or create a new name. This field is always editable.
- Enter a Map name.
- Choose a Map type that corresponds to a wireframe or points map configuration. This is set up in your system configuration file.
- Providing the map type selected is a wireframe map type, Wireframe Map options appear:
Click Browse for Points if you intend to map onto a point cloud.

Click Browse for Wireframes if you intend to map onto a wireframe surface.

Note: You can import one or multiple data files, and even a combination of points and wireframe files.
- Follow the data importation steps:
- Select a Driver Category.
- Select a Data Type.
- Click OK
Complete the importation screens (press F1 for more information on a particular step).
The 3D surface or points data imports and displays in the Map screen (which has the same name as your map).
Tip: You can select multiple wireframe or points data files for the same import operation, but you can't combine points and wireframe data in the same import.
-
The Mapping Task Bar updates to show the relevant tabs and commands.
-
Use the table below to enable or disable data files for inclusion in the map, or even delete them from the table (X).
-
Click OK to create your map. All active point and wireframe data is assembled into a single map.
-
Save your project.
The 3D surface and point data is copied to your current Studio Mapper database.
Related topics and activities