|
|
WFM Design Definitions Understanding the Imported Wireframe design type |
Imported Wireframes Design Type

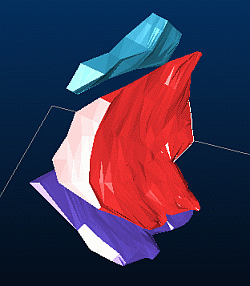
Imported Wireframes are underground cavities, which typically do not
have uniform dimensions, such as stopes. These can be imported
from 3rd party applications, or created
inStudio UGusing
theMineable
Shape Optimizer (MSO)tool.
The wireframe file is added to your project by specifying it as a Wireframes design type in the Project Settings task.
After applying design definitions to the imported wireframe (Apply Design Definitions), processing this data creates a string along the Z axis of each solid, and a point is added to the centre to allow each independent wireframe to be sequenced.
Wireframe design types are not segmented; unique wireframe entities (according to the specified Group Identifier) can be assigned independent definitions. Each definition should include a default Density value, production constraint and mining rate in order to be scheduled. These definitions are set up using the Design Definitions panel.
Find
out more about importing data...
Filtering and zooming using the Apply Design Definitions panel is particularly useful for the Wireframes design type; the Group Identifier field will trigger the creation of special table rows for each unique value found in the input file; this allows the wireframe to be automatically filtered according to those values, making it easier to visualize the structure of the input file and be able to assign definitions to a subset of the input wireframe data set.
Configuring Wireframe Design Definitions
Design types are defined using a combination of the following panels:
- Apply Design Definitions: apply previously-defined design definitions to your design data.
- Edit Design Definitions: edit, create and delete design definitions for FXS, CXS, OUT and WFM types.
- Generate Design Definitions: if you choose to create design definitions based on information in an existing physical file, use this to select a grouping field and extract the required properties.
- Edit FXS Shapes: create your cross sectional shape, or edit an existing one. Only used for Fixed Cross-sectional design type definitions.
- Edit Default Values: set up default value sets that can be applied to one or more definitions.
These panels are mode-less; they are independent and can be opened whilst another panel is currently displayed; handy for setting up default values, shapes and definitions, then applying them quickly.
The default Density that you wish to use for each design type must be pre-configured using the Edit Default Values panel.
Design Definitions and Matching Attributes
Accessing this function:
-
Using the Edit Design Definitions panel, click Edit Matching Attributes
In versions prior to version 2.1, Studio UG matched designs to definitions by the field DESIGNDF (the design definition Name). In these versions, you had to ensure you applied the design definition to your designs. Applying a design definition to a design would set the values of the DESIGNDF, COLOUR, LSTYLE, and SYMBOL columns. During processing, the design definition of a design was only matched by reading the values in the DESIGNDF column. This could lead to a mismatch between the value of DESIGNDF and the display Properties (COLOUR, LSTYLE, SYMBOL) if you modified the display properties of your designs without using the Apply Design Definitions feature. In effect, there was a risk of data duplication that could get out of sync.
In Studio UG version 2.1 designs are once again matched to design definitions by matching attribute values. This means that if the attribute values are on the design, you don't need to apply the design definition as it will automatically be matched during processing. The action of applying a design definition sets the matching attribute values on the designs so that the automatic matching will work. This provides more flexibility and can save significant amounts of time. If the designs already have the appropriate attribute values, you can jump straight to processing. To apply values to the matching attributes, you can use the Apply Design Definitions panel, standard Studio commands, or even use a script.
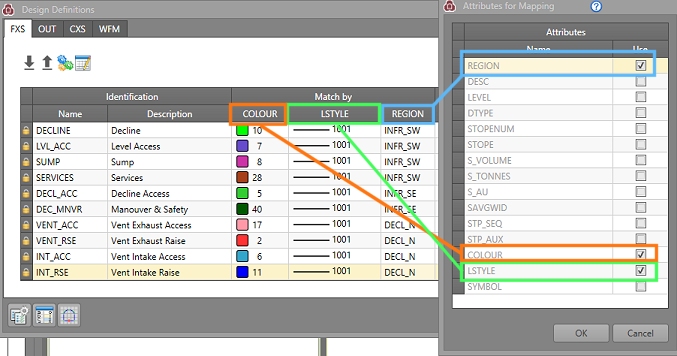
The user can select one or more attribute definitions to use for matching. Each design definition must have a unique combination of values for the matching attributes. The matching attribute definitions are defined per design type. You can still match using the display properties (LSTYLE, COLOUR, SYMBOL), but you are no longer restricted to doing so. Matching on fields other than the display properties allows you to use the same design definition for designs that have different colours, for example. Activity Solids get their colour from their associated Design, whether COLOUR is used in the attribute matching or not.
In a way this is how Studio 5D Planner worked: it was just hard-coded to match by the attributes COLOUR, LSTYLE, and SYMBOL. In Studio UG, this restriction has been lifted.
Each design type must match on at least one attribute. You can choose to match on the system attributes COLOUR, LSTYLE, and SYMBOL or any of the user attributes. The design definition needs a unique name as well.

These "Match By" attributes are configured using the Attributes for Mapping panel, a simple field chooser that updates (and is synchronized with) the Edit Design Definitions panel table.
If it is not possible
to create unique combinations of matching attributes for existing definitions,
non-unique value combinations will be highlighted in the definitions table
e.g.:

The Solid colour will be taken from the design file, regardless of whether COLOUR is used in the attribute matching or not.
How Mapping Attributes are used in Generating Definitions
The Generate Design Definitions function is a useful tool that allows you to extract information from external files and use it to construct design definitions automatically.
This panel also honours the current mapping attributes to automatically extract definitions from the selected file. For example, if your mapping attributes are LSTYLE, COLOUR and SYMBOL, the Generate Design Definitions panel will automatically construct definitions based on all combinations of values found for these attributes in the file.
More about Mapping Attributes...
More about Generating Design Definitions...

Setting up Imported Wireframes Design Definitions
The following steps outline the process of adding design definitions to theImported Wireframedesign type, in theDesign Definitionsdialog.
- Select the Complex Solids tab.
- In the Design Definitions
panel, select the Wireframes
tab.
Use the Design Definitions panel to edit or construct definitions manually, or Import them in from an external settings file (1), or Generate them from an existing Datamine table (3).

You can also Export your current settings for later use (2). To set up attribute matching, use Edit Matching Attributes (4)
- To create a new definition, you can either click the "+" in the top right of the panel, or extract a definition from an existing file using the Generate option. Whichever method is used, the Name field is editable up to 36 characters in length.
- Set a Name for the design definition - this must be unique amongst the table of definitions.
- Add a Description for the definition - this should describe the context in which the definition would be applied. This is the description that will appear in the UG Planning Report alongside the corresponding activities to which the definition has been used to create.
- Set the values for your previously-defined matching attributes. The combination of values for all columns under Match By must be unique for each definition.
- Select your default value set from the Default Values column. This will contain, for example, the default DENSITY value for the selected design item.
- Under Default
Constraint you must also define whether a particular outline
design type is to be mined:
- As soon as possible
- As late as possible
- The DefaultRate is the rate at which the complex solid will be mined. In the case of complex solids, you will need to specify a quantity, unit and time period in which the specified quantity is extracted.
- The Exclusion column is used to define sections of the design which will be EXCLUDED from the connection. This can be useful if there are construction lines within the design or when sections of the design have been mined.
- Once all entities (that you wish to use in your project) have been fully defined, you can apply them to your project's design strings. Click OK to dismiss the Design Definitions panel and return to the Apply Design Definitions panel.
- The list of all defined, imported and/or generated definitions will appear under the FXS tab (shown by default).
- To apply your definition(s) to your design
data, you first need to load the corresponding design type data
into memory; click Load Designs.
This will load all data that has been defined in Project
Settings as FXS type.
If data is already loaded, this option will not be available and design strings will already be visible in the 3D window.The top rows of the Apply Design Definitions table represent a summary of all data of the specified type that has been registered in the Project Settings dialog. Strictly speaking, these rows isn't a design definition; they represents the underlying design data and the number of distinct entities each unique group of attributes contains.
For Fixed Cross Sectional (FXS) and Complex Solids (CXS) items, a Group Identifier cannot be specified, so the corresponding definitions table will contain a single row showing all unique data entities within the input file, e.g.:

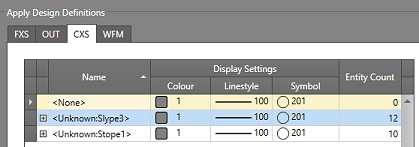
For Complex Solids (CXS) and Wireframes (WFM) design types, a Group Identifier is mandatory when setting up your project. Each unique value of this attribute will be represented by a corresponding row in the table, each displaying the entity count for each distinct group value. For example, if your input complex solids design strings contains an M4DDESC field with two unique values for slyping and stoping activities.
In this situation, you'll see 3 special rows in the table, e.g.:
This allows you to filter the view (Filter using selected definition) to see the design strings representing each activity, and also allows you to reassign entities between these values if you wish (e.g. swap a slyping activity to a stoping activity by selecting it in the 3D window, selecting one of the special rows and then using Apply to Selected. Alternatively you can unassign entities completely by applying the selected design strings to <None>.
The Entity Count denotes the total number of independent strings (for all design files of the selected type) for the currently loaded design data that have not yet been applied. If data is not loaded, the Entity Count will be zero for all special rows. These rows are read-only.
Decide to which of the loaded design strings you wish to apply a definition (only one definition can be applied at a time).
You can apply definitions:- to all visible data by selecting a definition to highlight it in the table then selected Apply to Visible (see the tip below), and/or;
- you can preselect data in the 3D window using any of the supported selection methods then use Apply to Selected to apply to a subset of the visible data in the 3D window.
Once a definition has been applied to a design string, its own Entity Count will increase, and the number of unassigned entities (represented by the top row of the table) will decrease e.g.:


If a definition is applied to a string that already has a definition applied (you can only have 1 definition per string entity), the existing definition is replaced with the new application and the table is automatically adjusted to show the new status of each definition. 
Use the Quick Filter control bar to interactively set the data that is displayed. This is a quick way to set the scope of your definition application in combination of the Apply to Visible option.

You can quickly assess the impact of your design definition choices using the Process all changes task. This will generate a 3D object called FXS solids that can be visualized, animated and formatted using the Sheets control bar and other interactive commands in Studio.
- Once you have applied all definitions to all required string entities, click Save Designs to update the Studio UG database.
Click Unload Designs to unload the current data set and move onto the next task.

