|

|
Sheets Control Bar
Using the Sheets Control Bar
|
Sheets Control Bar
Displaying
or hiding this control bar:
The Sheets control bar is used to manage
the various data window's sheets, projections, views and overlays.
Only visible data object overlays are listed in this control bar - you cannot
use it to manage other non-visual data tables (this is the responsibility of
the Loaded Data control
bar).
The Sheets control bar also lets you manage the data objects from which overlays are derived; you can save, load, unload, reload and refresh
data objects as well as making the parent object "current"
(find out more about the current
object concept..)
With regards to the object overlay (remember, this is just one representation
of a data object, and possibly one of many in memory), the Sheets
control bar manages displaying and hiding items, formatting overlays
and editing the associated overlay visual settings.
Follow the links below to find out more:
Introduction
The Sheets
Toolbar
Context Menus

|
For more information
on the viewing hierarchy in your application, see View
Hierarchy.
|
About the Sheets Control Bar
The Sheets control bar is situated
on the left of the main display window, in a default installation.
It can be docked or floated, shown or hidden as any other control
bar (see Customizing Control Bars).
Making extensive use of the right-click (context) menu system, the
Sheets control bar can be used to access
commands and functions related to both individual items, and groups
of items, depending at which point in the data hierarchy a menu is
selected.
The data window to which the selected item(s) relate (3D, Plots
etc.) will also determine the functions that are available in a given
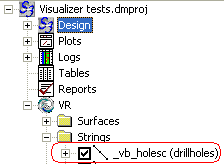
menu. For example, you can access the Strings
Properties dialog by right-clicking a string object (in the
Strings sub-folder of the main folder) and selecting , e.g.:
The Sheets
Toolbar
This toolbar is located at the top of the Sheets
control bar and contains the following buttons:
|
|
Description
|
|

|
Load points data and create a default
3D window overlay.
|
|

|
Load string data and create a default
3D window overlay.
|
|

|
Load drillhole (static) data and create
a default 3D window overlay.
|
|

|
Load wireframe data and create a default
3D window overlay.
|
|

|
Load block model data and create a
default 3D window overlay.
|
|

|
Load planes data and create a default
3D window overlay.
|
|

|
Import a non-Datamine format file
using the Data Source Drivers.
|
|

|
Export a loaded data object to a Datamine
or non-Datamine format file. Opens the Object
to Export dialog.
|
|

|
Display the Data
Object Manager.
|
|

|
Unload data objects from memory, from
the list provided by the Data
Unload dialog.
|
|

|
Unload all data objects and overlays
from memory, after confirmation
|
What Do the Different Text Formats Mean?
This control bar lists, amongst other things, a list of loaded 3D overlays. Overlays can be created either automatically by creating data of a new data type (e.g. the first string in a new project session, where no previous string object exists) or manually, say, by duplicating an existing overlay with Copy.
The text format used to describe each overlay provides information on the status of the data object to which it relates.
| Bold font |
The overlay is used to represent the "current" 3D object for a particular data type. More about current objects... |
| Italicized font |
The overlay represents a 3D object for which there are unsaved 3D changes* |
*The important description here is "3D", or something in the underlying data table for the object has changed and hasn't yet been saved. Visual formatting changes are ignored.
You can have any combination of font formatting; a bold, italicized overlay label represents a current data object for which there are unsaved changes.
Context Menus
A wide variety of functions can be accessed using the Sheets
control bar. The menu that is produced depends on:
Generally, the options available can also be accessed using alternative
methods such as the drop-down menu system, or icon toolbars, however,
the sheets menu provides a quick, context-sensitive way of managing
components of the View Hierarchy.
The relevant folder structure for your active data window (3D, Plots
etc.) will be automatically expanded when the window is activated.
In addition, folders pertaining to non-active windows will be collapsed
(although you can still re-expand them - editing a non-active window
item will automatically enable the relevant data window).
For more information on the available folder menus, select a link
from below:

 3D
Folder
Menus
The window folders of the Sheets
control bar is used to control the display of 3D objects, and
allows access to 3D object-related functionality. As with all
folders in the Sheets control bar,
the right-click (context) menu is used extensively. The following
sub-folders are provided with the VR folder:
-
Points:
lists points data overlays currently added to the selected/active
3D window.
-
Planes:
lists planes overlays currently added to the selected/active
3D window.
-
Strings:
lists strings data overlays currently added to the selected/active
3D window.
-
Drillholes:
lists drillhole data overlays currently added to the selected/active
3D window.
-
Wireframes:
lists wireframe data overlays currently added to the selected/active
3D window.
-
Block Models:
lists block model data overlays currently added to the selected/active
3D window.
-
Sections:
lists all sections and section definition files available
in the selected/active 3D
window.
-
VR
Objects: lists all DirectX objects currently added
to the selected/active 3D
window.
-
VR
Object Types: lists the available VR object categories.
The context menu can be used to add new object types to the
list, and to the selected/active 3D
window.
-
GVPs:
lists the Visualizer (.gvp) file overlays currently added
to the selected/active 3D
window.
-
Grids:
lists any 3D grids that you create for the selected/active
3D window. Right-click
the Grids folder to create
a grid that can be applied to loaded objects or sections in
the window.
For more information on the 3D Sheets folder, see Sheets
Control Bar Overview

 Plots Folder Menus
The Plots folder in the Sheets
control bar is used to access sheet-, projection- and overlay-related
display functionality. As with the Design
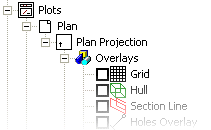
folder, this area shows a hierarchical structure. Each available Sheet folder (Plan, 3D or Section Name) contains
sub-folders showing the current Projection
(or set of projections if a set exists). Expanding the Projection
folder shows a list of available Overlays,
e.g.:
The context menus available for each section differ, and are described
below:
Plots Folder Menu (Sheets control bar only):
Right-clicking the Plots folder
icon allows you to perform the following actions:
New Plot Sheet: allows
you to add a new sheet, and cascades options for a Vertical ,
or
Sheet. These commands are identical to the ones found in the Plots window
Insert menu.
Paste: if you have
previously copied a sheet using the context menu at sheet-level (see below)
you can paste a copy of this data into the Plots
folder using this option. If no data currently resides on the clipboard,
this command will be unavailable.
Sheet, Projection and Overlays Menu:
Right-clicking a Sheet, Projection
or Overlay shows the following context-menu
(note that not all options will be available if data is not currently
copied to the clipboard). You will only be able to paste new items of
a specific level in the hierarchy by right-clicking the containing folder
icon. For example, to create a copy of an overlay item, you will need
to select on the item itself, and a
option by right-clicking the Overlays folder:
Select/Deselect All: select all items
of the current sheet, overlay or projection.
Data Object Manager: launches the Data Object
Manager
to allow you to modify loaded data objects.
[Data Type] Properties: shows the properties
dialog for the selected item.
Insert: opens the Plot
Item Library,
allowing you to insert a sheet-specific plot item.

|
When inserting plot items
with this command, at the Sheets
level or above, it is important to remember that any plot items
that relate to a particular projection (for example, a title bar
that will list the description of a projection) should not
be added at this level, instead, they should be added by right-clicking
the relevant Projection
folder and selecting Insert... |
Copy [Data Type]:
allows you to copy the currently selected item to the clipboard. Note
that if an item is copied, it can be pasted (as a copy) into the containing
folder by right-clicking that folder icon and selecting a paste option.
Insert...:
displays the Plot
Item Library dialog, allowing you to choose a plot item for
insertion into the current plot. The contents of the displayed dialog
will depend on the type of data selected. For example, if the Overlays
menu (or a Plots overlay) is selected, the resulting library will contain
only overlay plot item types, such as a 3D overlay, line overlay and so
on.
Insert copy of...:
you can insert a duplicate of the currently copied item using this item.
As mentioned above, this option is only available if you right-click the
containing folder of the originally copied item.
Paste Plot item/Format/Special:
methods for pasting data. See copying plot items for more information.
Quick Legend:
displays the Quick
Legend dialog for simple legend creation and editing.
Display Legend:
if a specific overlay project is selected, displays the legend for the
select overlay.
Wizard: opens a Object
Summary dialog allowing you to view and (optionally) amend properties
related to the selected item.
Reset: reset the selected
overlay to default settings.
Rename: rename
the selected overlay.

|
Overlay names (i.e.
the overlays listed under the Overlays folders in the Sheets control
bar) will track object names (i.e. the object names displayed
in the Loaded Data control bar) until the overlay has been renamed
by the user. After this point, the overlay will retain the user-defined
name, even if the base object is renamed.
|
Delete...: delete
the currently selected item.
In addition, if a sheet is selected, the following
option is available:
Lock/Unlock Overlay
updates: if a sheet is 'locked' it will not be altered when new
data is loaded into memory. If locked, the 'unlock' option will appear,
enforcing an update of all associated projections when data is imported.
Note that any unload operation will override a locked sheet; it is not
possible to show data in a plot sheet that does not exist in memory.
If all overlays are locked for the entire sheet -
that sheet is shown with a black 'lock' symbol in the Sheets
control bar. Conversely, if all sheets are unlocked, no lock icon is shown.
If a proportion of the overlays displayed within a given sheet (but not
all) are locked, a lock icon is still displayed, but in grey:
Consider the following example where a sheet contains two projections.
If the overlays for both projections (and thus, all overlays for the sheet)
are locked, the following icon appears:

Whereas if only one of the two projections is locked,
the icon will appear as a light grey version:

Finally, if no overlays are locked for any displayed
projection, a 'normal' icon is shown:


 Logs Folder Menus
The Logs folder in the Sheets control bar is used to access log-
and plot-related display functionality.
The context menus available for each section differ, and are
described below:
Logs Folder Menu:
Right-clicking the Plots folder icon allows you to perform the
following actions:
New Log Sheet:
adds a new, blank log sheet to memory.
Paste: if
you have previously copied a log sheet using the context menu
at sheet-level (see below) you can paste a copy of this data into
the Logs folder using this option.
If no data currently resides on the clipboard, this command will
be unavailable.
Sheet, Projection and Overlays Menu:
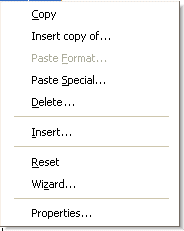
Right-clicking a Hole Log Frame,
or sub-item shows the following menu:
Copy: allows
you to copy the currently selected item to the clipboard. Note
that if an item is copied, it can be pasted (as a copy) into the
containing folder by right-clicking that folder icon and selecting
a paste option.
Insert copy of...:
you can insert a duplicate of the currently copied item using
this item. As mentioned above, this option is only available if
you right-click the containing folder of the originally copied
item.
Paste Special:
this is another method of pasting data. The Paste
Special dialog is displayed. See copying plot items for
more information.
Delete: delete
the currently selected item.
Insert: insert
an overlay with this option. Selecting it displays the Insert
Plot Item dialog. If an individual overlay item is currently selected,
you will have the option of inserting a Legend box. If the Overlaysfolder
is right-clicked, you will have the option to insert a variety
of overlay types; in this scenario you will need to select an
overlay type, and in the following dialog, select an object to
create a new overlay type (only objects associated with the selection
will be available - for example, if you select a Faces
overlay type. only wireframe objects will be selectable).
Reset: reset
the selected overlay to default settings.
Wizard: opens
a Object
Summary Dialog allowing you to view and (optionally) amend
properties related to the selected item.
Properties:
If an overlay item is selected, this command opens the Format
Display dialog. For other types (such as folders), the
Object Summary Dialog is displayed.

 Tables Folder Menus
The Tables folder in the Sheets control bar is used to table-related
display functionality. As with the Design
folder, this area shows a hierarchical structure. The Table folder
can be expanded to show a list of all tables currently in memory.

|
To
add a new table to memory - ensure thePlotswindow is displayed ()
and in the Plots window select. You will
then be prompted to select a project file to base the
table contents upon. Alternatively, add a table using
the context-menu function described below.
|
The following context menus are available:
Tables Folder Menu:
Right-clicking the Plots folder icon allows you to perform the
following actions:
New Table Sheet:
allows you to add a new table. Selecting this option shows the
Select Table
Source dialog, which is used to select an object. When
selected, and OK clicked, a new table
is created in memory.
Paste: if
you have previously copied a table using the context menu at table-level
(see below) you can paste a copy of this data into the Tables
folder using this option. If no data currently resides on the
clipboard, this command will be unavailable.
Table Menu:
Right-clicking a table below the Tables
folder displays the following context menu (options will be available
based on context). If a table component (that is, an object's
data column) is selected, a different menu is shown - see Table Component Menu further
below):
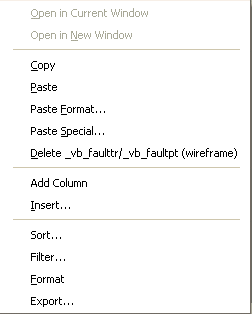
Open in Current Window:
this option is not currently supported in Studio 3.
Open in New Window:
this option is not currently supported in Studio 3.
Copy: copy
the currently selected item to the clipboard.
Paste/ Paste Format/
Paste Special: these options are not currently supported
in Studio 3.
Add Column:
add a data column to the selected table using this option. Displays
the Add Column
dialog.
Insert: this
option is not currently supported in Studio 3.
Sort: allows
you to sort the contents of the currently selected table using
the Table
Sort Dialog.
Filter: allows
you to filter the contents of the currently selected table using
the Table
Sort Dialog.
Format: allows
you to format the contents of the currently selected table using
the Format
Column Display Dialog.
Export: export
the currently selected table using the Data Export dialog and Data Source
Drivers.
Table Context Menu:
Expanding a table description shows the data columns from which
it is comprised. Each table field, if selected, shows a context
menu.
Open in Current Window:
this option is not currently supported in Studio 3.
Open in New Window:
this option is not currently supported in Studio 3.
Copy: copy
the currently selected item to the clipboard.
Paste: paste
the currently copied item.
Delete: delete
the currently selected data column from the table in memory.
Properties:
shows an Object
Summary Dialog displaying the selected data column's properties.

 Reports Folder Menus
The Reports folder in the Sheets control bar is used to table-related
display functionality. As with the Design
folder, this area shows a hierarchical structure. The Table folder
can be expanded to show a list of all tables currently in memory.

|
To
add a new table to memory - ensure thePlotswindow is displayed () and in the Plots window select. You will then be prompted to select
a project file to base the table contents upon. Alternatively,
add a table using the context-menu function described
below.
|
The following context menus are available:
Tables Folder Menu:
Right-clicking the Plots folder icon allows you to perform the
following actions:
New Report Sheet:
allows you to add a new table. Selecting this option shows the
Select New Report Sheet dialog, which
is used to select a report type. When selected, and OK
clicked, a new report is created in memory.
Paste: if
you have previously copied a table using the context menu at table-level
(see below) you can paste a copy of this data into the Reports
folder using this option. If no data currently resides on the
clipboard, this command will be unavailable.
Table Menu:
Right-clicking a report description below the Reports
folder displays the following context menu (options will be available
based on context). If a report component (that is, an object's
data column) is selected, a different menu is shown - see Report Component Menu further
below):

Open in Current Window:
this option is not currently supported in Studio 3.
Open in New Window:
this option is not currently supported in Studio 3.
Copy: copy
the currently selected item to the clipboard.
Paste/ Paste Format/
Paste Special: these options are not currently supported
in Studio 3.
Add Column:
add a data column to the selected report using this option. Displays
the Add Column
dialog.
Insert: this
option is not currently supported in Studio 3.
Sort: allows
you to sort the contents of the currently selected report using
the Table
Sort Dialog.
Filter: allows
you to filter the contents of the currently selected report using
the Table
Sort Dialog.
Format: allows
you to format the contents of the currently selected report using
the Format
Column Display Dialog.
Export: export
the currently selected table using the Data Export dialog and Data Source
Drivers.
Report Context Menu:
Expanding a report description shows the data columns from which
it is comprised. Each report field, if selected, shows a context
menu.
Open in Current Window:
this option is not currently supported in Studio 3.
Open in New Window:
this option is not currently supported in Studio 3.
Copy: copy
the currently selected item to the clipboard.
Paste: paste
the currently copied item.
Delete: delete
the currently selected data column from the table in memory.
Properties:
shows an Object
Summary Dialog displaying the selected data column's properties.

 Design
Folder Menus
The Design folder in the Sheets control bar displays items according
to the view hierarchy of your application. The tree menu can be
expanded to show the Design, Design View,
Design Projection and Overlays
items. Note that all settings applied in this area will affect
the display of data in the Design
window only.
Context menus are available for the Design
View, Design Projection, and Overlays
(individual items):
Design View Context Menu
Right clicking the Design View
icon shows the following option:
Settings:
opens the Project
Settings dialog, at the Data
Display tab, allowing you to access general data display
properties for the Design window.
Design Projection Context Menu
Right clicking the Design Projection
icon shows the following option:
Set View:
opens the View
Settings dialog, allowing you to configure the view
plane settings for the Design window.
Overlays Context Menu
Right-clicking an item in the Overlays
folder icon shows the following context menu (note
that some options will only be activated if a
has been performed previously).
Field Details:
Format: shows
the Format
Display dialog, allowing you to configure the selected
overlay.
Use Template:
apply a display template to the selected overlay (find
out more about Display Templates...). A sub-menu of templates
that are applicable to the selected data type (wireframe, block
model, string etc.) will be shown. Select a template to apply
it to the overlay.
Look At: quickly
centre the current view, updating the definition so that the selected
overlay is maximized to the Design window screen. Note that data
will be shown in its full context; neighbouring data will also
be displayed.
Copy: copies
the current overlay information to the clipboard. Subsequent access
to the same context menu (at overlay item-level) will then reveal
the following paste options:
Paste Plot Item:
this option is only available if an item has been previously pasted,
and the Overlaysfolder
selected. You can then insert a copy of the previously copied
overlay into the Overlays folder.
This is only relevant (and available) for Plots
window overlays.
Paste Format:
each overlay has an associated format, configured using the Format Display
dialog. You can apply the settings from one overlay to another
overlay using this option. For example, if you have two loaded
wireframes, one of which is set to display Faces, and the other
to display Intersections; you can copy the intersections format
to the faces-style overlay by selecting
on the former, and
on the latter.
Paste Special:
this is another method of pasting data in the Plots
window (it is not available in other windows). The Paste
Special dialog is displayed. See copying plot items for
more information.
Quick Legend:
displays the Quick Legend dialog, allowing you to set up a numerical
legend for applying to the current overlay.
Display Legend:
if a legend has already been associated with the selected overlay,
this option is used to display a preview of the legend intervals
and formatting, in a separate dialog.
Legend Column:
you can apply the legend currently associated with the selected
overlay to any column of data within the underlying object using
this menu; the menu cascades a list of all available data fields
- selecting one will apply the current legend to the selected
data column instantly.
Reset: reset
the selected overlay to default settings.
Rename: rename
the selected overlay.

|
Overlay
names (i.e. the overlays listed under the Overlays folders
in the Sheets control bar) will track object names (i.e.
the object names displayed in the Loaded Data control
bar) until the overlay has been renamed by the user. After
this point, the overlay will retain the user-defined name,
even if the base object is renamed.
|
Delete Overlay: select this option to remove the overlay
from memory, after confirmation. Please note that you cannot undo
this operation.


