|
|
An explanation of the menu options available. |

Sheets/Project Data | 3D Folder | Sections
Note: A Datamine eLearning course is available that covers functions described in this topic. Contact your local Datamine office for more details.
The active 3D window folder of the Sheets control bar is used to set view properties for all loaded 3D window data, access object-specific properties, and load/unload data from memory.
The Sections sub-folder contains a list of all loaded section objects (this includes the Default Section and any additional user defined sections) and any loaded/imported section definition files.
The following menu hierarchy is used:
- Top level menu (Sheets control bar only) - contains commands relating to all sections in memory. More...
- Sections parent menu - contains commands relating to a section, or group of sections if multiple definitions exist. More...
- Section Definition menu - contains commands relating to a single definition within a parent section. More...
Find out more about the relationship between parent sections and section definitions here.
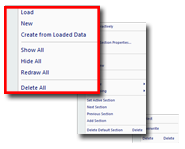
Sections Top Level Menu (Sheets control bar):
-
Double-clicking the Sections folder displays a Data Import dialog, allowing you to select a Section Definition File for import.
-
Right-clicking the top level Sections folder shows the following menu options:
Load: displays a Data Import dialog, allowing you to select a Section Definition File for import (this emulates the double-click behaviour for this folder icon).
New: select this option and click in the active 3D window to show the Orientation dialog. Note that this is the same command as Section Orientation 1 Point.
Create from Loaded Data: allows you to select a section definition file in memory in order to create another instance of a 3D section object. Note that you can only import objects that are currently part of the active project - if all available items of this data type are already loaded and viewable, or if no items of the specified type exist in the project file, you will be alerted to this fact and the import operation will cease.
Show All: enable the display of all items held within the selected folder.
Hide All: disable the display of all items held within the selected folder.
Redraw All: redraw (refresh) the view of all items in the selected folder.
Delete All: remove all loaded GVP project items from your scene - note that this will not delete the files from disc.
Sections Parent Item Menu:
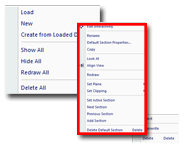
Right-clicking an item in the first sub-level of the Sections folder shows the following menu options:
Save: (only appears if multiple section definitions exist for the section) save the current overlay's data object without further prompts. For this option to be available, you will need to have already saved the associated object in memory to a file (e.g. using theData | Save Asoption - see below).
Note that you will only be able to save to the associated data file if it is writable, and you have the relevant access permissions.
Data: (only appears if multiple section definitions exist for the section) this option cascades the following sub-menu:
-
Reload...: reload the selected object into memory using new load/import settings.
-
Refresh...: refresh the selected object into memory using its associated data load/import settings.
-
Save As...: save the selected new 3D object to the project file or a new Datamine file. This option opens the Save New 3D Object dialog.
-
Export...: export the selected object to a Datamine or non-Datamine file, using the Data Export dialog.
-
To Excel...: export the selected object's table and open it in MS Excel. This provides an quick means of exporting data to *.xls format.

Microsoft Excel only supports a finite number of data rows, therefore, this option is not suitable for large data sets that have more data rows than this. If such a situation occurs and you are using Excel 2007, only the first 65535 rows of data will be displayed.
-
Unload...: unload the selected object data from memory.
")
This does not remove the file from the project (i.e. it remains listed in the Project Files control bar), nor does it remove the file from disk.
Make Active Section: selecting this option will make the current section 'active', meaning subsequent interactive design commands will
Data Object Manager: (only appears if multiple section definitions exist for the section) displays the Data Object Manager, with the associated data object selected for further analysis. More...
Edit Interactively: use the View ribbon's section widgets facility to edit the position and orientation of the selected section. Find out more about Section Widgets here.
Rename: rename the parent section item using this command.
[Section Name] Properties: access context-sensitive properties for the selected section, using the Section Properties dialog.
Copy:
creates an identical, automatically named copy of the selected object
(note that there is no requirement to paste the item - the list of
objects will be updated automatically). Copied objects have no link
to their origins; changes to the original object will not affect the
duplicated item, and vice versa.
Note that only the currently active section is copied to a new object
- if a section definition table is loaded, the other sections will
not be contained within the new section object.
Look At: automatically positions the 'camera' to show the selected section.
Align View: selecting this option will automatically rotate the view of the current data so that the specified section is viewed 'face on', i.e. perpendicular to the viewpoint. Note that if LookAt mode is active, the view will be rotated around the specified point, but if inactive, the view will rotate around the current camera position to so that the final viewing direction is perpendicular to the section.
-
In LookAt mode, this command will always try to ensure that the viewpoint remains on the 'same side' of the LookAt point, using the reverse normal of the section if necessary.
-
If not in LookAt mode, this command will always try to force a view directly towards the section, using the reverse normal of the section if necessary.
Redraw: redraw the currently selected section in the active 3D window.
Set Plane: this sub-menu allows you to redefine the orientation of the current section interactively, using one of the following options:
-
By 1 Point: select this option and click a point on a surface to display a second orientation menu from which you must select either toAlign to Surface(following the normals of the selected location),Horizontal,North-SouthorEast-Westoptions, using theSection Orientation by 1 Pointdialog.
-
By 2 Points: similar to the above option, but two points are required. After the second point has been digitized, you are offered options of either a Horizontal, Vertical or Perpendicular alignment before the section is updated.
-
By 3 Points: this option allows you to define all of the information that is required to set up a view direction; the first point references the bottom left of the view 'plane', followed by the top-left and bottom-right points. The resulting plane formed from the 3 points will be used to set the new view direction.
Set Clipping: control how data is clipped in relation to the defined section:
None: do not clip data.
Front: clip data that lies in front (according to the world coordinates) of the section plane.
Back: clip data that lies behind (according to the world coordinates) the section plane.
Outside: clip all data that does not fall with the 'volume' of the section. For example, if a section is defined to be 5 meters wide, the resulting data slice will also be 5 meters wide.
Next Section: if a section definition table has been loaded,
containing multiple instances of view sections, selecting this option
will display the next section in sequence (in the top-down order specified
by the underlying data table).
Previous Section: as above, but shows the previous section in the loaded table.
Add Section: add a new definition to the current section in memory - this definition will contain position, orientation and section width properties. You can add as many section definitions to a parent section as you like. Each will be shown as a new entry in the list and can be independently configured using the Section Row Properties dialog.
Rename: rename the selected 3D overlay.
Delete [Section Name]: remove the current section from memory (and the display area) using this option. You will be asked to confirm your deletion -
|
|
Note that if a parent section, containing multiple entries, is deleted, it is the database table (i.e. all defined section orientations) that will be removed from memory, and not just the section currently displayed. |
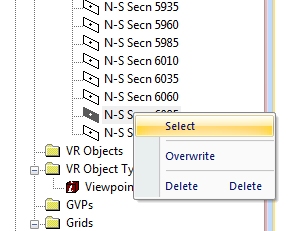
Section Definition Menu:
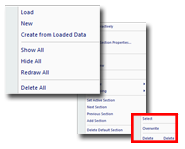
Right-clicking a section definition in the second sub-level of the Sections folder shows the following menu options:
Select: make the section definition active by selecting it - this will push the properties held in the section definition up to the parent item, which can then be edited further, if required.
Overwrite: update the selected section definition with the active section's properties.
Delete: delete the current section definition from the loaded section definition table.