
Independent View
To access this screen:
-
View ribbon >> New 3D Window >> Independent.
The Independent View screen is used to create and configure an independent 3D window, either as an embedded tab, or a floating window.
"Independent" 3D views allow you to scrutinise all types of data, with different formatting in unlinked windows. For example, you can fully scrutinise your geological data with independent formatting and loading of any data types in multiple windows; show your resource model as an intersection showing AU grades within bounding structures in one window, then display the model and corresponding drillhole data in the other with front clipping.
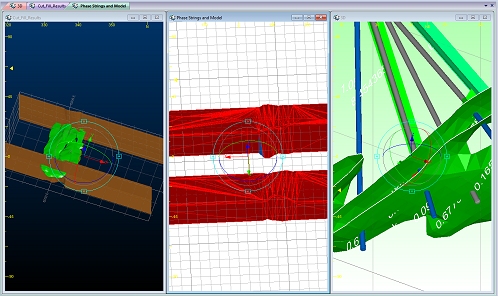
3 independent windows showing different rendering of the project data
For more information on independent 3D windows, see Independent 3D Windows.
Multiple 3D Windows
Your application supports multiple, linked 3D windows.
These additional windows can be additional representations of the current window (and linked to it), either by splitting the screen horizontally and/or vertically, or can be an 'external' floating view that is connected to your primary 3D window data and formatting options. All of these views are linked to a single data source and formatting settings.
Each window is supported by its own Sheets control bar sub-menu.
Independent 3D windows are also available. These allow you to set your own window-specific formatting of overlays, sections, grid and many other scene controls. Independent windows can either be embedded or external/floating.
Independent View Data Inheritance
How independent windows react to the presence of new data, and which overlays are created when the window is created, depend on two important settings provided by the Independent View screen.
Copy overlays from the current view
Checked by default, this setting relates to what happens when the window is initially created.
When checked, the initial state of the new, independent window mimics the primary 3D window as closely as possible, including a copy of all 3D object overlays there at the point of creation. You can adjust these overlays, or delete or remove overlays without affecting the primary 3D window after. This is the primary difference between an 'external, linked' window and an 'independent' window.
If you uncheck this option, the new independent view won't have any overlays to start with, so there will be an empty 3D scene.
Note: You can still add overlays from loaded object data afterwards using the Sheets or Project Data bar's Create from Loaded Data command.
Automatically synchronize overlays
This settings determines what happens when new data is added via another window, such as by drag and dropping data, or creating new object data via digitizing, for example. In other words, this setting dictates if data is inherited from other views after creation.
Unchecked by default, if you load data whilst another window (such as the primary 3D window) is active, a default overlay won't be created in the independent view automatically, although you can still generate overlays later if required (as above, using Create from Loaded Data).
If checked, an overlay with default settings is created in the independent view when data is loaded into another window. Formatting of this overlay afterwards is done independently.
Note: This setting only impacts the inheritance of data from actions performed in other windows. It is ignored if you create data directly within the independent window, for example, by digitizing a string or drag and dropping data into the independent window. This will always create a default overlay in the active window, whichever one it is.
You can change this property later by selecting the top-level 3D window folder in either the Sheets or Project Data control bar: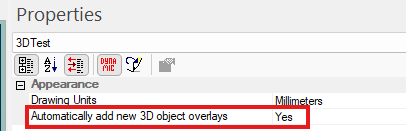
Managing Independent Views
To create a new independent window:
-
Display the Independent View screen.
-
Enter a New name for your 3D window. If you are creating an independent-embedded window type, this name appears on the window tab, for example:

If you choose an existing name, a numeric suffix is applied automatically, for example:

-
Choose what data (if any) from the primary 3D window is copied to the new one:
-
If Copy overlays from the current view is checked, all existing overlays in the primary 3D view (and their settings and visibility status) are copied to the new 3D view. This is a good idea if you want to present a visual variation on the existing displayed data.
-
If Copy overlays from the current view is unchecked, no 3D overlays are created in the new scene. You will need to create them manually (using the Sheet or Project Data bar's folder context menu option - Create from Loaded Data).
-
-
You can optionally Automatically synchronize overlays:
-
If checked, any data loaded into the primary 3D view is automatically represented with a default overlay in the new independent view. Effectively, this means you will see all newly loaded data in the independent view straight away after loading, but can format (or even hide) the overlay independently of other windows afterwards.
-
If unchecked, data overlays are not automatically added to the independent view, but can be added later if required.
Note: You can change the window's data inheritance setting using the Properties control bar.
-
-
Choose if the new window is to be Embedded (shown as a tab within the main application) or External (a floating window, unattached to the main application. You can't change this setting afterwards.
To delete an embedded, independent 3D window:
- Select the tab of the embedded window you wish to remove.
-
Click the "x" in the top right corner of the window display (be careful not to close the application instead).
To swap between existing independent-embedded windows
You can select any of your current independent-embedded windows with one of these methods:
- Select the corresponding window tab, for example:
- Select the appropriate entry in the Sheets
or Project Data control bar, for example:

To display multiple embedded views simultaneously:
The simplest way to do this is to use window arrangement tools:
- Create the embedded windows that you require
- Activate the Home ribbon.
- Expand the Window >> Arrange drop-down menu.
- Select the Cascade, Tile Horizontally or Tile Vertically option
- Hide the windows you don't wish to see (you can re-display them later if you need to)
- Position/align each window as you want them, for example:
Related topics and activities