
insert-points-mode ("ipo")
See this command in the command table.
To access this command:
-
Digitize ribbon >> Edit >> Insert Points.
-
Using the command line, enter "insert-points-mode" and press ENTER.
-
Use the quick key combination "ipo".
-
Display the Find Command screen, locate
insert-points-modeand click Run.
Command Overview
Insert vertices (string points) into a string. Snap settings are honoured.
This command can be run either before or after selecting the required string. The steps below show how to use the command in the case where the string has been preselected. For increased control, first select the required string before running the command. Inserting points without preselecting the string can potentially result in points being inserted in adjacent strings.
The undo-last-string-edit or redo-last-undo (<CTRL>+Y) commands can be used to remove incorrectly inserted points during the command session.
When inserting string points, filters and display settings are honoured.
There are 3 possible ways that this type of editing can be performed:
-
Data can be edited relative to the screen (that is, around a plane that is orthogonal to the current camera view). This behaviour is performed if the project setting Move relative to screen is checked. See Project Settings: Points and Strings.
-
Data can be edited relative to the current data plane. This type of editing allows the planar alignment of data to be maintained regardless of the position and direction of the 3D 'camera'. The bounding box aligns with the plane of rotation/point movement. This behaviour is performed if the project setting Move relative to plane is enabled. See Project Settings: Points and Strings.
-
Data can be edited using a locked view. In this case, the camera is always orthogonal to the view. See Section Locking.
Note: This command is influenced by the state of the edit-coincident-points-switch . If this is turned on then the point is inserted on any coincident segment. (Currently a coincident segment is defined by having coincident vertices).
Tip: Whilst digitizing, complete the digitizing operation by double-clicking or double-tapping the final point position.
Click Options
The following mouse click actions can be used when inserting points:
-
Left-click—Insert a new vertex, between the two closest vertices, at the selected location.
-
Right-click—Insert a new vertex, between the two closest vertices, at the snap point.
-
Left-click-and-drag—Insert a new vertex in the string, between the two closest vertices, at the location where the click-and-drag action finishes.
-
Right-click-and-drag—Insert a new vertex in the string, between the two closest vertices, at the final snap point.
The last two methods are essentially an 'insert and move' action all in one.
Point Depth Interpolation
Inserting points in a 2D graphical environment (computer screen) when working in 3D space, requires the interpolation of a third dimension. The position of the point is calculated as a mean interpolation of neighbouring screen points, for example.
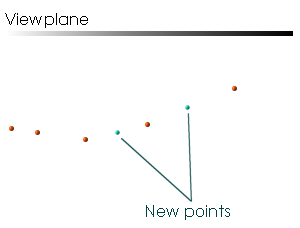
For example, suppose the 3D window's view plane is horizontal at an elevation of zero. Suppose also there is a string with each of its Z coordinates at 10. If a point is inserted then its Z coordinate will be added at an elevation of 10.
Command steps:
- Select the required string data if you want to constrain point additions to only one string or strings.
- Run the command.
- Click, click-and-drag or right-click to place the new points (see "Click Options", above).
- Click Done to close the command.
Related topics and activities