
Edit Samples
The following information relates to the vein-from-samples and surface-from-samples commands.
The Create Vein Surface task is a focussed tool for the calculation of hanging wall (HW) and/or footwall (FW) surfaces that represent vein or vein-like lodes. Similarly, the Create Contact Surface task is used to generate contact surfaces between groups of contiguous categorical values.
This topic explains how the vein-from-samples sample editing commands let you reverse samples, or ignore hanging wall or foot wall positions by deactivating them.
Note: A Datamine eLearning course is available that covers functions described in this topic. Contact your local Datamine office for more details.
The vein-from-samples command assesses the overall orientation of an implied structure and will assign HW and FW points accordingly. This assessment involves determining which side of the trend surface a point lies, with the assumption being that all hanging wall points are on one side and all foot wall points on the other, or pinching out will occur. In cases where the general direction of drilling is similar, the default assignment is typically acceptable.
However, in other cases (such as deeply dipping or vertical lodes, or where a structure has multiple implied anisotropic trends), there is an increased tendency for drillholes to intercept the trend surface from opposite sides and directions, meaning there is no consistent assignment of hanging wall and foot wall points. This poses a challenge to implicit modelling routines (but not ours).
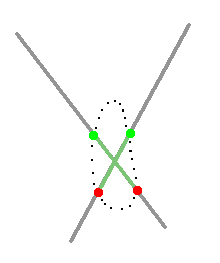
Consider the example below where the trend surface is formed by holes in different alignments. The implied surface is vertical and the dip of hole descent varies from 70 to 120 degrees. Constructing a surface with the default point assignment will result in excessive pinching out as the hanging wall and footwall surfaces become inverted in several places:
Where the underlying structure (based on the presence of drillholes in the vicinity) strongly implies a steeply-dipping vein, it makes sense to reverse samples in this case and if the general trend is for holes to penetrate the structure from opposing sides, the Auto Reverse All option could be useful as it will determine the mean plane of the intervals (near to vertical) and apply hanging wall and foot wall assignments appropriately.
Editing and Reversing Samples
Interactively editing samples is achieved in the Manage Contacts group, using controls in a left-to-right order.
-
HW and FWcolour pickers – Edit the colour of HW or FW points using the colour picker menus. The contact editing buttons update dynamically to match the selected colours, and your changes are saved to the current project.
-
Enable / Disable – Alter the action of a hanging wall (From) or foot wall (To) point by clicking either the On or Off buttons for the corresponding point type and then picking one or more points in the 3D window.
-
 HW on – Enable a previous disabled hanging wall point.
 -
 HW off – Disable an enabled hanging wall point.
 -
 FW on – Enable a previous disabled foot wall point.
 -
 FW off – Disable an enabled foot wall point.
Click Done to complete point editing mode.
-
-
Gaps: Off – Enter a command mode that lets you pick one or more gap-related points in the 3D window to deactivate them. Click Done to complete point editing mode.
-
All Gaps Off – Deactivate all gap-related points in the current context.
-
Enable All Points – Reactivate all points globally. This replaces the previous gap-specific reactivation workflow.
-
Swap to change the HW and FW assignation of points of either one or more intervals:
-
 Swap HW / FW – Switch a sample between a
hanging wall and a foot wall - if done at both ends of the interval, this results in a full
inversion of the interval.
Swap HW / FW – Switch a sample between a
hanging wall and a foot wall - if done at both ends of the interval, this results in a full
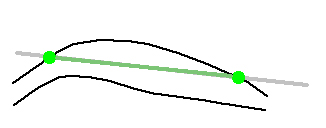
inversion of the interval.You can convert a sample into a double-hanging-wall or double-foot-wall interval. This might be useful where a hole is aligned so that it intercepts the lode hanging wall or foot wall in two places, for example:
Click Done to complete point editing mode.
-
 Auto Swap All – Create a trend plane through all sample
intervals and determine how intervals align in relation to the
normal of this plane, automatically reversing them if their direction
is significantly different from what is expected.
Auto Swap All – Create a trend plane through all sample
intervals and determine how intervals align in relation to the
normal of this plane, automatically reversing them if their direction
is significantly different from what is expected.Note: automatic reversal is performed when an attribute value is first selected for modelling.
-
Collar and EOH Point Influence
Depending on the command you are using, either a positive interval is comprised between a hanging wall and foot wall point (vein modelling) or a single contact point is used to denote the coincident location of lithological domains (contact surface modelling). In both cases, where drilling terminates within the selected lithology, the end-of-hole position can either be used to denote the foot wall or contact point, or it can be ignored, assuming the structure within which the sample has terminated is more substantial than the drilling implies.
For example, based on the location of surrounding points, it may be more likely that the undrilled lithology beyond the end of hole is positive.
You can control collar and end-of-hole points using the Snapping group, with the following options:
-
Snap—where collar or EOH points are positionally critical, select this option to force the generate surface to be snapped to the points. This is the default setting for new models.
-
Pass above, Pass below—treat points as a minimum or maximum bound (which allows the surface to pass above a collar or below an EOH point).
-
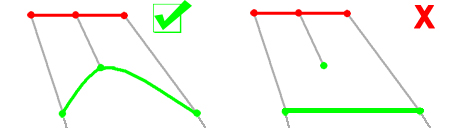
Ignore—points are not considered in modelling. For example, if EOH points are ignored, only the FROM (hanging wall) point of the hole is used to construct the hanging wall surface. The end-of-hole isn't considered in this case when the foot wall surface is generated:
Note: it is possible, if positive samples rise completely to the collar position, or all samples fall to the end-of-hole, for surface generation to fail as no sample mid points can be calculated (this is important to allow a trend surface to be calculated). If this happens, your modelling report indicates this is the case and that the collar or EOH positions may be better 'snapping' positions, rather than using the Pass Above or Pass Below options.
Related topics and activities