|
|
Survey Database Folder Menus |

Project Data Control Bar - Survey Database Menus
To access this folder:
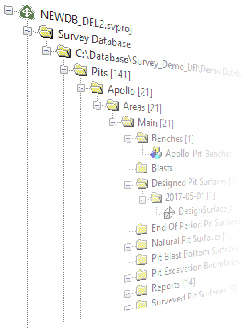
- The Survey Database folder is a sub-folder of your Project Data control bar. It can be expanded to reveal further categories of data.
The Survey Database folder of the Project Data control bar provides access to a dynamic context menu system.
For each level of the currently-initialized database, various options are available. Only the options that are relevant to your survey database folder will be displayed, and in some cases, options are available for a certain type of data (e.g. a reporting template).
Generally, the 'deeper' you go into the Survey Database folder, the more options you will be able to access; options will be provided for every item, plus all functions for more general database areas. The most specific commands will be listed at the top of the menu, with more general commands (potentially applying to a wider data scope) shown below.
For example, if you right-click the Designed Pit Surfaces folder under Pits | (Pit Name) | Areas | (Area Name), you will be able to access the Configure Database panel with all settings filled out for pit surface data, and also set and manage the current pit or area, or configure general database settings.
Here are all possible options in Survey Database folder context menus (see further below for menus relating to data files).
- Add to Database...:
Available for all survey data-type folders (e.g. Development Design Strings, Designed Pit Surfaces, Development Scan Solids, Pit Excavation Boundaries etc.) only
Opens the Add to Database dialog. The dialog will be configured to add data of the currently selected type; fields will be automatically populated to match the area that you are currently in. More... - Configure Database:
Available for any folder in the Survey Database area
Opens the Database Settings dialog. More... - Open File Location...:
Available for any folder in the Survey Database area
Opens a Windows folder containing the selected item. - Manage Areas...:
Available for the general 'Areas' folder or lower folder levels
Add, edit and delete pits from the current database, using the Manage Areas dialog. Areas for the appropriate pit (only) will be shown. More... - Manage Declines...
Available at all sub-folders of the Declines top level folder.
Add, edit and delete declines from the current database, using the Manage Declines dialog, More... - Manage Levels...:
Available for underground sub-folders for a specific level
Add, edit and delete levels for underground data storage, using the Manage Levels dialog. Levels for the appropriate area (only) will be shown. More... - Manage Pits...:
Available for the general 'Pits' folder or lower folder levels
Add, edit and delete pits from the current database, using the Manage Pits dialog. More... - Manage ROMs...:
Available for the general 'ROMs' folder or lower folder levels
Add, edit and delete ROMs from the current database, using the Manage ROMs dialog. More... - Manage Stopes...:
Available for the Stopes folder of a particular level.
Add, edit an delete stope description, using the Manage Stopes dialog. More... - Manage Surveyors...:
Available for any sub-folder of the 'Surveyors' folder
Add, edit and delete Surveyors from the current database, using the Manage Surveyors dialog. More... - Manage Templates...:
Available for any sub-folder of the 'Settings' folder
Opens a Manage dialog corresponding to the selected report folder. - Set Current Area:
Available for specific area folders or lower folder levels
Set the currently-selected area to be the current area. For open pit data storage, this will automatically update the Current Pit and Current Area fields in EOM reporting dialogs when they are next (re)opened. For underground storage, this will automatically update the Current Decline and Current Area fields in the Add to Database dialog. - Set Current Decline
Available for the named decline folder and sub-folders.
Set the currently-selected decline to be active. This will automatically update the Current Decline and Current Area fields in the Add to Database dialog. - Set Current Level (underground
data storage only):
Available for any folder beneath the a specific level folder
Set the currently-selected level to be the current level. This will automatically update the Current Decline, Current Area and Current Level fields in the Add to Database dialog. - Set Current Pit:
Available for specific pit folders or lower folder levels
Set the currently-selected pit to be the current pit. This will automatically update the Current Pit field in EOM reporting dialogs when they are next (re)opened. - Set Current ROM:
Available for specific ROM folders or lower folder levels
Set the currently-selected pit to be the current pit. This will automatically update the Current ROM field in the EOM ROM reporting dialog when it is next (re)opened. - Set Current Stope:
Available for specific Stope folders
Set the currently-selected stope to be the current stope. This will automatically update the Current Decline, Current Area and Current Level and Current Stope fields in the Add to Database dialog.
The terminal branches of the Survey Database folder tree may contain file references (if data has been added to, or created within, the current database). Right-clicking any file will reveal the following options:
File-Level Context Menu Options
Right-click a file to choose from one of the following options:
|
|
Not all commands in this section may be available. For instance, the Re-import option is only available if the data was originally imported using Data Source Drivers. |
Open: open the selected file in the Datamine Table Editor , for viewing and/or editing the file's contents.
Load: load the selected
file(s) into memory.
Another useful feature of this command is that it can be used in conjunction
with the <Ctrl> key held down to initiate a pre-filter of loaded
data.
|
|
Selected file(s) can also be loaded using drag-and-drop into any of the data windows. |
Preview: view the selected file in the File Previewer utility. Use this utility to preview 2D or 3D data before or after it is loaded into memory.
Display: display the selected Plots file in the Graphics window; this command launches DISPLA.
Re-Import: if the selected file was imported using the data source drivers, re-import it using the already associated driver and import settings. Use this option when the source file has been edited and the changes need to be shown in the resulting import *.dm file.
Export...: export the file to one of a variety of non-Datamine file formats; the Export Data dialog is displayed.
Remove From Project: remove the selected file(s) from the project.
This is not the same process as unloading data, which merely removes data from memory. Removing a file from the project, then saving the project file, will 'break' the association between the project file and the removed file. |
Cut: cut the selected file(s) to the clipboard and remove it from the project.
Copy: copy the selected file(s) to the clipboard.
Delete: delete the selected file from disk.
This action will REMOVE THE FILE FROM DISK, not just remove it from the project, so care should be taken when using this command as it cannot be undone. A confirmation dialog will be displayed before this action is performed. |
The shortcut key combination <Ctrl> + <Delete> can be used to delete the selected project files from disk. |
Rename...: rename the selected file, on disk and in the control bar.
Open Containing Folder: opens a Windows explorer view, showing the selected file location on disk.
Share to Summit: share a file to Datamine's Summit data management system (for more information, contact your local Datamine representative).
Properties: display general, table and file attributes in the Properties control bar.
|
| Related Topics |
|