|
|
Assess the correlation of end-of-period surface data vs.actual results |

Calculate Blast Volume

To access this dialog:
-
Activate the Reports ribbon and select Reports | Blast
-
Run the command calculate-blast-volume (command information).
About this Help File
This article contains the following sections:
-
About Calculate Blast Volume: command summary information.
-
Command outputs: what this command produces.
-
Inputs: blast outlines: about the blast outline data that is used by this command.
-
Optional inputs: other constraining surface data that can be used to limit a blast volume.
-
Command workflow: typical command usage.
-
Field details: field-level documentation for this command.
This function is used to calculate a blast volume from a set of known blast collar positions (or point data) and an expanded blast outline to a defined relative level. You can further constrain the resulting volume using either a pit surface or string data and/or a bottom surface (which is useful to blast to a known contact surface).
This facility is currently only available for open pit survey scenarios.
The inputs to this command will be, typically a set of planned blast hole collar positions or a set of points indicating the top surface, plus a blast outline (closed perimeter) which will be expanded by a set amount (commonly half the design burden) or snapped to a crest string. This closed string is used to define the volume boundary, projected to the specified RL unless constrained by an input 3D surface or pit geometry.
To use this command, your Survey Database must contain the following data:
- At least one surveyor name.
- A blast boundary string - the designed string representing the outer limit of the blast, projected vertically downwards.
- A points file representing blast hole collar positions.
- Optional: a pit surface (if you wish to use one to constrain the blast volume). This can be a surface within your database or any surface data file on disk.
- Optional: a lower contact surface (if you wish to use one to constrain the blast volume).
|
|
Output files from Studio Survey's reporting processes follow the same file naming convention. This is adopted to make files more easily recognizable outside of Studio Survey, and to make searching for them easier. The following conventions are used
for reports: Report_<pit>_<area>_<rom>_<date>.xlsx For example: Report_Pit_1_Area_1_ROM_1_2020-03-23.xlsx The following conventions are used for output data: Open pit scenarios: <data type>_<pit>_<area>_<rom>_<date>.dm For example: NaturalSurface_Pit_1_Area_1_2020-03-24_tr.dm |
The Calculate Blast Volume command, when completed, generates the following artefacts within your Studio Survey database:
- A copy of the blast boundary string (the Blast Outline). This file is called "BlastBoundary.dm".
- The actual boundary of the blast as constrained by the above designed string plus any additional constraining surfaces (e.g. the pit shell and/or a blast bottom surface). This file is called "BlastVolume.dm".
- The 3D solid wireframes representing the blasted volume(s). A wireframe file pair called "BlastVolume_pt.dm" and "BlastVolume_tr.dm" are generated.
- The blast boundary holes representing that border the top surface of the blast. This file is called "BoundaryHoles.dm".
- The blast collar positions making up the remainder of the top surface of the blast. This file is called "DesignCollars.dm".
- A PDF or Enhanced Metafile (.emf) file representing a blast report, based on your current blast plot template.
- A table containing per-bench blast volume results. This file is called "Report.dm"
More about setting up a Studio Survey database...
More about adding data to a Studio
Survey database...
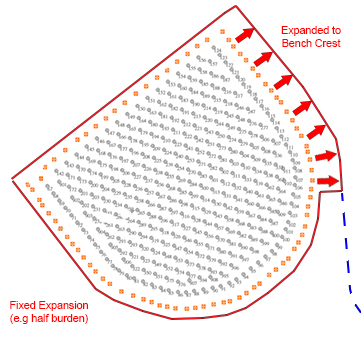
A blast boundary object is created by expanding a Blast Outline (string) object representing surveyed collars of boundary holes. The expansion distance is, typically, half of the design burden (distance from a single row to the face of the excavation, or between rows in the usual case where rows are fired in sequence), but may also be abutted to the crest of the design bench where the blast is sufficiently close to the pit wall. To assist with alignment of the pit wall, shortcuts to some boundary editing tools are included, and the default editing mode makes it easy to force a boundary to mimic the shape of another string using rapid digitize mode.
A blast outline is a mandatory input to the Calculate Blast Volume command.
You can also load an existing blast outline string, and load designed
pit strings within the active Survey database for visual reference
when adjusting the blast boundary.
Optionally, the following data can be used to constrain a blast volume:
- Pit wall data
Pit data is either specified as a wireframe surface or a pit design strings file, containing crest and toe strings. The volume will be clipped by either the specified surface, or the surface implied by the loaded string data. This can be full or partial clipping; for example, if the pit wall is partly within the projected blast outline, it is clipped, otherwise the projection continues to the defined RL, e.g: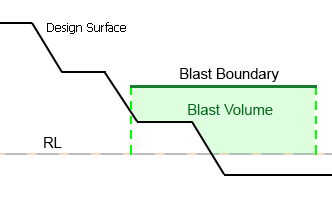
- Bottom surface
Typically representing a contact surface of an orebody or other structure that would inhibit the blast volume. An optional input, this surface will also constrain the resulting blast volume if encountered by the blast boundary projection, e.g: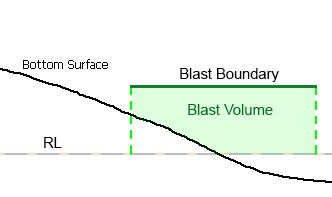
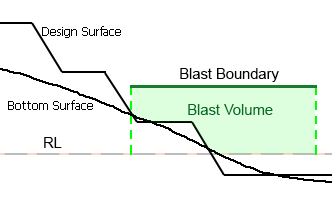
If a combination of constraining data exists within the projected blast outline, all will be used to calculate the resulting blast volume, e.g.:
The recommended procedure for completing a blast volume calculation is:
- Select the CurrentPit and Area to which the current volume calculation relates. These selections represent a folder within your Studio Survey database:
- The Current Pit drop-down list contains a list of all folders found in the Studio Survey Database's Pits folder.
- The CurrentArea drop-down list contains a list of all folders found in the Studio Survey Database's Pits | #Pit Name# | Areas folder.
- Enter survey details (Surveyor,
Blast ID etc.) and the
survey/firing date. The Blast ID can be a new text description
or you can select any existing (previously-defined) ID from the
drop down list.
The Survey Date is determined using a date picker tool. This will be the date on which the survey/ground information was gathered. The Date Fired is recorded using a similar tool.
Surveyor and Calculated By information is determined by your current database structure (the entries here represent folders in your current database's Surveyors sub-folder). Select the required name for each field before you continue. - Specify the initial Blast
Outline representing the perimeter of the blast (not expanded).
This may fully or partly encompass the designed blast holes. All
currently loaded string objects are listed here, as well as any
pit boundary or stockpile boundary data that
has been added to the database
(even if it is not currently loaded).
You can also load a blast outline string using the browse (...) button to pick a file from your project, or on disk. - Once an outline string has been selected, choose an attribute/value pair to select a subset of string data if you wish (useful for string files containing multiple boundaries), otherwise all string data will be used to constrain the blast volume. Ultimately, it is the boundary string that defines the shape that is extruded vertically to form the volume.
- Modify the blast outline to accommodate expansion and edit
the blast outline (if required) using the interactive commands.
For example, you may wish to snap part of the outline to one or
more crest strings, with the remaining outline expanded by the
fixed value (see "Blast Outlines", above).
It may be easier to adjust the blast boundary with reference to the a designed pit string. You can use the Design Pit Strings dropdown list to select/load the string file into the 3D window. This data isn't used in blast volume calculations but can help to adjust the boundary correctly. - Define the Top Surface as either surveyed collar positions and/or design holes (holes outside the expanded blast outline will be ignored). This is used to construct a DTM of the top surface of the blast volume, clipped at the (optionally expanded) blast boundary. You can also use the browse button on the right to pick a file containing collar data.
- If required, enter a distance value into the Minimum distance inside perimeter field and click Clean to remove the collar or design hole locations that are below that distance from the blast boundary string.
- Define the Blast RL; the reference level (RL) of the blast. The blast volume will not project below this fixed elevation value under any circumstances.
- (Optionally) select the Pit blast bottom surface file to constrain your blast volume with an intersecting contact surface/strata. The entries in this list refer to wireframe contact surface information that has been added to the current pit/area as a Pit Blast Bottom Surfaces data type (previously added, using the Add to Database dialog). The description found in this list is the Reference Name associated with the surface.
- (Optionally) define a Designed pit surface to constrain your volume. Design surface data will have already been added to your database as the Designed Pit Surface type. The selection is made by date associated with the design data when it was added to your database. As such, selection of a design surface is by date.
- Calculate the blast
volume. This will automatically generate a PDF view of a plot
file containing a view of your blast points and boundary,plus
summary volume calculation and blast details. If your local system
does not have access to a PDF printing driver, an Enhanced Metafile
(.emf) is produced instead.
These outputs, along with the 3-dimensional volumes representing the blasted volume, are stored in your Studio Survey database awaiting publishing (see below). - Publish the details of the blast. This is done using the Reports dialog. You can report blast details for a specific date, or between dates. More...
Previewing and Loading Report Data (including outputs)
EOM reporting panels offer functions to preview both your report input surfaces/strings and your output volumes and reports/tables.

- Preview data: available for all report inputs represented by 3D data.
- Load data: available for all report inputs represented by 3D data, including output data.
If results data is previewed, up to three separate displays will be created:
- A PDF or .emf report: this is generated based on the current Plot Template that is associated with your project. Only displayed if it is possible to generate an output report in this format. Not seeing a PDF or .emf report? Check to see if your report has an associated plot template, using the Database Settings screen.
- Wireframe Volume: this represents the cut & fill solids created by your reporting task. This is shown in Datamine's Table Previewer application. Only displayed if it is possible to construct a 3-dimensional volume from the input data of your report.
- A Report Table: this table, in Datamine binary (.dm) format, contains the volume assessment of your cut & fill volumes for the selected report. If it is not possible to construct a 3-dimensional volume, a table (nor any other output) will be displayed.
The Calculate Blast Volume dialog contains the following fields:
Current Pit: describes the pit to which the current report relates. The pit associated with the current project is set using the Database Settings screen. You can either pick an existing pit using the drop-down list or access the settings dialog to modify the pits of the current database.
Current Area: describes the pit area for the current report. This can be changed using the Database Settings screen, accessible via the browse button. You can either pick an existing area using the drop-down list or access the settings dialog to modify the areas of the current database.
Blast ID: enter a unique identifier for the current blast. This is a mandatory setting: the Calculate button will not be enabled unless a Blast ID has been specified.
Survey Date: select the date on which the blast hole survey was performed.
Date Fired: enter the date of blasting.
Surveyor: select a surveyor name from the drop-down list. This must be an existing surveyor within your Studio Survey database. More...
Calculated By: enter the name of the person performing the volume calculation.
Blast Outline: select a blast outline from the drop down list (this will have been added to your Studio Survey database previously).
Expand by: enter the expansion distance to offset the specified Blast Outline. This would normally be half the design burden, but can be any distance.
Edit outline commands: a set of commonly-used editing commands that can be used to modify the expanded Blast Outline.
-
Insert line: insert a new line segment into the existing Blast Outline. More about insert-line...
-
Move points: move existing blast outline vertices interactively. More about move-points-mode...
-
Insert points: add points to the existing Blast Outline. More about insert-points-mode.htm...
-
Insert curve: add a curved line segment between two points on the Blast Outline. More about insert-curve...
Designed Pit Strings: pick a designed pick string from the current database and load it into the 3D view. Not used directly in blast volume calculations, but it can be a useful visual cue when adjusting a blast boundary.
Top Surface: the top surface of the blast volume can be defined using a loaded points or strings object, which can be optionally filtered by an attribute/value pair selection. The loaded data will be used to construct a DTM that becomes the top surface of the blast. Commonly, this data would represent desurveyed blasthole collar positions.
If the top surface points or strings data isn't stored in your Survey Database, you can use the browse button on the right to pick a file to use instead.
If required, enter a distance value into the Minimum distance inside perimeter field and click Clean to remove the collar or design hole locations that are below that distance from the blast boundary string.
Bottom Surface: the bottom surface of the blast volume will be the specified reference level (Blast RL) unless it is constrained by another surface. Enter an elevation value for the bottom surface of the blast volume here.
Pit blast bottom surface: if you need to constrain your blast volume to a known contact surface (say, an orebody hanging wall), you can enable the PitBlast bottom surface check box and select any item within your database with a type of Bottom Blast Surface (as previously added, using the Add to Database function).
Designed
Pit Surface: optionally, you can limit your blast volume to
either a surveyed or designed/planned pit surface. This surface will
be part of your database, added as a Design
Surface data type.
Both options are supported by data Preview
and Load buttons (see "Previewing
and Loading Report Data", above).
Calculate: calculate a Blast solid and Volume object based on the specified parameters. Data will be generated, collated and associated with the Blast ID specified above. The generated blast volume will be analyzed when a blast report is published.
|
|
Related Topics |
|
|
About
Survey Reports
calculate-blast-volumeBlasts Summary |