Selecting Intervals

Selecting drillhole sample intervals

Selecting Drillhole Intervals

Drillhole intervals can be selected for general synchronization between windows or while using the Compositor tool. Intervals are selected using different methods in the following windows:

Tables Window

Plots Window

Logs Window

Selecting Intervals in Tables

Interactively

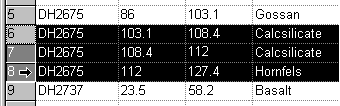
Position the pointer over the header of the first row so that the pointer shape changes to an arrow, then click once to select the row, or click-and-drag to select more than one row as shown below.

Selecting the collar, EOH or entire hole

Select Edit, then choose one of the Select options.

note.gif (1017 bytes) You can also double-click the collar record in the collars table and select the entire hole in other tables and views.

Selecting Intervals in Plots

To select samples in section views you must be in  Normal mode which can be selected from the (you are in normal mode when page layout mode is off) .

Selecting an interval without snapping

  1. If interval snapping is on, toggle off by accessing thePlotswindow, activating theManageribbon and selectingMethod | Table Interval

  2. Position the pointer at the start (From) of the interval, then click-and-drag down the hole to select the end (To) of the interval.
  3. The selected interval is displayed on the status bar:


Selecting an interval using snapping

  1. If interval snapping is on, toggle off by accessing thePlotswindow, activating theManageribbon and selectingMethod | Table Interval.

  2. Using theManageribbon, chooseSelect | Table and select the interval table (assays, lithology or other interval log) you wish to use to control interval snapping.

  3. Position the pointer over a sample in the section view and click once to select.

  4. Click-and-drag the interval end marker down the hole to extend the selected interval.

  5. To clear the selection, click onto the page away from the drillholes, or select another hole.

Selecting the collar, EOH or entire hole

Choose one of the Select command options from theManageribbon'sMethodmenu.

You can also select intervals on any hole using the Compositor window.

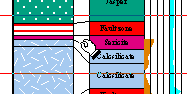
Selecting Intervals in Logs

To select samples in section views you must be in  Normal mode which can be selected from the Manageribbon (you are in normal mode when page layout mode is off) .

To select an interval without snapping

  1. If interval snapping is on, toggle off by accessing thePlotswindow, activating theManageribbon and selectingMethod | Table Interval.

  2. Position the pointer at the start (From) of the interval, then click-and-drag down the hole to select the end (To) of the interval.

  3. The selected interval is displayed on the status bar.

To move limits

Position the cursor over either the upper or lower limit so that the cursor changes to a two pointed arrow and click-and-drag the limit line up and down the hole.


To move composite

Position the cursor between the upper and lower limit so that the cursor changes to a hand symbol and slide composite up and down the hole.


Display the Compositor control bar to display the composite values as the selection changes.


Selecting an interval using snapping

  1. If interval snapping is on, toggle off by accessing thePlotswindow, activating theManageribbon and selectingMethod | Table Interval.
  2. Using theManageribbon, chooseSelect | Table and select the interval table (assays, lithology or other interval log) you wish to use to control interval snapping.

  3. Position the pointer over a sample in the log view and click once to select.

  4. Click-and-drag the interval end marker down the hole to extend the selected interval.

  5. To clear the selection, click outside the log sheet border, or select another hole.

Selecting the collar, EOH or entire hole

Choose one of the Select command options from theManageribbon'sMethodmenu.

   openbook.gif (910 bytes)   Related Topics


Synchronizing linked views
Compositor tools
Hole selection tool

Selecting and saving intersections