
ROM Stockpile Boundary
To access this screen:
-
Home ribbon >> Boundaries >> ROM Stockpile.
-
Run the command "survey-boundary-stockpile"
ROM stockpile monthly reporting typically includes a cut and fill assessment of ROM stockpile locations for a specific area of the mine. Commonly, multiple stockpiles are assessed and results are broken down into per-pile results.
To limit the data that represents each stockpile, and to assign a unique stockpile reference, a boundary string can be used. This can be one or more closed strings to represent one or more stockpile limits.
Stockpile boundary strings and surveyed topography
As boundaries change over time, each boundary string object (containing one or more strings) is added to the database in relation to a reporting date.
There are two approaches to boundary string specification:
- Digitize string data using the ROM Stockpile Boundary panel's New command and add the string to the database with the specified date label.
- Load previously created boundary data and highlight a boundary (or boundaries), then add it to the database. Again, this will be added with the current Survey Date context.
String data that is associated with the same date will be available for selection when running an EOM
ROM report, and that survey date is selected.
ROM Stockpile Boundary Setup Example
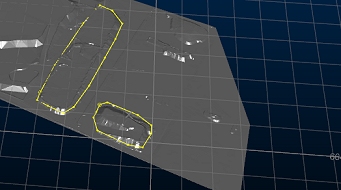
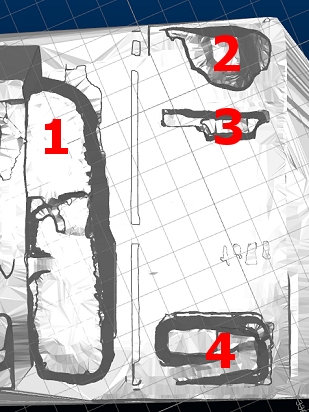
In the following image, showing a ROM surface according to latest drone data, the EOM ROM report needs to include volume results for each of the four stockpiles indicated. Currently, stockpile boundary data is not available for stockpiles 1, 2 and 3. Existing boundary data is available for stockpile 4 (from a previous report):
To digitize boundaries for stockpiles 1-3, you can either use existing string editing tools (e.g. those on the Edit ribbon) to create closed strings around the stockpile bases, or you can use the ROM Stockpile Boundary screen:
- Ensure the Current ROM is the one you want (the one to which the boundary string data applies). Change it using the browse button to display the Database Settings panel (ROMs category).
- Select the Surveyor responsible for the boundary data.
- Select the Survey Date that represents the boundary data you are going to create. This date will be chosen during the EOM ROM report calculation later.
-
Next to ROM Stockpile Boundary Click New.Digitize a boundary.
Note: a closed string is always created.
- Enter the ROM Stockpile Name.
- Under ROM Stockpile Attributes, you can specify more reporting values relating to the stockpile boundary, such as adding a comment that relates to the measured stockpile, or a known density value, or anything else.
- Enter a Value for the default Comment attribute. This is always available.
- Click Configure Attributes to display the Configure Stockpile Attributes screen.
-
Click Add Selected.
The stockpile boundary string is added to the current database with all custom attributes (if any).
- Repeat for stockpiles 2 and 3.
For stockpile 4:
- Load and display the string boundary for stockpile 4.
- Use the same Survey date to ensure the imported data is added to the same boundary collection as boundaries 1-3.
- Enter the ROM Stockpile Name .
- Click the imported (closed) string data to highlight it.
- Click Add Selected.
Tip: quickly generate a ROM stockpile boundary at a fixed elevation using the Surfaces ribbon's Plane >> Section command. This creates a string at the intersection of the surveyed ROM and a default section direction, or the current section definition.
Related topics and activities