
Secondary Clipping
To enable secondary clipping:
-
Enable or disable secondary clipping using the View ribbon's Clip >> Secondary toggle.
-
Press <SHIFT> + <F3> in any 3D window. All clipped data is updated.
Secondary clipping is used to deprecate the view of data falling within a clipped data region, but without removing it from the screen completely. It can be useful to see an indicator of clipped data, without it obscuring the data you really want to see.
Clipping can be applied with within a section corridor to either side of the active section (front or back clipping). Primary clipping removes data from the screen entirely, whereas secondary clipping leaves a lower-profile version of the data in view.
For example:
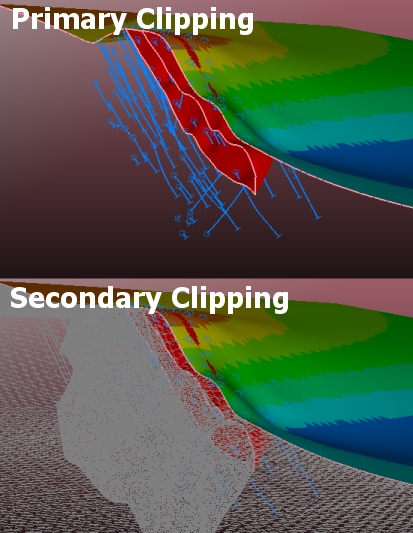
If secondary clipping is enabled, the data in the clipped region will be shown in an unlit grey colour. The size of the secondary clipping region is, by default, infinite (i.e., all clipped data in the secondary clipping region is displayed) - however - you can change the front and back secondary clipping distance easily using the Section Properties screen.
Data in the secondary clipping region can't be selected, or used for snapping, or otherwise interrogated. As with primary clipping, however, data that is clipped can still be input to other processes such as evaluation and other functions.
Secondary clipping distances are measured from the section plane, and can be set independently for the region in front of, and behind, the section plane. For example, in the image below, an ellipsoid overlay, 20 meters wide, has been bisected by the active section. Primary Clipping is applied with both Front and Back clipping distances set to 10m.
Secondary Clipping
is applied to 15m at the Front
(right) of the section and 17.5m at the Back
(left):
Note: clipping is only applied to an overlay if that overlay is "clipping-aware". Each 3D overlay can be set to be clipping-aware (default) or to always be displayed. Enable or disable overlay-specific clipping using the Sheets control bar's context menu for each 3D overlay that is listed.
Useful Pointers for Secondary Clipping
- Quickly enable/disable secondary clipping using the SHIFT + F3 keyboard shortcut.
- Secondary clipping can be displayed in all external 3D windows, including embedded, external, linked and independent views.
- Secondary clipping widths (front and back of section) can be edited using the Section Properties dialog.
- Labels are not displayed in a secondary clipping regions, nor symbols.
- You can still use 'intersection' style 3D formatting if you are using secondary clipping.
- Secondary clipping will be applied to the active section, like primary clipping.
- Secondary clipping can be used with other data filtering operations, including the Quick Filter control bar.
- Secondary clipped data may depend on your current 3D data properties
- Secondary clipping settings can be specified independently for independent, external 3D windows.
Related topics and activities