
VR Objects
Note: A Datamine eLearning course is available that covers functions described in this topic. Contact your local Datamine office for more details.
The active 3D window folder of the Sheets or Project Data control bar can (product-permitting) be used to set view properties for all loaded 3D data, access object-specific properties, and load or unload data from memory.
The VR Objects folder displays all instances of objects of your active 3D window.
Each object has an associated Object Type (added using the Object Types menus), and there can be multiple instances of the same object type (multiple miners, trees, blast tapes and so on).
Each object must have a unique name.
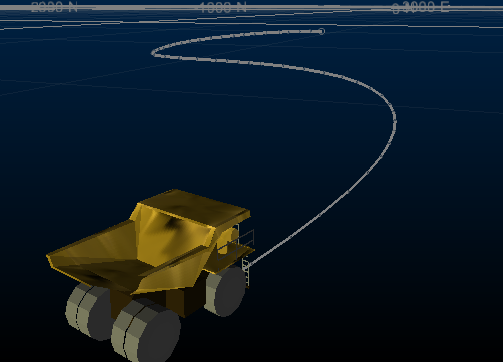
A mobile VR object with an alignment string
Objects can be added to this list by right-clicking an item in the Object Types list and selecting Place Objects. You can then add objects of the selected type to the active 3D window interactively, and this list will be updated automatically to show the new object entries.
See VR Objects and Types.
VR Objects Folder Menu
To access this menu:
-
Right-click the VR Objects folder in the Sheets or Project Data control bar (if your product has one, and is configured to use default menus).
Note: Double-clicking the VR Objects folder displays the Object Properties screen, to allow you to define your own object.
Right-clicking the VR Objects folder displays the following context menu options:
| Load | Display the Data Import screen, used to select a Data Source Driver to import a new VR object. |
| New | Add a new object to the list, and to the world, with this option. The VR Object Properties screen is displayed, allowing you to set the properties of the new object. |
| Place New Objects |
Add new VR objects to your 3D scene. Selecting this command enables object placement mode, allowing you to click at the required positions in the data window whereby a 'blank' object will be added. Note that these objects will not be associated with an object type, so you will need to amend the object's properties at a later time to ensure they are rendered as required. |
| Load X File | iIport a texture image onto a default, flat 3D plane. This is useful if you wish to preview a texture map, but a wireframe surface is not yet loaded to drape it onto. The Import Map screen displays, allowing you to specify an image file and plane origin locations, followed by the Choose Texture Size screen, which is used to control any scaling you may wish to perform. |
| Show All | Enable the display of all items held within the selected folder. |
| Hide All | Hide all VR objects. |
| Delete All | Delete all VR objects from the 3D scene. |
| Move Horizontally | Activate movement mode then drag an existing VR object around the 3D scene, over the horizontal plane. |
| Move Vertically | Activate movement mode then drag an existing VR object around the 3D scene. Move is restricted to the vertical plane. |
| Adjust Yaw | Activate rotation mode to adjust the yaw of an existing VR object. |
| Adjust Pitch and Roll | As above, but reposition an object's pitch and roll. |
VR Objects Item Menu
To access this menu:
-
Right-click an overlay item in the VR Objects folder.
| Rename | Rename the current VR object instance. |
| Object Properties | Display the Object Properties screen, allowing you to change the properties of the selected object. |
| Copy |
Create an identical, automatically named copy of the selected object. Note: Copied objects have no link to their origins; changes to the original object will not affect the duplicated item. |
| Look At | Orient the view to look directly at the target VR object. |
| Move To | Move the camera to the centre position of the selected VR object, without changing the viewing angle. |
| Inside View | Move the 3D camera to show a view from the inside of the selected object. |
| Outside View | Move the 3D camera to show a view from above and behind the selected object. |
| Show Name | Enables or disables the display of object names in the active 3D window for the selected object. |
| Delete | Delete the selected object from the active 3D window, following confirmation. |
Related topics and activities