
Create Date Legend
To access this screen:
-
Format ribbon >> Overlays >> Date Legend.
-
Use the quick-key combination 'cdl'.
-
Enter create-date-legend into the command line.
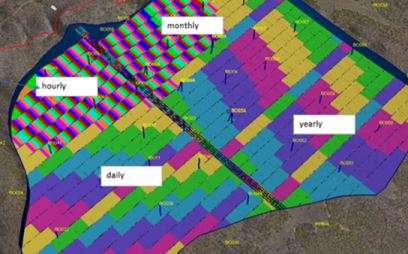
The Create Date Legend screen is used to generate legends automatically based on date values, such as those created by Datamine's Datamine Task Scheduler (DTS) application. Build up a series of date ranges, which can either be the same or different in terms of duration and frequency.
One application could be to generate a date legend based on the periods of the currently loaded DTS schedule, or you can generate one manually using simple time and duration increments. You have full control over colour cycling and recurrence of the category within the legend (if required).
A date legend applied to a series of mining blocks in the 3D view
You can create either a project or user legend, which is then selectable in any legend selection drop-down control in your application (e.g. to colour according to the chronology of an operational scheduling sequence.
There are several ways of generating legends in Studio products:
- You can define any type of legend using the Legends Manager.
- You can create date-based legends using the Create Date Legend dialog.
- You can quickly create a visualization legend using the Quick Legend tool.
- You can generate a filter legend based on one or more attributes values, using the Multiple Attribute Legend tool.
- Several commands and functions within Studio will automatically create (and possibly assign) legends.
To generate a date legend based on the currently active DTS schedule:
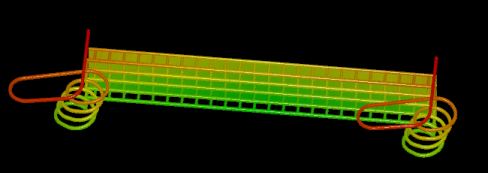
This example assumes DTS is installed and licensed on the host machine, and a valid DTS schedule is loaded (for example, using the DTS planning panel). The loaded schedule details activities from June 2020 to October 2022. The requirement is to provide a legend that colours each of 119 periods uniquely using a colour cycle from red (earliest period) to green (latest period).
-
Load the data containing date information, e.g. sequenced and scheduled FXS wireframe solids.
-
Activate the associated DTS schedule using the Planning ribbon's DTS panel.
-
Now that both 3D data and schedule are loaded and displayed, display the Create Date Legend screen.
-
Enter the Legend Name you wish to assign to your date legend, or select an existing date legend to update.
-
Choose your Storage option: either a Project or as a User legend.
Note: a user legend is transferable between projects.
-
Choose From current schedule.
-
Select the date of the earliest period you wish your legend to start (by default, this is the earliest period in the connected schedule).
-
Each legend bin is described according to the selected date Label format. Standard OLE date formatting can be selected which can be used to colour against any attribute containing OLE date information. For a simple
dd/mm/yyformat, choose %m/%d/%y, for example. -
You won't be able to adjust the Duration or Increment of your legend as this is derived from the periods in the active schedule. However, you can choose how colour cycling is applied; for example, to set a clockwise transition from red-green across the full range of periods in the table, set Transition to Clockwise, From is red, To is green and Recurring is unchecked:

-
Click OK to generate the legend.
-
Apply the generated legend to the date attribute in your loaded file(s). In the example below, the START attribute for a set of FXS wireframes containing OLE date information as a result of scheduling the solids using DTS. This is matched to the generated legend when applied, showing early activities in red through to later activities in green:
To generate a custom date legend:
- Display the Create Date Legend screen.
-
Enter the Legend Name you wish to assign to your date legend, or select an existing date legend to update.
-
Choose your Storage option: either a Project or as a User legend.
Note: a user legend is transferable between projects.
-
Select the Custom radio button and use the date picker to select the date of the earliest legend bin.
Note: the From current schedule option is used where an DTS schedule is loaded and connected to the current project.
-
The desired bin labelling format is the one used by the current operating system (the locale). This is chosen using the %x option.
-
In the intervals table below, click "+" to add a new row to the table.
Note: this option isn't available if generating a legend using the From current schedule option.
-
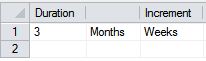
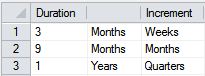
Define the Duration, time unit and Increment for the legend bin. For example, if the first set of bins represents 3 months of weekly intervals: Duration = 3, the time unit is Months and the Increment is Weeks:
-
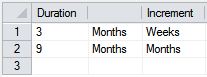
Click "+" again for the next legend generation instruction. Continuing the example above, add monthly intervals for 9 months with the following settings:
-
Continue to add rows, where a new row is required wherever the time unit or Increment changes. For example, you could add a third row representing the 2nd year in quarters:
-
Define the From and To colours for each of the instructions and the type of transition for each instruction. For example, you could change the From and To values for the second row of the example above to cycle from blue to white, and the third row could be set as random colours:

-
Choose how the legend bin colours Transition From one colour To the other.
The Clockwise and Anticlockwise options determine if colours progress in a From-To direction or To-From. Alternatively, pick Random colouring for each interval of the range.
-
By default, a colour cycle is applied across all values in the date legend, but you can set up a Recurring pattern if you wish (say, to highlight days of the week).
For example, in the image below, the left image shows the start of default non-recurring colouring across all date periods (the cycle is actually from red to green but the later bins are obscured). On the right, the same Transition, From and To settings are selected, but Recurring is checked with an Every value of 4, meaning the colour cycle repeats every four periods:

-
Click OK to generate the legend.
-
Open the Legends Manager and expand either the User Legends or Project Legends category (Available Legends list).
-
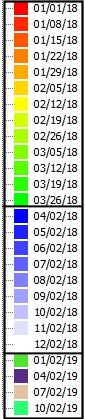
Locate the new legend and expand it to review the new legend date intervals. Following the example above, you would see 12 weekly intervals transitioning from red to green, followed by 9 monthly intervals cycling from blue to white, followed by four intervals representing quarters, randomly coloured:
Related topics and activities