
Transfer Data to DTS
To access this screen:
-
Activate the Planning ribbon and select Schedule >> DTS.
The Transfer Data to DTS screen connects your current schedule information to Datamine's Datamine Task Scheduler (DTS) application.
Note: If a master project is active, additional controls are shown on this panel to manage the merging of DTS schedules.
Before you start, if you wish to use a specific schedule template or configuration in DTS, the following is recommended:
- Ensure the latest version of DTS is installed and licensed. Studio UG versions expect a minimum version of DTS to be installed. If in any doubt, check your release notes, or contact your local Datamine office for guidance.
- Run DTS and create a blank template file in .ewst format. This project should include all required project settings (calendars, filters, dependency layers, global constants etc).
- Save the template file to the local disk.
Exporting to an existing DTS template is as simple as selecting Use Template and picking the .ewst file on disk.
If you have recently changed design data, only information reflecting new or changed activities will be sent to , meaning existing data from assigning resources, defining schedule constraint dates, baselines, work packages and even attributes and dependencies are retained. This means you don't have to rework the schedule each time you update your schedule
Alternatively, you can create a new DTS schedule file with default settings and you can adjust it afterwards, using the wide range of tools available in DTS. A new .ews file will be related in the location shown in the DTS Schedule File field above.
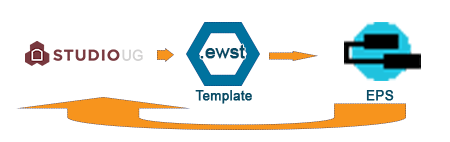
The Studio UG - DTS workflow
Important: The functions of this panel rely on the installation of a suitable version of on the host machine. If DTS is not installed or is unavailable for any reason, much of this form will be disabled.
In Studio UG, you can update DTS with design changes at the click of a button without impacting all the existing tasks in DTS:
- There is no need to write-back schedule information to design, re-process design changes and re-export to start new schedule
- Manually-applied information is retained in DTS (split-tasks, resource allocation, manual links, new tasks, fixed start dates)
If you already have an DTS Schedule File that you wish to update with new information, use the Update Schedule option. In this situation, the DTS Schedule File field will denote the file to be updated. If this file doesn't exist, a warning will be shown.
When updating an existing schedule a backup of the schedule is first created in the current project folder under \UGDatabase\Scenario1\Data\Backup.
When you exit the DTS panel, the options you have selected in the Update Existing Schedule section will be saved and reinstated when the panel is next opened.
DTS is automatically displayed (either showing a new or existing schedule) when the Transfer button is select, and processing has completed.
See More about DTS.
Animating a Schedule
The Transfer Data to DTS panel can also be used to display and animate your design data and dependencies in line with an existing schedule.
Once schedule and design data are loaded, the DTS Sequence and DTS Crosstab control bars will become available. You can then use the DTS ribbon to further control and configure your animation.
You can also load your outline data (each activity will have an outline) using the Load Outlines button.
Then, ensure the DTS Schedule File field points to an .ews file that is appropriate for your project and data, then Load Schedule to synchronize the sequencing of the loaded design data with the external DTS file. This allows you to view an animation of your design data according to the latest schedule information held by DTS.
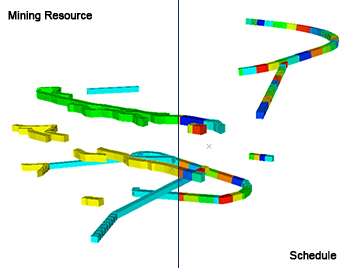
The animation process uses defined DTS links, as well as internal links to animate the outlines. Animations are displayed in Studio UG's 3D window and can be coloured to show whichever information is relevant. For example, you could colour based on the schedule or the mining resource:
Select whether you wish to view and animate your design Solids, Points, Dependencies and/or Outlines by pre-loading them with the appropriate button.
Once an DTS schedule has been 'connected' to your loaded data, you can use the DTS Sequence control bar to manage the animation playback and settings.
Synchronizing Data with DTS
The Dependency Synchronization screen is used to align data between your product and Datamine Task Scheduler (DTS), and specifically, schedule dependency information. The following can happen as a result of this:
- You commit existing dependency information in your project to the DTS project.
- You add schedule dependencies to your project schedule from DTS where they didn't exist before.
You can also choose to ignore dependency differences between your product and DTS if you wish.
Legend Mismatches
When exporting data to DTS, it is important that material categories in DTS and legend categories in Studio UG are matched correctly, or this can lead to misclassification of materials. As such, the following logic is adopted when exporting data:
-
If there are legend categories in Studio UG that do not exist as material categories in DTS then they are added during the Schedule Update process.
-
If there are material categories in DTS that do not exist as legend categories in Studio UG then the export is prevented, and you are shown a message highlighting the problem material categories. These need to be resolved before an export is reattempted.
See Dependency Synchronization.
Merging Project Schedules (Master Projects Only)
If a master project is loaded, the DTS panel displays tools to Merge Sub Project Schedules.
This section lists all sub-projects of the current master project, as defined via the Settings panel. Each sub-project is assigned an ID that will be described in the combined schedule, highlighting the source of the activities.
Merge the listed sub-projects to combine their schedules. Selecting Merge creates a new DTS file for the master project according to the name defined in the selected schedule file above.
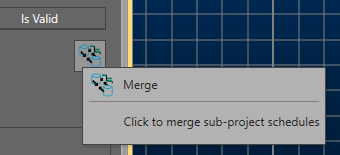
After sub- projects are merged, you can load the merged DTS schedule using Load Schedule, further below. All DTS projects are merged into a single one, bringing Production/Text/Code fields, Filters, Workpackages, etc.
Note: You can edit dependencies in a master project and then update the merged schedule just like any other linked schedule.
Converting Legacy EPS Projects
You can convert legacy EPS schedule (.ews) and schedule template (.ewst) files using the DTS panel.
To do this, define the path to the schedule or template file using the respective browse button. Then, click the corresponding conversion button to update the project or template to the new DTS format expected by Studio UG.
To exchange data between Studio UG and DTS (Sub-projects):
-
Select an DTS Schedule File. Either select the location of an existing schedule file (.ews) or specify the location of a new file. An existing file is used to 'connect' the existing UG data, allowing you to visualize your schedule based on the latest contents. It is also used to receive new activity and dependency information based on the latest changes in Studio OP.#
Tip: To update a legacy EPS schedule file, browse for the .ews file instead of a .dtss file, and click Convert schedule to DTS format. This automatically upgrades the schedule file and replaces its reference in the path above.
-
Confirm if you are going to Create new schedule or Update an existing schedule.
-
Create new schedule based on the current UG settings. The file will be created as specified in the DTS Schedule File field (see above). If selected, you can optionally choose an existing DTS template (.dtss) file to manage the transfer of information between UG and DTS .
Tip: To update a legacy EPS schedule template file, check Use Template and browse for the .ewst file instead of a .dtsst file, and click Convert template file to DTS format. This automatically upgrades the schedule template file and replaces its reference in the path above.
-
Update an existing scheduleto maintain an existing DTS schedule (which must exist at the location specified in DTS Schedule File), updating it based on the latest information from Studio UG.
If selected, the following options become available:
-
Overwrite Evaluation Legend: by default, the current evaluation legend is updated, meaning schedule material categories will also update (if required).
-
Activity Task Synchronization. Choose the extent to which tasks are synchronized, including whether or not to automatically update activities within the schedule, remove tasks from DTS if they are not found in the Studio project and update derived activity properties.
-
Field Value Updates. Choose the attribute values to update during DTS synchronization. In addition to updating schedule values, you can choose to update Task Name(s) and/or Task Description(s), or neither. Each attribute can be individually flagged for update and you can use the global check box at the top of the list to toggle attributes.
By default, DTS task rates (or durations, depending on the task type) are not updated during synchronization, but you can enable this using Update Task Rate / Duration with values specified on the Design Definitions screen (or the Derived Activities screen). Similarly, you can update the Task Constraint and Task Dependency Method if you wish.
Tip: if updating task descriptions, a global header cell checkbox allows for global selection or deselection of all listed items.
-
Overwrite Dependencies: Select Replace dependencies for project activities (default) to update DTS dependency information with the latest data available.
-
-
Related topics and activities