
Dependency Synchronization
To access this screen:
-
Using the DTS panel, load the schedule and select Synchronize Dependencies
The Dependency Synchronization screen is used to align data between your product and Datamine Task Scheduler (DTS), and specifically, schedule dependency information. The following can happen as a result of this:
- You commit existing dependency information in your project to the DTS project.
- You add schedule dependencies to your project schedule from DTS where they didn't exist before.
You can also choose to ignore dependency differences between your product and DTS if you wish.
Legend Mismatches
When exporting data to DTS, it is important that material categories in DTS and legend categories in Studio UG are matched correctly, or this can lead to misclassification of materials. As such, the following logic is adopted when exporting data:
-
If there are legend categories in Studio UG that do not exist as material categories in DTS then they are added during the Schedule Update process.
-
If there are material categories in DTS that do not exist as legend categories in Studio UG then the export is prevented, and you are shown a message highlighting the problem material categories. These need to be resolved before an export is reattempted.
What happens where a dependency discrepancy is found between the two systems is up to you; for each conflicting dependency situation you can choose to update the Studio schedule, the DTS schedule or neither.
As such, potentially, either the your Studio project or the DTS schedule can be updated as a result of synchronization.
The dependency synchronization data flow
Note: Dependency synchronization relies on an installed and licensed, local instance of Datamine Task Scheduler (DTS). You must also load the DTS schedule using the DTS panel before the Synchronize Dependencies option becomes available.
The Dependency Synchronization screen detects all dependency conflicts between and your Studio schedule data, including:
- Dependency changes made in Studio that aren't represented (or represented in the same way) in DTS.
- DTS dependency data that can't be found as-is in Studio for the same activities.
- Differences between dependency types (start-finish, finish-start etc.) between the two systems.
- Differences in lag between activities between the two systems.
- Any discrepancies found in layer specification between the same dependencies in both systems.
The screen is dominated by a list of dependency conflicts that have been detected. On the left, there is a group of columns representing a dependency in Studio UG. The next, similar, group of columns represent the data detected in the DTS schedule.
Tip: hover your cursor over any dependency to show a tooltip displaying the ID, name, design type, description, design ID and segment number of the dependency.
Either group of data can be blank (indicating dependencies were found in one system and not the other. For example, in the image below, two dependency conflicts were found. The first (a) exists in DTS but not in Studio UG and the second (b) in Studio UG but not DTS :
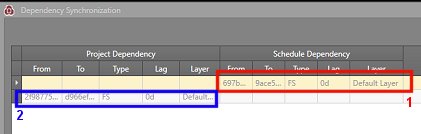
In the following example, an identical dependency has been found in Studio UG and DTS , but the lag differs (0d in Studio UG and 2d in DTS ). In this case, the predecessor (From) and follower (To) are identical, as is the dependency status (finish-start). It is the lag that differs, so in this situation both sets of data are filled for the same row:

You can filter the main list to show only a specific type of discrepancy if you like. By default, all differences are shown, but you can change this using the drop-down list in the top right of the screen:
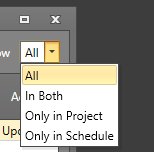
In this context, Only in Project refers to discrepancies currently unique to Studio and Only in Schedule those that have only been found in DTS .
Note: Dependencies are deemed to be the same specification if they are found to have both the same predecessor and follower. This is represented by In Both.
Managing Project & Schedule Conflicts
If dependency discrepancies are found between DTS and Studio, generally, you should consider adopting the dependency in one or both systems. For each discrepancy listed in the main table, the Action column is used to determine what happens (if anything).
The following options are available by clicking inside the Action column for a particular row of data:
- Do Nothing – Ignore the difference - neither system is changed.
-
Add to Project – Add the DTS schedule dependency data to the Studio project, retaining the current status. To update the Studio project with DTS dependency data, the Is Override option must also be checked.
Note: if you have chosen to override a Studio UG dependency with DTS data, the status bar will display that such a change will be made. If multiple rules of this type are specified, the number of changes is highlighted.
- Delete from Schedule – Remove the conflicting dependency from DTS and retain it in the Studio project.
You can do this row-by-row, or you can select a group of records to assign the same Action.
- Click any row to highlight it
- Click a row, hold down <SHIFT> and select another row to group-select all rows between.
- Hold down <CTRL> and select one or more rows. Each click will add to the current selection, or toggle an active row off. This is the only method that will allow the selection of non-contiguous rows.
Once a group have been selected, use the drop-down list at the bottom of the form to select a group Action to apply to selected rows. This contains the same options as the list filter described above; either ignore, update Studio UG (Add to Project), or update DTS (Delete from Schedule).
Processing Changes
Any item in the discrepancies list that is assigned an action of Add to Project or Delete from Schedule requires processing. The number of items to be processed is shown at the bottom left of the screen.
For example, where four differences have been found, but two can be ignored, one is correct in Studio and one is correct in DTS , the readout will be like this:
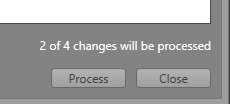
The Process button is only enabled if at least one discrepancy must be processed.
Once processed, changes are committed immediately to the corresponding systems, synchronizing the affected dependencies in one system or the other. As those items are now the same, they are removed from the list.
Synchronize/process dependency differences, or choose to ignore them.
When you close the Dependency Synchronization dialog without processing all actionable changes, a warning is shown.
Viewing Dependencies
All dependencies found to mismatch between Studio and DTS can be visualized in the 3D window, providing dependencies have been loaded first (using the Load Dependencies button on the DTS panel) and the selected dependency already exists in Studio UG.
- Filter on selection change: enable this check box to automatically filter (hide) all data other than the selected dependency when the corresponding table row is selected.
- Zoom all when filter changes: enable this check box to zoom to display the selected Studio UG dependency, maximized to the current 3D window extents.
Tip: Select both check boxes to filter and zoom simultaneously.
Related topics and activities