
Block Model Validation
To access this screen:
-
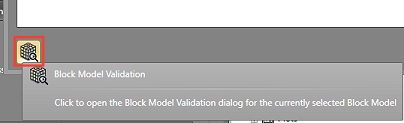
Display the Edit Block Models panel and select Block Model Validation.
The Block Model Validation panel allows for a geological block model to be checked and validated before being used in the Interrogation process. The tool can also be used to perform basic validation of any Block Model.
In brief, the automated validation routine includes:
-
Highlighting (and potentially fixing) negative and missing values
For each of the numeric fields in the model, a check is completed for negative or missing values. If any exist, the field will appear in the Process output window indicating the number of model cells containing missing values and/or the presence of negative values. If desired, an action can be taken to set the missing or negative values to another value to clean up the model. Please read the explanations of missing and negative values below.
Here's an example of how missing field values are detected/treated:
Absent numeric values in block model files are represented as a hyphen ("-"). Absent values are only significant when used in an interrogation of a grade field where they are interpreted as a wildcard. Consider the following shape within 4 model cells where the grade values are represented in the middle of each cell:
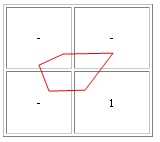
For the interrogation of the red shape above, the grade value returned will be 1 as the missing values are not considered (not as 0):
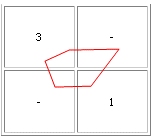
For the interrogation of the red shape above, the grade value returned will be 2 assuming that there are equal volumes of cell in the top left and bottom right cells contained within the shape outline. The top right and bottom left cells are not included in the grade calculation.
For the volume and tonnage calculations of the shape, they will be identical for both cases above as the volume and tonnage of the cells is not ignored, just the grades with absent values.
-
Validating a legend to highlight if any cells are not in an expected range
If using a legend, a check is made of all model values in the Legend Field specified in the Evaluation Legend at the top of the panel. This step is optional and is disabled by default.
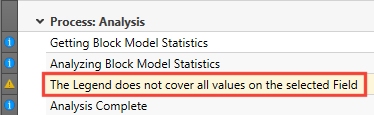
If there are any values that fall outside of the legend bins, they are highlighted to warn you that the tonnage represented by these model cells will be excluded from interrogation results.If any problems are detected, the Process output window below will show the following warning when validation is complete:
-
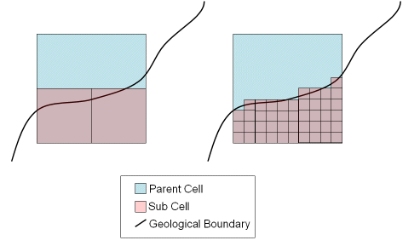
IJK and subcell dimension checking
Block models can either be regular (all cells are the same dimensions) or irregular (using subcelling to honour value boundaries more closely). A parent cell is split a number of times in order to produce sub cells. The fewer sub-cells that are created, the greater the amount of potential error in the estimation of volume and hence tonnage. Effectively, this determines the amount of refinement used when a parent cell in the block model is intersected by a wireframe:
Using the Block Model Validation Tool
To validate a block model:
- On the Edit Block Models screen, select the model in the table provided so that it is highlighted.
-
Select Block Model Validation:
- The Block Model Validation tool displays. The Block Model list at the top of the screen displays the name of the model to be validated.
- The first step is analysis. Click Analyze.
- The model is analyzed to determine the numeric fields it contains and other summary information, displayed in the Summary Statistics table:
- The Minimum and Maximum value detected for a field, and thus, the data Range for the attribute.
- The Mean average of all numeric values in the field. This is calculated on non-absent values only.
- The number of Absent values found in the field. You can choose later how these values are treated during validation (either ignored or forcibly updated to another value.
- The number of Negative values found in the field. Negative values in a block model normally indicate data errors and you should investigate these issues before re-evaluation. Again, you can choose how these fields are treated later.
- The number of fields containing Zero (0). Whilst the presence of zeroes may be benign, it may need investigation if unexpected. Again, you can choose how these fields are treated later.
- Check if any warnings have been issued at the analysis stage. Generally, the analysis will compete with 3 Messages appearing in the Process Output table below. These state each stage of analysis in order (get statistics, analyze statistics, complete analysis), which means the model contains no early indications of potential problems.
-
As you can optionally update the specified model to rectify instances of absent, negative or zero values, you need to choose whether the updates will be done in-place (Overwrite Existing Model) or a new model file will be created instead (Generate New Model).
Note: The latter option may be safer, particularly if you are performing validation for the first time on a new model. If creating a new model, you need to specify a name.
-
For each field where absent, negative or zero data has been detected, a row is displayed in the Block Model Field Updates table. You use this table to define how your application treats potentially non-compliant data. For each of the target conditions (absent, negative, zero) you can choose to either Update the field (and if so, to which value, using the corresponding ...Value Change field).
For example, if you wanted to convert all absent values in a numeric density field to zero, you would check Update Absent for the field in question, then enter "0" into the Absent Value Change field.
-
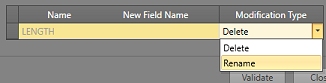
Analysis may also reveal the presence of Invalid Fields. A field is deemed invalid if it matches a reserved system attribute name.
Here's a full list of reserved system fields
If an invalid field is detected, it is listed in the Invalid Fields table. For each conflicting field, you can choose to either [Delete] or [Rename] the field during validation, for example:
-
Once all preparatory settings have been defined, click Validate to perform the validation and (potentially) update the existing model or create a new, validated model.
If you have created a new model, it will automatically appear in the Edit Block Models panel as a validated model item, otherwise, the Validation State of the updated model becomes enabled.
- During validation, progress message and any Errors or Warnings will be displayed in the Process Output table.
- When you're finished, click Close to return to the Edit Block Models panel.
Related Topics and Information