|
|
Studio UG Tutorial - Project Setup Creating a project for your tutorial |
Underground Planning Tutorial - Getting Started
A brief exercise to set up a new project for your UG planning tutorial.
Creating a new Studio UG project will automatically create a new folder on disk. This folder, by default, is structured to host the following information types:
-
Non-managed Data files (Datamine or otherwise) that will be 'fed into' the functions that Studio UG has to offer. These can reside anywhere on disk, but are commonly found at the root level of the project folder. Files that start off here may be migrated to a managed environment by other functions, for example, fixed cross section design data is moved into the "UGDatabase\Scenario1\Data\Prepared" folder once it has been connected to design definitions.
-
Managed Data Files: Studio UG also hosts data that is managed by the planning functions and commands.
A specific structure (both within the data file and within a specific folder structure) is created to allow data within it to be accessed and utilized by Studio UG's planning functionality. This database is not encrypted, but is instead comprised of a series of folders and sub-folders.
The "UGDatabase" sub-folder is automatically created when a Studio UG product is formed. It will contain a "Data" sub-folder and a default set of folders. These folders, and their contents, will be appended as you progress through the managed planning workflow. This represents your project's managed data files. -
XML Project Settings: Studio UG uses XML (Extensible Markup Language) files to store and transfer settings that determine how your schedule is formed. You can create these XML definition files yourself within many of the planning dialogs, and Studio UG will automatically create these files as well. The automatically-created XML settings files are also stored in the "UGDatabase" sub-folder, and a "Settings" sub-folder.
Prerequisites
-
You have access to the Internet (to download tutorial data files).
-
Your Studio UG installation is licensed.
-
You have some knowledge of Studio user interface customization, in particular, docking and floating control bars. You can find out more here.
Exercises in this section
This section contains the following exercises:
Exercise 1: Underground Planning Project Setup
- Launch Studio
UG and, at the Start
page, select New Project...:

- Progress the New
Project wizard with the following data:
Name: "UG_Tutorial" (if a project with this name already exists, pick a different name - an empty project is required for this tutorial)
Location: C:\Database\UG_tutorial (or whatever the project name is)
Automatically add files...: disable (uncheck)
Otherwise, click Next and Finish to complete the wizard. The 3D window will be displayed.
Exercise 2: Download Tutorial Files
You will need access to the Internet for this section. If you are unable to download these files to your machine, please contact your Datamine representative who will be able to submit them to you via other means.
- Use this link to download your tutorial data (Internet connection required).
- Click Download to download the tutorial files archive to your local machine. Download to any suitable, temporary, local folder.
- Unzip the contents of the archive to the folder created above e.g. C:\Database\UG_tutorial
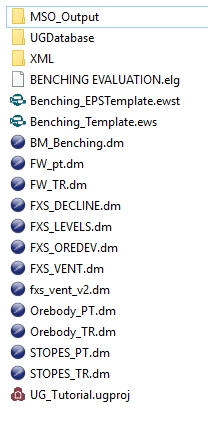
- Your project folder should now contain the
following items:
Exercise 3: Setup the User Interface
The following section assumes some knowledge of Studio UG user interface customization. See "Prerequisites" for more information.
- If the 3D window isn't already displayed, display it.
- Dock the Project Files, Loaded Data, Sheets, Customization and Holes control bars in a cluster on the left of the screen.
- Dock the Command, Output and Desurvey Report, control bars in a cluster at the bottom of the screen.
- Dock the Properties, Data Properties, Quick Filters and Compositor control bars in a cluster on the right of the screen. Set these to auto-hide (gives you more display area for viewing 3D data).
- Activate the Planning
ribbon and click Show
to display the Settings
panel, ready for the next exercise.
You should be looking at something like this: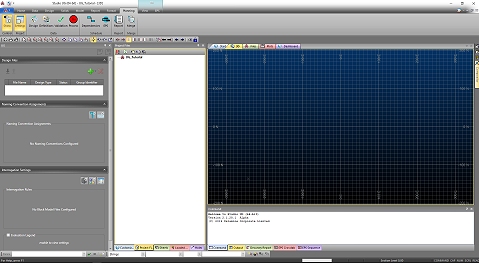
The next step is to define the design files that will become the basis for your planning project. This is described in the following section.
