
Using the V3 Menu
Overview
The CCLAS EL menu comes in two styles: the V3 Menu which is .NET-based and the classic V2 Menu. This process addresses the V3 Menu. Also refer to Using the V2 Menu.
The menu serves as a starting point to launch CCLAS EL, allowing for quick access to frequently used V2 and V3 applications.
Process
Double-click the CCLAS EL icon ![]() on the desktop to launch the V3 Menu, that is, the cclaselmenuapp.exe application.
on the desktop to launch the V3 Menu, that is, the cclaselmenuapp.exe application.
Note: All CCLAS EL applications can be launched from a shortcut or directly from the command line. Refer to Launching Applications without using the Menu.
When the V3 Menu is launched, the CCLAS EL splash screen displays while the menu loads and the licence is verified. The ApplicationPicture Program Settings—GLOBALSETTINGS for CCLASMGR defines the URL of the splash screen file.
Interaction with CCLAS EL requires appropriate security protocol and a connection to CCLAS EL. Refer to Managing the Database Connection and Security.
Where these processes are not yet running on your computer, you are prompted to log in with a username, laboratory and password.
Refer to Logging In To a Laboratory.
Note: If no user is logged in, then the menu Open and Save buttons are disabled (though the icons themselves do not change).
V3 Menu Launch and Title Bar
When the V3 Menu application is launched:
-
The MenuTitle Program Settings - CCLAS defines the title or caption of the Main Window.
-
The FormBackColour Program Settings - CCLAS defines the background colour of the menu's right-hand panel.
-
The InputBackColour, InputForeColour, LabelBackColour and LabelForeColour Program Settings - CCLAS define the colours used to display input text and labels of CCLAS EL forms.
-
The FontName and FontSize Program Settings - CCLAS define the font used on CCLAS EL forms.
-
The SystemFontName Program Settings - CCLAS defines the font to be used by the operating system.
When the V3 Menu is launched, then the CCLAS EL splash screen displays while the menu loads, and the licence is verified. The ApplicationPicture Program Settings—GLOBALSETTINGS for CCLASMGR defines the URL of the splash screen file.
The CCLAS EL Version 3 logo displays in the screen header next to the menu title, which itself is defined by the MenuTitle Program Settings - CCLAS, and all dialogs have a new look and feel.
The window's Title Bar and the Menu panel background colour is white.
When the V3 Menu application is launched, if licence expiry is to occur within a given number of days, then a warning is given in the screen header next to the menu title: A discrepancy has been detected between the expected and actual Licence conditions in the CCLAS installation. Please contact Datamine Support Centre... to obtain a new Licence Key. This software version will expiry on DD/MM/YYYY. Before this time a new Licence Key MUST be obtained.
The number of days warning is defined by the LicenceExpiryDays Program Settings—GLOBALSETTINGS for CCLASMGR, and if that is not defined, is then seven days.
To minimise or restore the window down:
-
Click
 and
and  , respectively.
To close the window:
-
Click
 .
.Refer to Logging Out Of a Laboratory.
Tool Bar
The toolbar displays at the top of the V3 Menu application window.
The toolbar contains the following menu options:
-
File » Exit
-
Help » Contents
-
Help » About.
Refer to Accessing Help from the Application.
Title Bar
Menu Title
The menu title displays in the screen header next to the CCLAS EL Version 3 logo, and is defined by the MenuTitle Program Settings - CCLAS.
Warning of Licence Expiry
If licence expiry is to occur within a given number of days, then a warning is given in the screen header next to the menu title: A discrepancy has been detected between the expected and actual Licence conditions in the CCLAS installation. Please contact Datamine Support Centre... to obtain a new Licence Key. This software version will expiry on DD/MM/YYYY. Before this time a new Licence Key MUST be obtained.
The number of days is defined by the LicenceExpiryDays Program Settings—GLOBALSETTINGS for CCLASMGR, and if that is not defined, then within seven days.
Menu Panel
Which Menu is Used?
The StartMenu Program Settings - CCLAS contains the name of the menu file that is run for the logged in user (defined by their staff code), however, where an XML version of that file exists in the same folder (for example, %User%.Mnu.Xml), then that menu takes preference.
If a menu is not defined for the staff code, then the one defined for the role associated with the staff code is used, and if that one is not defined, then the one defined for CCLASMGR staff code is used, that is, CCLASMGR.MNU.XML.
Should the CCLAS.MNU file not be present at all, then the V3 Menu application launches as an empty shell, ready for menu configuration from scratch. Saving of the new configuration creates the XML file for the staff account, however, the StartMenu Program Settings - CCLAS must be updated for the menu to be used.
Menu files are located in the folder defined by the LoginDirectory Program Settings—GLOBALSETTINGS for CCLASMGR.
Menu File Structure
The main menu is an XML file with specific structure and tag types.

Layout
The menu panel displays on the left-hand side of the screen and can be toggled to minimise or maximise.
The CCLAS EL V3 Menu application displays menu groups and menu items in a Menu panel on the left-hand side of the screen, and is implemented as a pull-down menu style.
The types of applications that can be added as a group item comprise CCLAS EL applications, custom scripts or website URLs.
If changes are made to the current menu and those changes are not saved, when an attempt is made to open a different menu or close the application, then a prompt is given to save the menu changes.
Interacting with the Menu
To collapse and expand the Menu panel:
-
Click
 .
.
To locate and load a different menu:
-
Click
 to open the dialog to locate and open the MNU or XML menu file.
To save changes to the current menu to the menu's MNU or XML menu file:
-
Click
 .
.
To expand a group to view the items:
-
Click
 .
.
To collapse a group:
-
Click
 .
.
To add a group:
-
Right-click in the menu panel and select Add group... to open the Properties dialog.
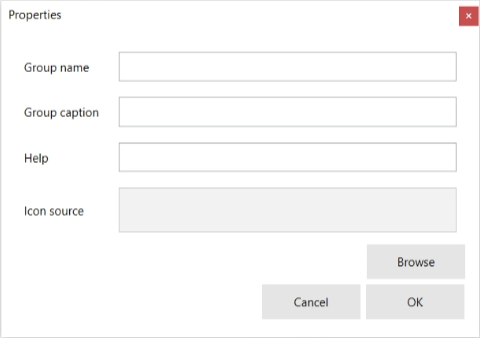
-
At any time, click
 to cancel the action and close the dialog.
 -
Enter the Group name. This is upper-cased and must be unique within the menu.
-
Enter the Group caption to be displayed in the node.
-
Enter the Help to be displayed as the tool tip when the mouse hovers over the node.
-
Click Browse to locate an EXE file for the Icon source.
-
Click OK.
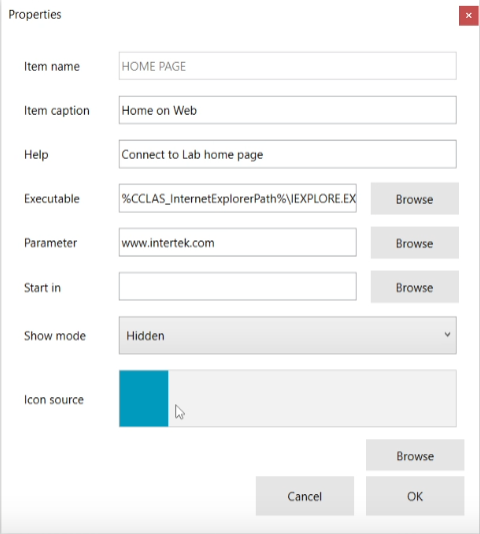
To add an item to a group:
-
Right-click a group and select Add item... to open the Properties dialog.
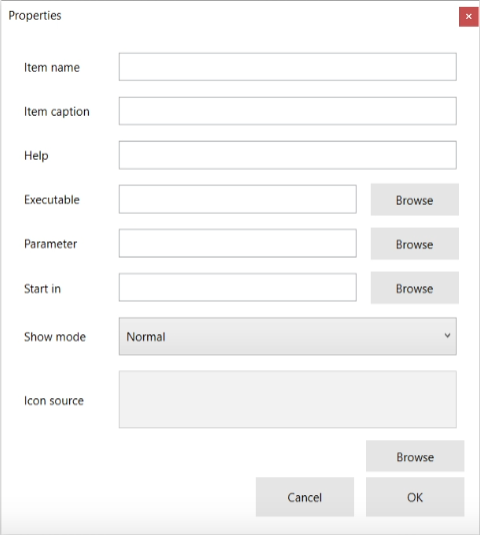
-
At any time, click
to cancel the action and close the dialog. -
Enter the Item Name. This is upper-cased and must be unique within the group.
-
Enter the Item caption to be displayed in the node.
-
Enter the Help to be displayed as the tool tip when the mouse hovers over the node.
-
Browse to locate an EXE file as the Executable.
-
Browse to locate a Parameter file containing parameters for the launch.
-
Browse to locate the Start in folder.
Note: It is expected that the Start in folder is set to the folder that contains the cclas.exe file and Languages folder, and also contains folders for the V3 applications. If this is not the case, then an error can be raised on application launch, for example, if Start in is set to %CollDirectory%, then an error is raised: Could not find a part of the path 'C:\ELSITES\DEMO\COLL\Languages'. It is expected that the Start in folder is set to the folder that contains the cclas.exe and also contains folders for the V3 applications. If this is not the case, then an error can be raised on application launch, for example, if Start in is set to %CollDirectory%, then an error is raised: Could not find a part of the path 'C:\ELSITES\DEMO\COLL\Languages'. From V3.0.5.2 onwards, the Licence application (licenceapp.exe) is contained in an additional folder where the cclas.exe directory named Licence that contains the Languages folder. The Executable and Start In directories must include the Licence folder to properly launch the Licence application.
-
Select the window's Show mode.
-
Click Browse to locate an EXE file for the Icon source.
-
Click OK.
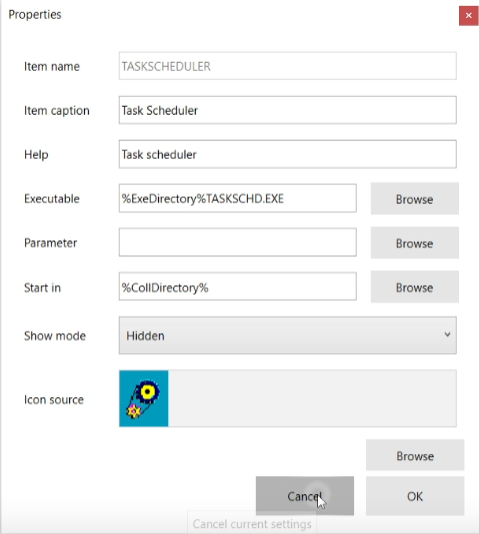
Note: To add Staff , Staff Group and Staff Role in version 3.0.6, you have to run Add Items three separate times, the value of the executable for each item should be STAFF, GROUPING and STAFF_ROLE respectively. You do not need to specify the path unlike previous methods of adding items to menus. This differs from previous versions where the user can browse through the folder in search of the executable and the path is defined. See the image below for an example of how to define STAFF in the executable.

Note: To add the 3.0.6 licence application, in the Executable field, specify the 3.0.6 path and select the licenceapp.exe. The licenceapp.exe is located inside the Licence folder which is under the 3.0.6.0 Exe folder (ex. C:\CCLASEL\3.0.6.0 Exe\Licence). Proceed to save the item as indicated in the procedure and this should add the 3.0.6 licence application to the menu. Remember to consider if your CCLAS.INI file has the MSOLEDBSQL19 driver before doing this step. See the screenshot below for an example.

To delete a group and all its items, or delete an item within a group:
-
Right-click a group or item within a group and click Delete to delete the node.
To view the properties of a group or item node:
-
Right-click a group or item within a group and select Properties to open the Menu Group Properties or Menu Item Properties dialog, respectively.
Example of a menu item that launches an exe file:
Another example of a menu file that launches an exe file, but in this case, it is a web browser with a specific page loaded:
To toggle an item as a favourite in the Launch Pad:
-
Right-click a group or item within a group and select Favourite.
Favourite applications are indicated by
 in the menu and display in the Launch Pad under the menu group's heading.
To launch a menu item's application:
-
Click the menu item.
Menu Icons
Various menu icons are used on forms where there is a browser containing Folder Items nodes and the list-view panel. Where the V3 menu is created from a V2 menu, then the menu still uses the V2 menu icons. Refer to Using the V2 Menu.
If required, the CCLAS Icons folder provided with the CCLAS V3 installation package contains V3 icons, to be used as required.
Viewing the Current User's Account and Logging Out
To view the current user's account details:
-
Click
 to display the user name, laboratory code and server.
From this dialog, you can also change your password or logout.
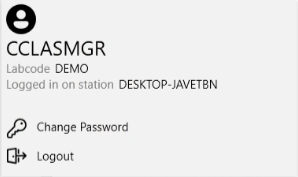
Refer to Changing Your Password.
Refer to Logging Out Of a Laboratory and Logging In To a Laboratory.
Changing the Interface Language
When any V3 application is run, before a user logs in, then the CCLAS EL application settings file is used to establish:
- The language in which screen prompts and error messages are displayed on the user interface.
- The database connection from the workstation to the CCLAS EL server.
When CCLAS EL V3 is first installed, the CCLAS EL initialisation file must be updated to configure these details.
After a user logs in, the user's Language Program Settings - CCLAS is used to establish the language in which screen prompts and error messages are displayed on the user interface.
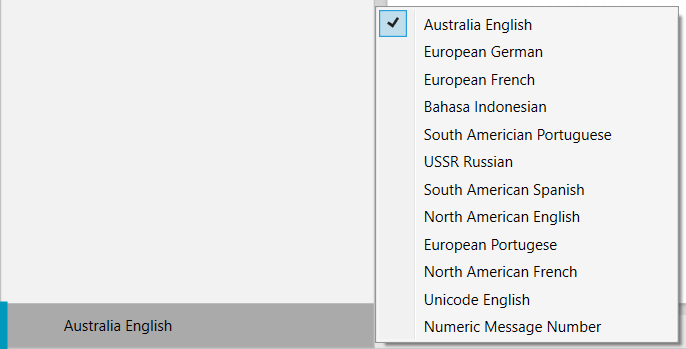
The V3 Menu allows users to change the language for screen prompts and error messages.
-
Right-click the language area in the bottom left of the menu panel and select the required language.
Launch Pad
The Launch Pad panel displays on the right-hand side of the screen and can be closed and re-opened, if required.
To close the Launch Pad panel:
-
Click x on the tab header.
To re-open the Launch Pad panel:
-
Click
 .
.
Recent Applications
The first column on the launch pad is the Recents column that contains the last accessed applications during the current login session from any group, tiled vertically in the column. The Recent applications list is empty until an application is accessed.
The maximum number of applications in the Recents column is defined by the MaxRecents parameter in the CCLAS entity of the user.MNU.XML file. This may be updated, as required. For example:
<CCLAS xmlns:xsi="http://www.w3.org/2001/XMLSchema-instance" xmlns:xsd="http://www.w3.org/2001/XMLSchema" caption="CCLAS MGR" MaxRecents="8">
In previous releases, when the user.MNU.XML file was created from a user.MNU file, then MaxRecents was set to 10. Since then, the default is 5 for newly converted menu files, to avoid the list taking up too much vertical space.
Favourite Applications
Subsequent columns on the Home panel are the favourites columns, one for each menu group that contains applications flagged as a favourite during the current login session, tiled vertically in the column.
Launching Applications
Click an application either in a menu group, or in the Recents or a favourites list in the launch pad.
Status Bar
A status bar displays at the bottom of the screen to allow for the display of system messages.
Backwards Compatibility
If upgrading the menu from a previous version of CCLAS EL, the desired menu options may already be present in an MNU file used by the previous CCLAS EL version. These files were written to a %USER%.MNU file in the %LoginDirectory%.
To assist migrating an older menu to a V3 menu, when the V3 Menu application is launched, these MNU files are accessed and you are prompted with an option to save the menu as a V3 menu, written to a %USER%.MNU.XML in the same folder. The V3 Menu application then uses this XML file to provide its configuration. Any future configuration changes to the V3 menu are written to this file.