View Tools
-
 Click View Mode (or use the keyboard shortcut Escape to switch between view and pick mode) to be able to move (left mouse button + Ctrl), rotate (left mouse button), zoom in, zoom out (mouse wheel) the view.
 -
 Click Pick Mode (or use the keyboard shortcut Escape to switch between view and pick mode) to get information on any object (displayed in the upper left corner of the Display Window and in the Application Messages Window) by picking it in the Display Window.

-
 Click Seek Mode (or use the keyboard shortcut K) to set the viewer in "waiting-to-seek" mode. When clicking on a point in the view, the camera will be repositioned so that the camera focal point lies on the point of the geometry under the mouse cursor.
-
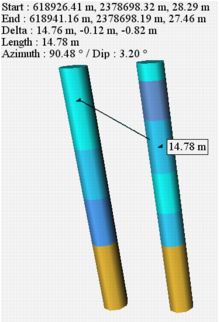
 Click Ruler and pick two objects of the scene (boreholes, results or surfaces) to measure the distance between them. The two picked points are marked by a cube. The 3D length of the drawn line is displayed in a label box.
The following information is available in the 3D view when using the 3D ruler: Start point coordinates, End point coordinates, as well as the DX, DY, DZ, 3D length, Azimuth and Dip of the drawn line.
Press Shift-key while moving the mouse to pick the end point to constrain the ruler to the closest principal axis (X, Y or Z).

-
 /
/  Click Perspective / Orthographic Projection (or use the keyboard shortcuts P / O) to switch between orthographic or perspective camera view. The functionality is also reachable thanks to the keyboard shortcuts o / p.
-
 Click View all (or use the keyboard shortcut Home) to change the camera position in order to visualize all objects.
-
 Click View from Top (or use the keyboard shortcut U) to set the camera position along the Z axis in order to view the top of the scene on an horizontal projection plane (keyboard shortcut: u).
-
 Click View from Bottom (or use the keyboard shortcut D) to set the camera position along the Z axis in order to view the bottom of the scene on an horizontal projection plane (keyboard shortcut: d).
-
 Click View from South (or use the keyboard shortcut S) to set the camera position along the Y axis in order to view the south side of the view on a vertical projection plane (keyboard shortcut: s).
-
 Click View from East (or use the keyboard shortcut E) to set the camera position along the X axis in order to view the east side of the view on a vertical projection plane (keyboard shortcut: e).
-
 Click View from North (or use the keyboard shortcut N) to set the camera position along the Y axis in order to view the north side of the view on a vertical projection plane (keyboard shortcut: n).
-
 Click View from West (or use the keyboard shortcut W) to set the camera position along the X axis in order to view the west side of the view on a vertical projection plane (keyboard shortcut: w).
-
 Click Fullscreen to enlarge the view to the entire screen.
- Z Scale: The vertical scale may be modified to enhance or flatten the relief effect. A list of scale factors is provided. Click on
 Set to Preferences to define the selected Z scale as the default value (visible in the 3D Views section of the Setting up Preferences). If you modify the Z scale, click on
  to get the default value back.